The Outcome registry is an online tool that allows you to view forms that have been submitted through Dentrix Enterprise, view a report, download data, and manage your user account information.
You can log in to the registry as needed.
To log in to the registry
Visit https://hsps.irp.iqvia.com.
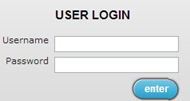
The User Login page opens.

Enter your Username and Password (if you are logging in to the registry for the first time, you must use the temporary password that you received), and then click Enter.
Note: If you do not have a password or cannot log in, contact the Support Team at 866-316-6947 or HSPSSupport@outcome.com.
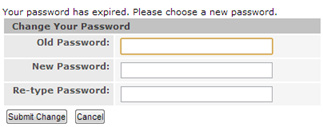
If you are logging in to the registry for the first time, the system will prompt you to enter a permanent password. Otherwise, ignore the steps that follow.

Enter your temporary password in the Old Password box and a new password in the New Password and Re-type Password boxes, and then click Submit Change.
Important: A password must meet the following requirements:
Be at least 7 characters long.
Must contain at least one letter and one number.
Should not contain any information about you that can be easily obtained, such as the following:
Your name or the name of a child, friend, pet, or spouse.
Your birth date.
Your Social Security Number.
Your phone number.
Your PIN number.
Your street address.
The Subscriber Agreement appears.
Review the agreement, and print a copy for your records. This is the only time the agreement will appear.
If you have the rights to sign off, depending on your account setting, the E-Signature Agreement appears.
Read and agree to the electronic signature affidavit.
Your user name and password serve as your electronic signature. Your electronic signature has the same weight and legal status as your ink signature on a paper form.
You can access the various features of the registry by selecting any of the four tabs in the upper-right corner.

Patient - This tab stores all the Carries Risk Assessment Forms submitted from Dentrix Enterprise. You should not edit data in the registry. You use Dentrix Enterprise to record information, and then the information that is collected is passed through to the Oralhealth registry. To view a form within the registry, click the corresponding visit date.
Reports - This tab provides access to the Caries Risk Assessment Report.
Download - This tab allows you to export the data captured in the registry.
My Account - This tab allows you to edit your user account information and reset your password.
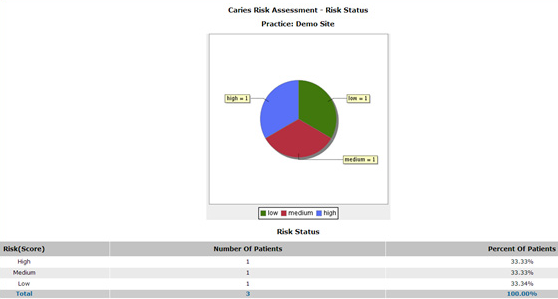
The Carries Risk Assessment Report aggregates Carries Risk Assessment Scores for the site and outputs the percentage of each Carries Risk Assessment Category (High, Medium, or Low). The report only considers one score for each patient based on his or her most recent visit. The Carries Risk Assessment Report gives a picture of the Carries Risk Status at the current moment for the patient population of the site.
To run the report
Select the Reports tab.
A pie chart and data table of the Caries Risk Assessment Scores appear.

To generate a PDF version of the report, click the Print link in the upper-right corner of the report.
With the data download tool, you can export all the data captured in the registry as a .csv file.
To export registry data
Select the Download tab.
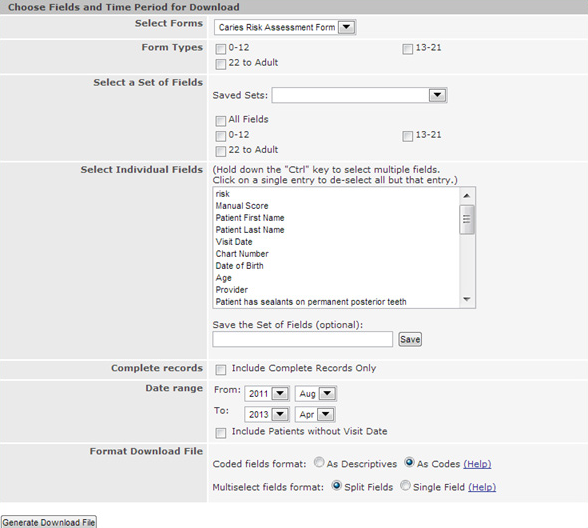
The options for generating the .csv file appear.

Set up the following options:
Select Forms - Currently there is only one form available in the registry, so the "Carries Risk Assessment Form" is selected by default.
Form Types - Specify the age ranges that you want to include.
Select a Set of Fields - Select All Fields or only those that are applicable to particular age ranges.
Select Individual Fields - Select the boxes that you want to include. To select multiple boxes, while holding down the Ctrl key on your keyboard, click the desired boxes.
Complete Records - Select the Include Complete Records Only checkbox to include only the forms that have been saved as "Complete."
Date Range - Enter starting and ending months and years of a date range. Only forms that were filled out within the specified date range will be included.
Format Download File:
Coded Fields format - Select whether you want the data to be listed with the form labels (Descriptives) or by coded numeric values (Codes).
Multiselect Fields format - For boxes that allow multiple selections, select whether you want all the values of a box to appear in one column or you want each value of a box to have a separate column.
Click Generate Download File.
Once the file has been generated, click the HSPS link that appears to download a .zip file that contains the .csv export file.