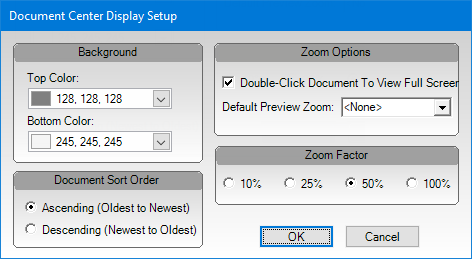
By setting the Document Center display options, you can personalize Document Center for this computer. You can change the background color of the preview area, alter the zoom functionality, and specify how to sort the documents in the document tree.
To customize the Document Center display options
In Document Center, on the Setup menu, click Document Center Display.
The Document Center Display Setup dialog box appears.

Set up any of the following options:
Background - To change the background color of the preview area, for the Top Color and/or Bottom Color, do either of the following:
Enter an RGB value in the box.
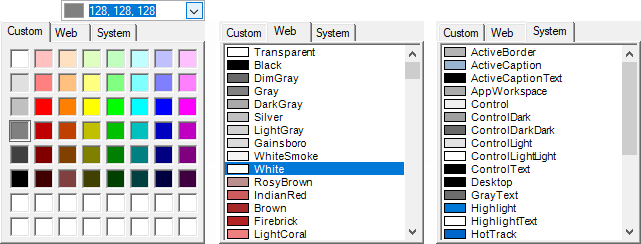
Click the down arrow to view the color palette, and then select a color on the Custom, Web, or System tab.

Note: If the top and bottom color are the same, the preview area will be all the same color. If the top and bottom colors are different, the background will be a mixed gradient.
Document Sort Order - Select the option that corresponds to how you want to sort the documents within each document type category in the document tree:
Ascending - In chronological order (from oldest to newest).
Descending - In reverse chronological order (from newest to oldest).
Zoom Options:
Double-Click Document to View Full Screen - To allow you to double-click a document that you are previewing to view it full screen, select the checkbox.
Default Preview Zoom - From the list, select how you want an image to be sized by default when you preview it. You can choose to scale the image by a percentage, to fit the image by its height, to fit the image by its width, or to fit the whole image in the preview area.
Zoom Factor - Select the option
that corresponds to how much zoom (10%,
25%, 50%,
or 100%) you want to apply to
each click of the Zoom In ![]() and Zoom
Out
and Zoom
Out ![]() buttons, which are
available while you are previewing an image. For example, by selecting
50%, each click of the Zoom In
or Zoom Out button will zoom in
or out, respectively, by 50 percent.
buttons, which are
available while you are previewing an image. For example, by selecting
50%, each click of the Zoom In
or Zoom Out button will zoom in
or out, respectively, by 50 percent.
Click OK.