You can set goals for patients to achieve.
To add a patient goal
With a patient selected in Chart, do one of the following:
Click
the Patient Goals button  on the toolbar.
On the File menu, click Patient Goals.
The Patient Goals dialog box appears.

Click Add.
The Add Patient Goal dialog box appears.

Set up the following options:
Goal:
Start Date - The date that the goal will begin. By default, today's date is selected, but you can specify a different date. To change the date, do one of the following:
To enter the correct month, day, and/or year in the box (which uses a mm/dd/yyyy format), do any of the following as needed:
To change the month, click the first date segment to select the number, and then enter the number (from 1-12) of the correct month.
To change the day, click the second date segment to select the number, and then enter the correct day of the month.
To change the year, click the third date segment to select the number, and then enter the correct 4-digit year.
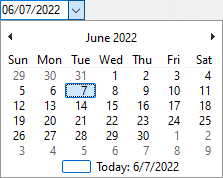
To use a date selector to select the correct date, click the downward-pointing arrow to view a calendar, navigate to the correct year and month, and then click the correct day.
Click the downward-pointing arrow to view a month calendar.

Navigate to the correct month using the left and right arrows.
Note: To quickly change the year and month, click the month-year at the top of the calendar, navigate to the correct year using the left and right arrows, and then click the correct month.
Click the correct day.
Goal End Date - The date that the goal will end, if applicable. To specify a date, do the following:
Click the calendar icon to view a month calendar.

Navigate to the correct month using the left and right arrows.
Note: To quickly change the year and month, click the month-year at the top of the calendar, navigate to the correct year using the left and right arrows, and then click the correct month.
Click the correct day.
SNOMED CT - A SNOMED code to associate with this goal. To select a SNOMED code, do the following:
Click the search button ![]() .
.
The Select SNOMED Code dialog box appears.

To search for SNOMED codes in a specific category or in all categories, under Search SNOMED Codes, from the Search SNOMED Category list, select a category or <All Categories>.
Do one of the following:
To get a list of all SNOMED codes in the selected category or all categories, do not enter any search criteria in the box under Search SNOMED Codes.
To search for SNOMED codes by ID or name, do the following:
Under Search By, select one of the following options: SNOMED Concept ID or Fully Specified Name.
Enter the first character or more of a concept ID, or enter one or more characters of a fully-specified name in the box under Search SNOMED Codes.
Click Search to view a list of matching SNOMED codes.
Note: The list displays up to 1000 SNOMED codes at a time. To find the desired code, you may need to click Show Next 1000 Records to load subsequent sets of SNOMED codes.
In the list, select a SNOMED code.
Click OK.
Status - The status of the goal. From the list, select one of the following options to specify the status of the goal: Active, Complete, or Inactive.
Patient Goal - Text to describe the goal. If a SNOMED code has been selected, its description is entered automatically in the box.
Note: To
check the spelling of the note text, click the Check
Spelling button ![]() (this button is available only
if a certain preference
setting is enabled).
(this button is available only
if a certain preference
setting is enabled).
Instructions - Instruction for the patient to follow.
Note: To
check the spelling of the note text, click the Check
Spelling button ![]() (this button is available only
if a certain preference
setting is enabled).
(this button is available only
if a certain preference
setting is enabled).
Patient Progress - Notes regarding the patient’s progress toward achieving the goal.
Notes:
To add a date stamp to the note where the text cursor is currently positioned in the box, click Insert Dateline.
To
check the spelling of the note text, click the Check
Spelling button ![]() (this button is available only
if a certain preference
setting is enabled).
(this button is available only
if a certain preference
setting is enabled).
Click OK.