You can specify a patient's default medical insurance claim settings as needed. When a new medical insurance claim is created, Dentrix Enterprise uses the patient's default settings for that claim.
Notes: Editing appointments requires the "Appointments, Edit" security right.
To change a patient's default medical insurance claim settings
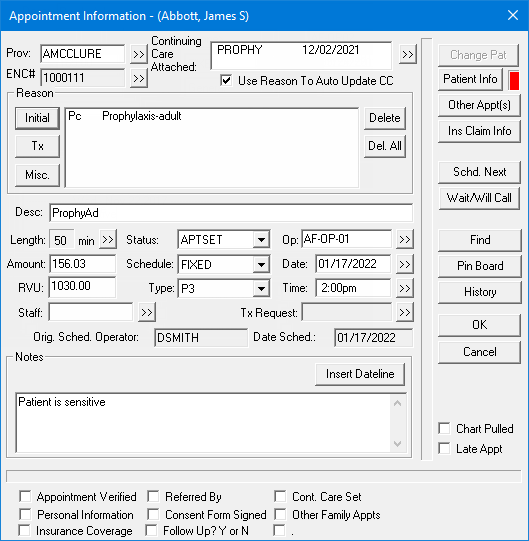
In Appointment Book, double-click an appointment.
Note: If the current Appointment Book view includes operatories for multiple clinics, you can open the appointment only if the appointment was scheduled in an operatory of the clinic that has been assigned to the current view.
If applicable, do one of the following:
If the Password - Appointments, Edit dialog box appears, user verification has been assigned to the "Appointments, Edit" task. Do one of the following:
If your user account has been granted the "Appointments, Edit" security right, enter your credentials in the User ID and Password boxes, and then click OK.
If your user account has not been granted the "Appointments, Edit" security right, have a user with permission temporarily override this restriction so you can edit the appointment this one time. The overriding user enters his or her credentials in the User ID and Password boxes and then clicks OK.

If a message appears, informing you that you do not have rights to this operation, your user account has not been granted the "Appointments, Edit" security right. To have a user with permission temporarily override this restriction so you can edit the appointment this one time, do the following:
On the message, click Yes.

In the Password - Appointments, Edit dialog box, the overriding user enters his or her credentials in the User ID and Password boxes and then clicks OK.

The Appointment Information dialog box appears.

Click Ins Claim Info.
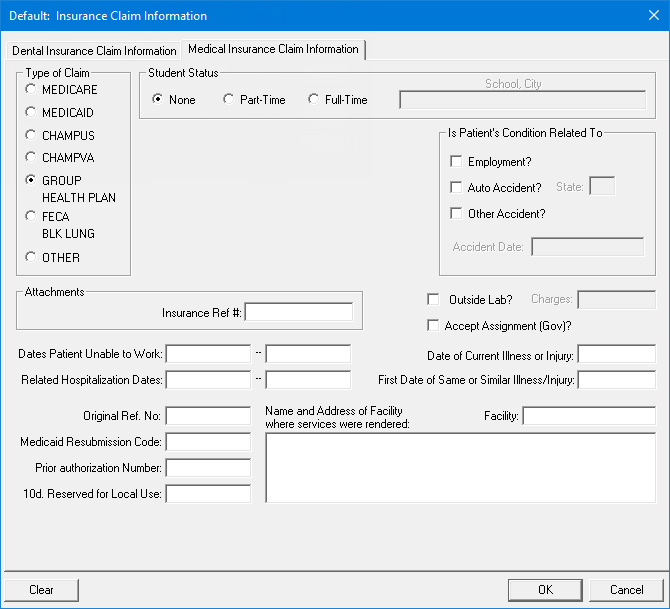
The Default: Insurance Claim Information dialog box appears. The Dental Insurance Claim Information tab is selected by default.
Select the Medical Insurance Claim Information tab.

Change any of the following options as needed:
Type of Claim - The type of claims submitted. Select one of the following options: MEDICARE, MEDICAID, CHAMPUS, CHAMPVA, GROUP HEALTH PLAN, FECA BLK LUNG, or OTHER.
Student Status - To specify that a patient is enrolled in school (college, university, and so forth), select one of the following options: None, Part-Time, or Full-Time. If the Part-Time or Full-Time option is selected, enter the school and city in the School - City box.
Is Patient's Condition Related To?:
Employment? - If treatment is necessary due to a work-related injury or illness, select this checkbox.
Auto Accident? - If treatment is necessary due to an automobile accident, select this checkbox, and then enter the 2-letter abbreviation of the state where the accident occurred in the corresponding State box.
Other Accident? - If treatment is necessary due to an accident that was not automobile-related or work-related, select this checkbox, and then enter the date (in a mm/dd/yyyy format) of the accident in the corresponding Accident Date box.
Note: Dentrix Enterprise automatically adds slashes to dates when you enter six or eight numbers (mmddyy or mmddyyyy) and then press the Tab key.
Attachments - Claim attachments. If any, enter a reference number in the Insurance Ref # box.
Dates Patient Unable to Work - The days that the patient has not been able to go to work. To specify a range, do the following:
In the first box, enter the start date (in a mm/dd/yyyy format).
In the second box, enter the end date (in a mm/dd/yyyy format) or today's date.
Note: Dentrix Enterprise automatically adds slashes to dates when you enter six or eight numbers (mmddyy or mmddyyyy) and then press the Tab key.
Related Hospitalization Dates - The days that hospitalization was required as part of treatment. To specify a range, do the following:
In the first box, enter the start date (in a mm/dd/yyyy format).
In the second box, enter the end date (in a mm/dd/yyyy format) or today's date.
Note: Dentrix Enterprise automatically adds slashes to dates when you enter six or eight numbers (mmddyy or mmddyyyy) and then press the Tab key.
Original Ref. No - The original reference number for a voided or resubmitted Medicaid claim.
Medicaid Resubmission Code - For a Medicaid claim, enter the code that is required for resubmitting this claim.
Prior authorization Number - The pre-authorization number for a pre-treatment estimate.
10d. Reserved for Local Use - The applicable code to identify additional documentation for a claim. If you need to add more than one code, each additional code that you add must be preceded by three spaces.
Outside Lab? - If a third-party lab does any work for treatment, select this checkbox. With this checkbox selected, in the Charges box, enter the dollar amount of charges for those services.
Note: For a whole dollar amount, you can enter a number without adding the decimal point and two zeros. For example, if you type 36 and then press Tab, Dentrix Enterprise will change the amount to 36.00.
Accept Assignment (Gov)? - If the provider of the procedures on a claim accepts assignment of Medicare benefits, select this checkbox.
Date of Current Illness or Injury - If treatment is necessary due to an illness or injury, enter the date (in a mm/dd/yyyy format) of the onset of the illness or injury in the box.
Note: Dentrix Enterprise automatically adds slashes to dates when you enter six or eight numbers (mmddyy or mmddyyyy) and then press the Tab key.
First Date of Same or Similar Illness/Injury - If treatment is necessary due to an illness or injury that is the same or similar to an illness or injury the patient has had previously, enter the date (in a mm/dd/yyyy format) of the onset of the previous illness or injury in the box.
Note: Dentrix Enterprise automatically adds slashes to dates when you enter six or eight numbers (mmddyy or mmddyyyy) and then press the Tab key.
Name and Address of Facility where services were rendered - Where treatment is usually performed. Do the following:
In the Facility box, enter the name of the facility.
In the larger box, enter that facility's address.
Note: To reset all the options in the Medical Insurance Claim Information dialog box to their default settings, click Clear. A confirmation message appears, reminding you that the claim information will be cleared for this claim and any other claims that include the procedures on this claim. Click OK.
Click OK.