
You use the Letter or Custom List Setup dialog box to set up merge data.
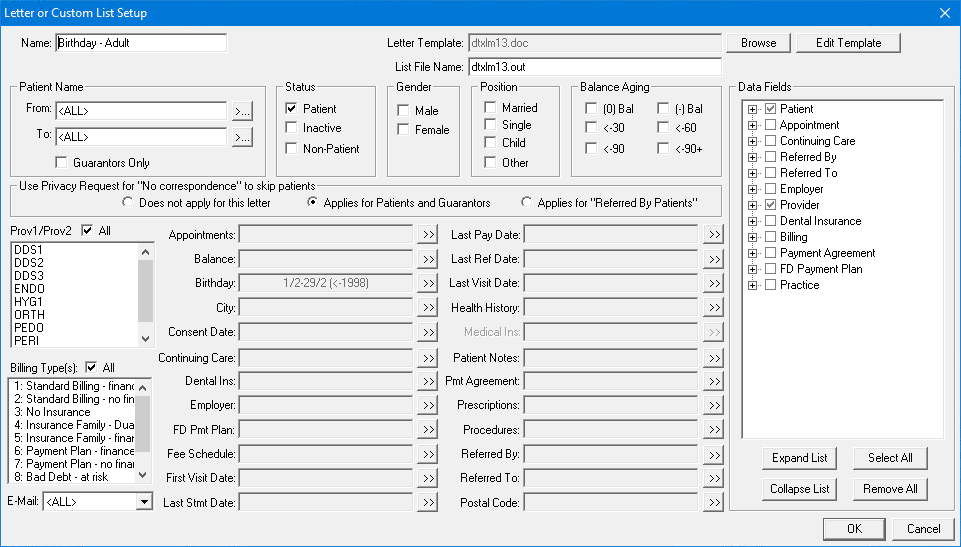
Patient filters identify which Dentrix patient records to include, or exclude, from the patient file that is to be created for a merge document. These are referred to as ranges or filters. When a data file is created, only the records that match all filters will be included.
The following is a list of the available filters:
· Patient Name - For name ranges, a single character can be entered, or the beginning or ending field can be left blank. If a range from A to Z is entered, all records will be included. Any of the name ranges can use partial keys (e.g. “Sm” for Smith). If the beginning range is left blank, the search will be as if “A” was entered, and if the ending range is left blank, the search will be as if “Z” was entered. The Search buttons for each name range can be used to select a specific name.
· Guarantors Only - Select this option to include only guarantors in the data file.
· Status - Select Patient to include only patients in the search, Inactive to include patients with an inactive status, and/or Non-patient to include patients with a non-patient status.
· Gender - You can select Male and/or Female.
· Position - Select Married, Single, Child, and/or Other to specify a particular position in the search.
· Balance Aging - This option allows you to include patients with a certain aged balances in their Ledgers.
· Use Privacy Requests for No Correspondence to skip patients - If Does not apply for this letter is selected, patients with privacy requests will not be skipped. If Applies for Patients or Guarantors is selected, all patients who have the “No correspondence” option selected in the Family File will be skipped. If Applies for “Referred By Patients” is selected, the letter will not include any patients who have a “Referred By” patient who has the “No correspondence” option selected in the Family File.
· Prov1/Prov2 - Select All if you do not want to filter by patients’ providers for the data file. Or, select the specific providers to only include patients with the selected providers (Prov1 or Prov2 in the Family File).
· Billing Type(s) - Select All if you do not want to filter by billing types for the data file. Or, select the specific billing types to only include patients with the selected Billing Types.
· Appointments - Click the search button to set up search criteria to include patients with appointments or who have missed appointments within a specific date range.
· Under Date Range, select Appointment Date Range to search for patients who have appointments within the date range entered, Last Missed Appt Date Range to search for existing patients who have missed an appointment within the entered date range, or select None if you do not want to specify a date range.
· Under Search, select the option for how you want to search: Prospective Patients with appointment in date range (prospective patients are defined as those patients who have set appointments as New Patients and do not have a record in the Family File), Existing Patients with appointment in date range, Existing Patients with NO appointment in date range, or Existing Patients with an Unscheduled appt in the date range.
· Under Select # of Appts Missed, select the number of appointments missed for the patients you want to include: 0 or more, 1 or more, 2 or more, 3 or more, or No appts missed.
· In the Appt Provider(s) pane, select the appointment providers for which you want to search, or leave All selected to include all appointment providers.
· Balance - Click the search button to enter a Beginning Amount and/or an Ending Amount for a range.
· Birthday - Click the search button to enter the Beginning and Ending dates for the range. Any date field can be left blank for an open-ended range (<ALL> is assumed if any field is left blank). Check Search as Date Range if desired; otherwise, only the dates you enter will be included in the merge.
· City - Click the search button enter a city range. Only patients who live in that city range (according to the Family File) will be included in the data file.
· Consent Date - Click the search button to enter a Beginning Date and/or Ending Date in a DD/MM/YY format. If both fields are left blank, the date range will not be used. Either field can be left blank for an open-ended range. The Consent Date is pulled from the Family File.
· Continuing Care - Click the search button to set up the search options to include patients with a specific Continuing Care Type (select the appropriate types, or select All), that are due within a date range (enter the range in the From and To fields), that were previously seen within a date range (enter the range in the From and To fields), and that have, or do not have an appointment attached to Continuing Care, or both (select the option).
· Dental Ins - Click the search button to search by No Ins, Primary Ins, and/or Sec Ins (select the options), an Insurance Company Name range (click the search button to select the range), and a Remaining Benefits amount range (click the search button to select the range). Patients will only be included in the data file if their insurance matches the corresponding filters you set up.
· Employer - Click the search button to enter an employer range. For the range, a single character can be entered, or the Beginning and/or Ending field can be left blank. If a range from A to Z is entered, all records will be included. The employer range can use partial keys (such as “Se” for Sears). If the beginning range is left blank, the search will be as if “A” was entered, and if the ending range is left blank, the search will be as if “Z” was entered.
· FD Payment Plan - Click the search button to enter a balance range for patients with a Future Due Payment Plan.
· Fee Schedule - Click the search button to set up the search options to include patients by Provider Default, Insurance Default, or Patient Default (select the appropriate options, and/or by fee schedules (hold down the Ctrl key to select more than one fee schedule).
· First Visit Date - Click the search button to enter a date range for the First Visit Date as recorded in the patients’ Family Files.
· Last Statement Date - Click the search button to enter a date range for the Last Statement Date as recorded in the patients’ Ledgers.
· Last Pay Date - Click the search button to enter a date range for the Last Pay Date as recorded in the patients’ Ledgers.
· Last Referral Date - The Last Referral Date is the date the patient last referred another patient. Click the Search button to enter a date range.
· Last Visit Date - Click the search button to enter a date range for the Last Visit Date as recorded in the patients’ Family Files.
· Med Alerts - Click the search button to display a list of Medical Alerts. This is an “and” search function, meaning that if Hay Fever and Allergies are selected, patients must have both Hay Fever and Allergies to be included in the data file. Highlight the appropriate alerts.
· Patient Notes - Click the search button to set up the combinations of strings by which you want to search in the Patient Notes in the Family File. Three text strings can be used along with Boolean functions (i.e., AND, OR). For example, if “movie” is entered in the Text 1 field, “surf” in the Text 2 field, and “sail” in the Text 3 field, and the OR boxes are selected, patients will be included in the data file if their notes contain any of the text specified. If an AND box is selected, the notes will need to include both the previous text and the subsequent text.
· Pmt Agreement - Click the search button to select certain search parameters for patients with payment agreements. You can specify the payment agreement date range, balance remaining, remaining number of payments, payment interval, and number of payments missed.
· Prescriptions - Click the search button to enter search parameters for patients with prescriptions. Enter a date range to search for prescriptions assigned within that range, or leave <ALL> entered to include all dates. Also, you can select the desired prescriptions (up to ten can be selected).
· Procedures - Click the search button to find patients that have treatment-planned, completed, or existing procedures, or conditions within a range of procedure codes and/or dates.
· Referred By - Click the search button to specify if the letter is to be for Patient referrals or Dr./Other referrals. Enter a range of referral sources. Enter the referral date range and choose whether you want to insert multiple referrals into one letter and/or skip non-person referrals.
· Referred To - Click the search button to enter a ranges of referral sources and Referred To dates.
· Postal Code - Click the search button to specify a Postal Code or range of Postal Codes to include. If a specific Postal Code range is entered, only patients who live in that Postal Code range (according to the Family File) will be included in the data file.
The items on the Data Fields group box correspond to the data fields that appear on the letter template.
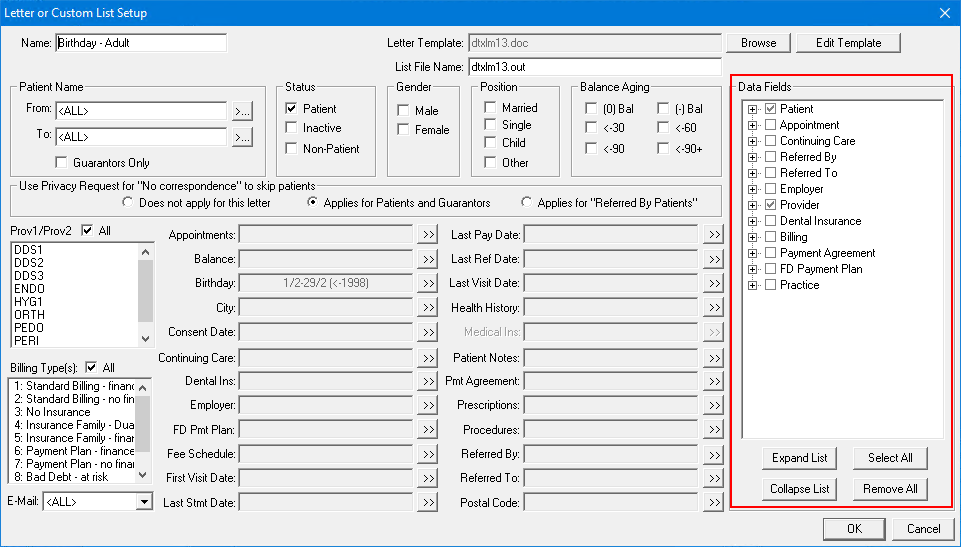
In order for a letter template to function properly, it is necessary to flag the fields of data that the letter uses. For example, the letter template can have a field indicating where the first and last name of the patient can be inserted. If this is the case, the merge data file created by Dentrix must include data filters for the first and last name of the patients. The letter templates provided with Dentrix have the merge data filters properly selected.
If a filter is left blank, the contents of the filter field cannot be taken into account when the data file is created. Only select a filter if the field is to be considered when the data file is created.
Some Dentrix letter templates require that you select additional items, depending on the template’s merge data fields. Any item selected in the Merge Data Filters list will be included in the merge data record, whether or not it will be used in the template.
Note: The more items that are selected, the longer it will take to create the merge data records. Therefore, be selective when selecting the desired merge data filters.