
As needed, you can configure the options under the General tab to your personal preferences.
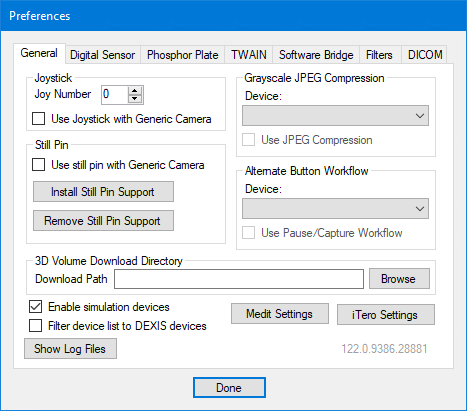
· Joystick - If you use a "Generic" intraoral camera with a joystick button interface instead of proprietary buttons, select the Use Joystick with Generic Camera checkbox. The camera button will use a specific joystick number. This is typically zero if no other joysticks are installed on the computer. Enter a number from 0 - 10 for Joy Number.
Note: If you use a Digital Doc camera, and it has been installed to use a port other than zero, you must specify the appropriate joystick number.
· Still Pin - If you use a "Generic" intraoral camera with a still pin to initiate captures, you must install still pin support for that camera. Make sure that the camera is plugged in and that all the necessary drivers for that device are installed before you attempt to install still pin support. Click Install Still Pin Support, click OK on the message that appears, select the camera that you want to install still pin support for, and then press the Enter key when the installation is complete. The Use still pin with Generic Camera checkbox is selected automatically, but you can clear the checkbox if at any time you decide that you do not want to use a still pin camera.
· Grayscale JPEG Compression - Dentrix Imaging can use JPEG lossy compression or PNG lossless compression for grayscale images (intraoral and extraoral X-ray images). To specify the compression method for a device, select that Device, and then select or clear the Use JPEG Compression checkbox. By default, this checkbox is selected for every acquisition device. With this checkbox selected, Dentrix Imaging uses a JPEG lossy compression (which has been optimized for grayscale images and uses a Q factor of 96) to obtain near-perfect-quality images. With this checkbox clear, Dentrix Imaging uses PNG lossless compression (which may produce larger file sizes and negatively impact the performance of uploading and downloading images). Repeat this process as needed for any other devices.
· Alternate Button Workflow - For the following intraoral cameras, you can specify whether you want to use an alternative functionality for the capture button or use the standard functionality: generic cameras, DEXcam 3 and 4 cameras, Sopro cameras, and Digital Doc Iris and Iris HD cameras. With the alternative button functionality enabled for a camera, after you push the button once to freeze the video stream, you either push once to capture the image or push twice to not capture it. The standard functionality does not support pushing the button twice to not capture the video frame. To specify the button functionality for a camera, select that Device, and then select or clear the Use Pause/Capture Workflow checkbox. Repeat this as needed for any other devices.
· 3D Volume Download Directory - This is the location where 3D volumes are saved.
· Enable simulation devices - With this checkbox selected, a Simulation option (for testing purposes) appears on the Available Devices menu when you are acquiring images (intraoral X-rays, extraoral X-rays, CAD/CAM scans, 3D volumes, intraoral photos, or extraoral photos). With this checkbox clear, the Simulation option does not appear on the menu.
· Filter device list to DEXIS devices – Select to filter acquisition devices based on DEXIS-equivalent settings, pre-selecting the appropriate device for intraoral and extraoral X-ray procedures.
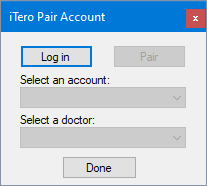
· iTero Settings - Click the button to configure the settings for the Align iTero software bridge:
a. In the iTero Pair Account dialog box, click Login.
The iTero Authorization dialog box appears.
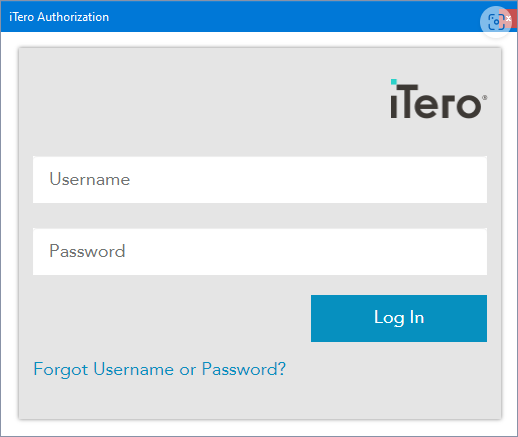
b. Enter your iTero credentials, and then click Log In.
You are returned to the iTero Pair Account dialog box.
c. Select your account from the Select an account list.

d. Click Pair.

e. Select a doctor from the Select a doctor list.

f. Click Done.

You are returned to the Preferences dialog box.
· Show Log Files - The acquisition agent logs actions that it performs for debugging, troubleshooting, and performance monitoring. To view the log, click (or tap) Show Log Files.