![]()
Dentrix Ascend Imaging
USER'S GUIDE
![]()
![]() www.DentrixAscend.co.uk
www.DentrixAscend.co.uk
Publication Information
Publication date
April 2021
Copyright
� 2021 Henry Schein One. All rights reserved. No part of this publication may be reproduced, transmitted, transcribed, stored in a retrieval system, or translated into any language in any form or by any means without the prior written permission of Henry Schein One.
� 2021 RealCloud Imaging, Inc. All rights reserved. No part of this publication may be reproduced, transmitted, transcribed, stored in a retrieval system, or translated into any language in any form or by any means without the prior written permission of RealCloud Imaging, Inc.
Software license notice
Your license agreement with Henry Schein One, which is included with the product, specifies the permitted and prohibited uses of the product. Any unauthorised duplication or use of Dentrix Ascend, in whole or in part, in print or in any other storage and retrieval system is forbidden.
Licenses and trademarks
Dentrix Ascend and the Dentrix Ascend logo are registered trademarks of Henry Schein One. Henry Schein One and its logo are trademarks of Henry Schein One. Software of Excellence is a registered trademark of Henry Schein One. The Dexis imaging software, product names, and logo are either trademarks or registered trademarks of Dexis, LLC. The Planmeca imaging software and product names are either trademarks or registered trademarks of Planmeca USA, Inc.
Version
You can find the UDI (Unique Device Identifier) followed by the current version number of Dentrix Ascend Imaging by doing the following: on the Developer Tools panel (in Chrome) or on the Web Inspector panel (in Safari), select the Console tab, and then open Dentrix Ascend Imaging. A line of text similar to "Ascend Imaging: (01)00864058000302(10) 1.1.6911.29768 12/3/2018 4:32 PM US" appears.
Real Cloud Imaging, Inc.
2625 North Loop Drive
Suite 2130
Ames, IA 50010
United States
Advena Ltd. Tower Business Centre, 2nd Flr,
Tower Street, Swatar, BKR 4013 Malta
Contents
-
Introduction
-
Indications for use
-
Contraindications
-
Precautions
-
Minimum system requirements
-
Supported acquisition devices
-
Customer/Technical support
-
Setting up imaging devices
-
Setting up the acquisition agent
-
Updating the acquisition agent
-
-
Acquiring images
-
Acquiring images
-
Acquiring an image for selected teeth
-
Importing images
-
-
Modifying exams
-
Resuming incomplete exams
-
Recovering images
-
Rearranging images in exams
-
-
Viewing images
-
Viewing recent images
-
Viewing image history
-
Determining which teeth have images
-
Viewing images for selected teeth
-
-
Comparing images
-
Manipulating images
-
Deleting images
-
Reassigning images to a different patient
-
Sharing images
-
Exporting images
-
Printing images
-
-
Setting up custom imaging procedures
-
Creating custom imaging procedures
-
Editing custom imaging procedures
-
Deleting custom imaging procedures
-
-
Managing favourite imaging procedures
-
Adding imaging procedures to the list of favourites
-
Removing imaging procedures from the list of favourites
-
-
Using the offline mode
-
Acquiring images in offline mode
-
Viewing offline images
-
Synchronizing offline images
-
Introduction
Dentrix Ascend's digital imaging solution is a cloud-based 2D dental imaging software module that interacts seamlessly with the Dentrix Ascend practice management program to provide efficient and versatile image management. Dentrix Ascend Imaging manages intraoral and extraoral X-rays as well as intraoral and extraoral colour images produced by intraoral video and/or consumer digital cameras.
Because Dentrix Ascend Imaging is a web-based imaging software application, you can use it with Windows, Mac OS, iOS (iPad), and other operating systems in a supported, HTML5-compatible internet browser.
Important Note: You can use the iPad for non-diagnostic purposes only.
You can acquire, import, export, view, and manipulate 2D images of dental anatomy. Dentrix Ascend Imaging supports the acquisition of images from many brands of intraoral and extraoral imaging devices, which allows you to mix and match imaging devices and brands of equipment as needed.
All images that you acquire or import are uploaded immediately to the cloud, so you can access them from multiple locations for any number of users in near real time. Dentrix Ascend Imaging uses world-class storage providers, and images are automatically replicated to multiple servers for disaster recovery.
Dentrix Ascend Imaging has many tools for manipulating images to help determine the necessary treatments for patients. Also, you can attach images that you acquire and import to dental e-claims.
Dentrix Ascend Imaging is available as an add-on and must be purchased separately from the Dentrix Ascend practice management program.
Dentrix Ascend Imaging is used for diagnostic purposes in the field of dentistry.
By default, Dentrix Ascend Imaging utilises lossless compression for all intraoral and extraoral x-ray images and which is 100% reversible and does not result in loss of data. Optionally, Dentrix Ascend Imaging can be configured to utilize lossy JPEG compression when acquiring intraoral and extraoral images; and which is not 100% irreversible and does result in loss of data. The JPEG compression Q factor used in Dentrix Ascend Imaging is Q96 and which is considered near perfect quality. Dentrix Ascend Imaging utilises lossy compression (JPEG) for all intraoral and extraoral colour images.
Contact Customer/Technical Support should you have any questions, difficulties using, experience any anomalies, or have comments regarding the Dentrix Ascend Imaging program. See the "Customer/Technical Support" section of this user's guide for contact information.
Indications for use
Dentrix Ascend Imaging is a web-based Dental Picture Archiving and Communications Systems (PACS), i.e. dental imaging software, that enables dental care facilities to acquire and view dental images.
Dentrix Ascend Imaging provides a web-based interface for image acquisition and management of images which are used in the field of Dentistry and when operated by dental professionals who are responsible for providing dental care.
Images can be acquired from dental image acquisition devices and/or consumer imaging devices such as colour digital cameras. Previously acquired images can be selected for upload directly from the user's computer.
Supported images include intraoral and extraoral dental X-rays and intraoral and extraoral colour images produced by intraoral video or consumer digital cameras.
Dentrix Ascend Imaging is used for diagnostic purposes in the field of dentistry.
Dentrix Ascend Imaging is not intended for diagnostic use on a mobile display.
Images can be manipulated (e.g. zoomed, contrast adjusted, inverted, annotated, rotated, filtered, etc...) as well as exported to standard image file formats.
Contraindications
None known
Precautions

Federal law restricts this device to sale by or on the order of a dentist.
To effectively use the Dentrix Ascend Imaging program, it is Strongly Recommended that all users obtain dedicated training on the use of this software prior to use on any live patients.
Read and understand the User's Guide in its entirety before using the Dentrix Ascend Imaging program upon live patients.
Use of this software as a diagnostic aid must be used in combination with other diagnostic aids and clinical experience to form a diagnosis and should not be solely relied upon for diagnosis.
Distance and Angle measurements require calibration by measuring length of a known object in image.
It is the operator's (user) responsibility to properly calibrate prior to clinical measurements and to determine if the accuracy achieved is within the error range required.
Do not operate this software upon live patients if you are feeling ill, fatigued, or if you are experiencing lack of concentration.
Do not leave any computer/device which is operating Dentrix Ascend Imaging unattended as this can create a security risk to patient or practice data. Always close the Dentrix Ascend Imaging program when leaving a computer or device unattended.
Dentrix Ascend Imaging is intended to be used in combination with other approved medical devices. To ensure Dentrix Ascend Imaging is safe and does not impair the performance, the other approved medical device must be functional and working per the manufactures IFU before using in combination with Dentrix Ascend Imaging.
System requirements
Browser
-
Latest version of Chrome for PC and Mac
-
Latest version of Chrome for Chromebox and Chromebook (only for viewing images or acquiring images with the built-in camera)
Important: Dentrix Ascend Imaging may work with a Chromebox or Chromebook, but the Dentrix Ascend practice management system has not been tested on those types of devices.
-
Latest version of Chrome for iPad (only for viewing images)
-
Latest version of Safari for iPad (for viewing and acquiring images)
Note: iPad can be used for acquiring images and viewing images for non-diagnostic purposes.
Operating System
-
Microsoft Windows 8 or newer
Important: Microsoft discontinued support for Windows 7 in January 2020. Dentrix Ascend works with Windows 7, but it is not recommended since Microsoft no longer provides security updates for Windows 7.
-
MacOS 10.10 or later
-
iOS 11 or newer
-
Chrome OS 79.x or later (for Chromebox and Chromebook; only for viewing images or acquiring images with the built-in camera)
Important: Dentrix Ascend Imaging may work with a Chromebox or Chromebook, but the Dentrix Ascend practice management system has not been tested on those types of devices.
Note: The operating system must be updated with the latest versions of any system patches and security updates.
Anti-Virus Software
-
Anti-virus software patched to latest version and virus definitions
Display
-
15-inch (measured diagonally) monitor for PC, Mac, Chromebox, and Chromebook
-
1024 x 768 resolution for PC, Mac, iPad, Chromebox, and Chromebook
Note: For best results, always use the native screen resolution of a monitor.
Supported acquisition devices
Legend
|
Windows |
Mac |
Supported Intraoral X-ray Acquisition Devices
-
Acteon Sopro SOPIX (for Windows OS, supported directly or via a TWAIN driver; for Mac OS, supported directly)


-
DentalSensors.com Apex
-
Dentsply Sirona XIOS XG
-
Dexis Platinum
-
Dexis Titaninum
-
Gendex/KaVo IO (supported using the GxPicture acquisition device)
-
Gendex GXS-700
-
Gendex Visualix eHD (only compatible with Windows 7)
Important: This device is not officially supported because it is only compatible with an unsupported operating system. However, this device may function with Dentrix Ascend Imaging on a computer running Windows 7.
-
Gendex Visualix GX-S (only compatible with Windows XP)
Important: This device is not officially supported because it is only compatible with an unsupported operating system. However, this device may function with Dentrix Ascend Imaging on a computer running Windows XP.
-
Hamamatsu
-
ImageWorks EVA Select (supported directly as an e2v sensor or via a TWAIN driver)
-
Jazz (supported via a TWAIN driver)
-
KaVo Dig eXam
-
KaVo IXS
-
Kodak/Carestream 5000 series and 6000 series (supported directly or via a TWAIN driver)
-
Owandy ONE and OPTEO
-
Polaroid KEREN HD-S (supported via a TWAIN driver)
-
LED Dental Tuxedo
Note: Not all Tuxedo sensors are Hamamatsu devices. Only Tuxedo sensors that are Hamamatsu devices are supported. Contact LED Dental to verify if a Tuxedo sensor is a Hamamatsu device.
-
Midmark Progeny ClearVision (supported directly or via a TWAIN driver)
-
Planmeca ProSensor (supported via DIDAPI)
-
Planmeca ProSensor HD (supported via DIDAPI; for Mac OS, DIDAPI 5.4.0 or newer is required)
-
Remedi (rebranded Hamamatsu sensor)
-
Schick (supported via a TWAIN driver)
-
Schick 33 (supported directly or via a TWAIN driver)
-
Schick CDR 2000 (supported directly or via a TWAIN driver; only compatible with Windows 7 32-bit)
Important: This device is not officially supported because it is only compatible with an unsupported operating system. However, this device may function with Dentrix Ascend Imaging on a computer running Windows 7 32-bit.
-
Schick Elite (supported directly or via a TWAIN driver)
-
Schick HS (supported directly or via a TWAIN driver)
-
Suni (most models supported via a TWAIN driver; contact the support department to verify)
-
Teledyne e2v
Note: e2v sensors are rebranded and sold by many companies under their specific brand names. The following devices are supported using e2v as the acquisition device:
-
Dentimax Dream sensor
-
EVA Select sensor
-
Sota/Clio sensor
-
Apteryx Tuxedo sensor (previous version is Hamamatsu, which is also supported directly)
-
QuickRay HD sensor (previous version is Hamamatsu, which is also supported directly)
-
-
Video Dental Concepts QuickRay HD
-
Dexis Software Bridge
-
Morita i-Dixel Software Bridge
-
Romexis Software Bridge
-
Sidexis Software Bridge
-
File Import (.bmp, .png, .jpg, .tif)
Supported Phosphor Plate Devices
-
Acteon Sopro PSPIX
-
Air Techniques ScanX Classic
-
Air Techniques ScanX Duo
-
Air Techniques ScanX IO
-
Air Techniques ScanX Swift
-
Durr VistaScan (supported directly or via a TWAIN driver)
-
Durr VistaScan Combi+ (supported directly or via a TWAIN driver)
-
Durr VistaScan Mini (supported directly or via a TWAIN driver)
-
Durr VistaScan Perio (supported directly or via a TWAIN driver)
-
Gendex Denoptix QST
-
Gendex GXPS-500
-
Instrumentarium Express
-
Instrumentarium Express Origo
-
KaVo Scan eXam
-
KaVo Scan eXam One
-
Soredex Optime
Supported Extraoral X-ray Acquisition Devices (Pan and Ceph)
-
Gendex 8500/9200 DDE
-
Gendex GXDP-300
-
Gendex GXDP-700
-
Instrumentarium OP30
-
Instrumentarium OP300 (supported via a TWAIN driver)
-
KaVo OP3D (supported via an Instrumentarium TWAIN 7.6 driver)
-
Kodak 8000/8100 (supported via a TWAIN driver)
-
Kodak 9000/9300 (supported via a TWAIN driver)
-
Morita Veraviewepocs 2D (supported via a TWAIN driver)
-
Morita Veraview IC5 HD (supported via a TWAIN driver)
-
Planmeca ProMax (supported via DIDAPI; for Mac OS, DIDAPI 5.4.0 or newer is required)
-
Planmeca ProOne (supported via DIDAPI; for Mac OS, DIDAPI 5.4.0 or newer is required)
-
Sirona Dentsply Orthophos SL series (supported via a TWAIN driver)
-
Sirona Dentsply Orthophos XG series (3, 5, Plus, 3D Ready, and 3D; all supported via a TWAIN driver)
-
Dexis Software Bridge
-
Morita i-Dixel Software Bridge
-
Romexis Software Bridge
-
Sidexis Software Bridge
-
File Import (.bmp, .png, .jpg, .tif)
Supported Extraoral X-ray Acquisition Devices (CBCT)
-
Morita Veraviewepocs 3D Series
-
Morita Veraview X800
-
Morita 3D Accuitomo Series
Supported Intraoral/Extraoral Colour Acquisition Devices
-
Acteon Sopro (all models)
-
Air Techniques CamX Polaris (supported via a TWAIN driver)
-
Air Techniques CamX Spectra (supported via a TWAIN driver)
-
Dexis CariVu
-
Dexis DEXcam 3
-
Dexis DEXcam 4
-
Digital Doc (Mac version)
-
Digital Doc IRIS (non-HD)
-
Digital Doc IRIS HD
-
DiscoveryHD Lite (Wired)
-
DiscoveryHD Lite (Wireless)
-
DiscoveryHD Pro (Wired)
-
DiscoveryHD Pro (Wireless)
-
DrsCam (Wired)
-
DrsCam (Wireless)
-
iPad (supported using one of the built-in cameras via the Safari browser on iOS)

-
EZ ShotHD (Wired)
-
EZ ShotHD (Wireless)
-
Polaroid (Wired)
-
Polaroid (Wireless)
-
RealCloud HD1 (for Mac OS, supported using the Generic Intraoral Camera device in Dentrix Ascend Imaging)
-
SuniCam HD (Wired)
-
SuniCam HD (Wireless)
-
WhicamStory3 (Wired)
-
WhicamStory3 (Wireless)
-
Any USB intraoral camera with buttons that have a joystick/game-port interface
-
Any USB intraoral camera without buttons that has a foot pedal (or a similar triggering device) with a joystick interface
-
Dexis Software Bridge
-
Morita i-Dixel Software Bridge
-
Romexis Software Bridge
-
Sidexis Software Bridge
-
File Import (.bmp, .png, .jpg, .tif)
Important: For some devices, additional costs may be required, such as the purchase of drivers, to integrate that device with Dentrix Ascend Imaging. Before you purchase the Dentrix Ascend Imaging add-on or a particular device that you want to use with Dentrix Ascend Imaging, consult the manufacturer of that device to verify if there will be costs to get that device working with Dentrix Ascend Imaging.
Note: Some, but not all, devices have been tested using a TWAIN driver. Using a TWAIN driver with certain devices might have unexpected results.
Customer/Technical support
-
Phone: 01634 266800
-
Email: AscendSupport@soeuk.com
Setting up imaging devices
Setting up the acquisition agent
Because Dentrix Ascend Imaging is a web-based application, it is available immediately for use once you have purchased it and it is enabled by Software of Excellence. However, for each computer that you want to acquire images from, you must install the following on that computer:
-
Drivers - The drivers for the intraoral and/or extraoral acquisition devices that you want to use. For the complete list of acquisition devices that are supported by Dentrix Ascend Imaging, see "Supported Acquisition Devices."
-
Acquisition agent - A small application that runs in the background and handles the communication between your acquisition devices and Dentrix Ascend Imaging. You do not need to install the acquisition agent on computers that you will be using to only view images.
Note: During the installation of the acquisition agent, a security certificate is installed automatically to allow for secure communication between the browser running Dentrix Ascend Imaging and the acquisition agent.
Setting up the acquisition agent consists of the following three tasks:
-
Downloading
-
Installing
-
Configuring
Downloading
You can download the acquisition agent installer by attempting to acquire an image on a computer that you want to use to acquire images. A message will appear and provide you with a link to download the acquisition agent installer.
Note: Alternatively, you can access the link to download the acquisition agent installer in Dentrix Ascend. On a computer that does not have the acquisition agent installed, open the Document Manager while viewing any patient's record, and then click (or tap) Scan.
To download the acquisition agent
-
Attempt to acquire an image (see "Acquiring Images").
If the acquisition agent is not installed, the Acquisition Activation dialogue box appears.

-
Click (or tap) the Click here link to download the acquisition agent installer.
-
Click (or tap) Done.
-
When the download is complete, you can install the acquisition agent.
Installing
You must install the acquisition agent on each computer that you want to use to acquire images. Complete the steps that correspond to the operating system of the computer that you are installing the acquisition agent on: Windows or Macintosh.
Notes:
-
(Windows only) Prior to installing the acquisition agent, verify that the Microsoft .NET 4.0 framework is installed. If .NET 4.0 is not installed, you must install it before you attempt to install the acquisition agent.
Before attempting to install the acquisition agent, you should be logged on to your operating system (Windows or Macintosh) as a local administrator (not as a domain administrator).
To install the acquisition agent (Windows) ![]()
-
Run Acquisition Agent Installer.exe.
-
On the welcome screen, click (or tap) Next.
-
On the Choose Components screen, leave Acquisition Agent selected, and then click (or tap) Next.
-
On the Choose Install Location screen, leave the default Destination Folder selected, or click (or tap) Browse to select a different location. Then, click (or tap) Install.
-
On the completion screen, click (or tap) Finish.
-
After installing the acquisition agent, you can install the drivers for your acquisition devices and change the default settings of the acquisition agent (even though the defaults should suffice).
To install the acquisition agent (Macintosh) ![]()
-
Run Acquisition Agent Installer.pkg.
Troubleshooting: If an error with the message "Acquisition Agent Installer.pkg can't be opened because Apple cannot check it for malicious software." appears, complete the following steps:
With the error message still open, open the System Preferences.

-
Select Security & Privacy.

-
On the General tab, click the lock icon.

-
If you are prompted to do so, enter your MacOS User Name and Password, and then click Unlock.
-
Under Allow apps downloaded from, select App Store and identified developers.
Note: The error message needs to be open to see this option.
-
Click Open Anyway, follow the prompts, and eventually the acquisition agent installer should start.
-
On the Introduction screen, click Continue.
-
If the Destination Select screen appears, select the disk where you want to install the program. Then, click Continue.
-
On the Installation Type screen, click Install.
-
If the system prompts you to do so, to allow the installer to install the program, enter your MacOS User Name and Password, and then, click Install Software.
-
On the Summary screen, click (or tap) Close.
Note: After installation, the acquisition agent starts automatically. The first time the acquisition agent starts, it will need 90-120 seconds to finish its configuration. When acquisition agent icon stops bouncing, the configuration is complete.
-
After the initial configuration is complete, right-click the Acquisition Agent icon on the dock, point to Options, and then select Open at Login if the option does not already have a check mark next to it.

-
Restart the computer to finish the required setup.
-
After installing the acquisition agent, you can install the drivers for your acquisition devices and change the default settings of the acquisition agent (even though the defaults should suffice).
Configuring
If you need to change the default settings of the acquisition agent (even though the defaults should suffice), after you complete the installation, configure the acquisition agent's options as needed. Complete the steps that correspond to the operating system of the computer that you are configuring the acquisition agent on: Windows or Macintosh.
To configure the acquisition agent (Windows) ![]()
Click (or tap) the Acquisition Agent icon
 in the notification area of the Windows taskbar, and then click (or tap) Preferences.
The Preferences dialogue box appears.
-
Set up any of the options on the following tabs as needed:
-
General
General tab

-
Joystick - If you use a "Generic" intraoral camera with a joystick button interface instead of proprietary buttons, select the Use Joystick with Generic Camera check box. The camera button will use a specific joystick number. This is typically zero if no other joysticks are installed on the computer. Enter a number from 0 - 10 for Joy Number.
Note: If you use a Digital Doc camera, and it has been installed to use a port other than zero, you must specify the appropriate joystick number.
-
Still Pin - If you use a "Generic" intraoral camera with a still pin to initiate captures, you must instal still pin support for that camera. Make sure that the camera is plugged in and that all the necessary drivers for that device are installed before you attempt to instal still pin support. Click (or tap) Install Still Pin Support, click (or tap) OK on the message that appears, select the camera that you want to install still pin support for, and then press the Enter key when the installation is complete. The Use still pin with Generic Camera check box is selected automatically, but you can clear the check box if at any time you decide that you do not want to use a still pin camera.
-
Grayscale JPEG Compression - By default, Dentrix Ascend Imaging uses PNG lossless compression for grayscale images (intraoral and extraoral X-ray images). For each acquisition device, you can specify whether Dentrix Ascend Imaging should use JPEG lossy compression on X-ray images. The JPEG lossy compression that Dentrix Ascend Imaging uses has been optimized for grayscale images and uses a Q factor of 96 to obtain near-perfect-quality images. To specify the compression method for a device, select that Device, and then select or clear the Use JPEG Compression check box. Repeat this as needed for any other devices.
-
Alternate Button Workflow - For the following intraoral cameras, you can specify whether you want to use an alternative functionality for the capture button or use the standard functionality: generic cameras, DEXcam 3 and 4 cameras, Sopro cameras, and Digital Doc Iris and Iris HD cameras. With the alternative button functionality enabled for a camera, after you push the button once to freeze the video stream, you either push once to capture the image or push twice to not capture it. The standard functionality does not support pushing the button twice to not capture the video frame. To specify the button functionality for a camera, select that Device, and then select or clear the Use Pause/Capture Workflow check box. Repeat this as needed for any other devices.
-
Show Log Files - The acquisition agent logs actions that it performs for debugging, troubleshooting, and performance monitoring. To view the log, click (or tap) Show Log Files.
-
-
Digital Sensor
Digital Sensor tab

-
DEXIS:
Use Binned Acquisition - In the Dexis imaging software (versions 9 and 10), "binned" is the default operating mode for Dexis sensors, so this check box is selected by default for Dentrix Ascend Imaging.
-
Correction Path - This is the location of the calibration files for Dexis sensors. The default is C:\Dexis\Flashdir.
-
Hamamatsu Correction Path - This is the location of the calibration files for Hamamatsu sensors. The default is C:\Program Files (x86)\Acquisition Agent\Correction Files.
-
e2v Correction Path - This is the location of the calibration files for e2v sensors. The default is C:\Program Files (x86)\Acquisition Agent\Correction Files.
-
Hamamatsu - The Gamma correction value defines the relationship between a pixel's numerical value and its actual luminance; use it to redistribute the tonal levels of a raw image to be closer to how human eyes perceive them (on a standard monitor). The Integration Time, Incidence Threshold, and Integration End Threshold options determine how Dentrix Ascend Imaging control the integration timing and triggering of sensors. You may want to change these settings if, for example, you use a low-dose, portable X-ray machine.
-
Planmeca - For Planmeca sensors, "binned" is the default operating mode, so the Use Binned Acquisition check box is selected by default for Dentrix Ascend Imaging.
-
e2v Settings - Click (or tap) the button to configure the following settings for size 1 and size 2 e2v sensors:
-
Use Binned Acquisition - Controls whether "binned" operating mode is on or off.
-
Sensor Gain - Controls the output signal strength from sensors.
-
Integration Time - Determines how Dentrix Ascend Imaging controls the integration timing of sensors. You may want to change this if, for example, you use a low-dose, portable X-ray machine.
-
Triggering Level - Determines how Dentrix Ascend Imaging controls the triggering of sensors. You may want to change this if, for example, you use a low-dose, portable X-ray machine.
-
Gamma Level - Defines the relationship between a pixel's numerical value and its actual luminance; use it to redistribute the tonal levels of a raw image to be closer to how human eyes perceive them (on a standard monitor).
-
Do Not Use Sensor Calibration Files - Controls whether the sensor calibration files are used or not.
-
-
-
Phosphor Plate
Phosphor Plate tab

-
ScanX - These are filters to use with a ScanX phosphor plate scanner. The Gamma correction value defines the relationship between a pixel's numerical value and its actual luminance; use it to redistribute the tonal levels of a raw image to be closer to how human eyes perceive them (on a standard monitor). The Intraoral Mode, Panoramic Mode, and Cephalometric Mode values indicate the scanning modes being used for intraoral, panoramic, and cephalometric images, respectively. The mode affects image resolution.
-
Optime Settings - Click (or tap) the button to configure the IAM settings for an Optime scanner.
-
OP30 Settings - Click (or tap) the button to configure the IAM settings for an OP30 scanner.
-
VistaScan - The Device Type (the default is IMDA) and the Registered Device of a VistaScan scanner. You can leave the Registered Device box blank to use the first device found that matches the specified type.
-
-
TWAIN
TWAIN tab

-
TWAIN - The Use Buffered TWAIN Transfer option is selected by default as the transfer method for images from acquisition devices that use a TWAIN driver. If there are issues with TWAIN sources delivering images properly to the acquisition agent, clear this check box to use the native transfer mode, which some TWAIN sources require or recommend.
-
TWAIN Categories - For each TWAIN source, you can specify the applicable acquisition types. Select a TWAIN source from the Device list, and then select the applicable acquisition types (Digital Sensor or Phosphor Plate, Panoramic, Cephalometric, and/or Intraoral Camera). The selected TWAIN source will only be available for selection in the device list when someone is acquiring images for one of the selected acquisition types. Repeat this as needed for any other TWAIN sources.
-
TWAIN Rotation - For each TWAIN source, you can specify the default orientation (rotation and/or flip) to apply to images by acquisition type prior to those images being delivered to Dentrix Ascend Imaging. Select a TWAIN source from the Device list, select an acquisition type (Digital Sensor, Phosphor Plate, Panoramic, Cephalometric, or Intraoral Camera) from the second list, and then select an orientation option (No Rotation, Rotate 90, Rotate 180, Rotate 270, Mirror, Rotate 90 + Mirror, Flip, or Rotate 90 + Flip) from the third list. Repeat this as needed for any other TWAIN sources.
-
-
Software Bridge
Software Bridge tab

-
DEXIS - If someone selects the Dexis software bridge from the device list when acquiring an image, the Application Path (where the Dexis software is installed; the default is C:\DEXIS) and the Images Path (where the Dexis software stores images; the default is C:\DEXIS\DATA) must be correct, so Dentrix Ascend Imaging can open the Dexis software and have bi-directional communication with it. The Dexis software must be installed to use this software bridge.
-
SIDEXIS - If someone selects the Sidexis software bridge from the device list when acquiring an image, the Application Path (where the Sidexis software is installed; the default is C:\Program Files\Sirona\SIDEXIS4), the SLIDA Mailbox Path (the location of the SLIDA mailbox file; the default is C:\PDATA), the Ascend Mailbox Path (the location of the Dentrix Ascend mailbox file; the default is C:\ProgramData\Acquisition Agent), the SLIDA Mailbox File name (the default is siomin.sdx), and the Dentrix Ascend Mailbox File name (the default is Ascend.sdx) the must be correct, so Dentrix Ascend Imaging can open the Sidexis software and have bi-directional communication with it. The Sidexis software must be installed to use this software bridge.
-
-
Filters
Filters tab

-
Acquisition Filters - For each acquisition device, you can specify a set of filters to apply to images to fine tune those images more than what Dentrix Ascend Imaging does by default. Select a Device, and then set up the following filters as needed:
-
Apply Gamma Correction - To customise this filter, select the check box, and then enter the amount of Gamma correction. The gamma correction value defines the relationship between a pixel's numerical value and its actual luminance; use it to redistribute the tonal levels of a raw image to be closer to how human eyes perceive them (on a standard monitor).
-
Apply Pre Smoothing - To customise this filter, select the check box, and then enter the Strength of the smoothing effect.
-
Apply Sharpening - To customise this filter, select the check box, and then enter the Effect and the Strength of the sharpening effect.
-
Apply Post Smoothing - To customise this filter, select the check box, and then enter the Strength of the smoothing effect after the sharpening filter is applied. The Apply Post Smoothing check box is available only if the Apply Sharpening check box is selected.
Repeat this as needed for any other devices.
-
-
Schick Filter - You can specify the following types of sharpness adjustments to apply to an image that is acquired with a Schick device, according to the type of image that is acquired: General Sharpness, Endodontic Sharpness, Periodontic Sharpness, Caries Sharpness, and Hygiene Sharpness.
-
-
-
Click (or tap) Done.
To configure the acquisition agent (Macintosh) ![]()
Click the Acquisition Agent icon
 on the dock.
From the Acquisition Agent menu, click Preferences.

The Acquisition Agent Preferences dialogue box appears.

-
Set up any of the following options as needed:
-
Planmeca:
-
Use Binned Acquisition - For Planmeca sensors, "binned" is the default operating mode, so this check box is selected by default for Dentrix Ascend Imaging.
-
-
DEXIS Platinum - For DEXIS Platinum sensors, "binned" is the default operating mode for direct integration, so the Use Binned Acquisition check box is selected by default for Dentrix Ascend Imaging.
-
RealCloud HD1 - Dentrix Ascend Imaging can automatically detect the port that the RealCloud HD1 intraoral camera is using so the buttons function properly, or you can specify a port. By default, Auto-Detect is selected as the Port.
-
Grayscale JPEG Compression - By default, Dentrix Ascend Imaging uses PNG lossless compression for grayscale images (intraoral and extraoral X-ray images). For each acquisition device, you can specify whether Dentrix Ascend Imaging should use JPEG lossy compression on X-ray images. The JPEG lossy compression that Dentrix Ascend Imaging uses has been optimized for grayscale images and uses a Q factor of 96 to obtain near-perfect-quality images. To specify the compression method for a device, select that Device, and then select or clear the Use JPEG Compression check box. Repeat this as needed for any other devices.
-
Show Log Files - The acquisition agent logs actions that it performs for debugging, troubleshooting, and performance monitoring. To view the log, click Show Log Files.
-
-
Close the dialog box.
Updating the acquisition agent
The acquisition agent is a small application that runs in the background and handles the communication between your acquisition devices and Dentrix Ascend Imaging. To benefit from the latest enhancements of Dentrix Ascend Imaging, on each computer that you want to acquire images from, you should verify that you have the most recent version of the acquisition agent installed.
Note: Before attempting to update the acquisition agent, you should be logged on to your operating system (Windows or Macintosh) as a local administrator (not as a domain administrator).
To update the acquisition agent (Windows) ![]()
-
Click (or tap) the Acquisition Agent icon
in the notification area of the Windows taskbar, and then click (or tap) Check For Updates.
If an update is available, the Agent Auto Update dialogue box appears.

-
Click (or tap) Download And Install.
-
Follow the instructions in the Acquisition Agent Setup to complete the upgrade.
To update the acquisition agent (Mac) ![]()
-
Log in to Dentrix Ascend.
-
If the correct patient is not already selected, use the Patient Search box to access the patient's record.
-
On the Patient menu, under Clinical, click Chart, Progress Notes, Quick Exam, Perio, Tx Planner, NHS Claims, or Imaging.
-
While viewing the patient's clinical record, on the Imaging tab's menu, click Acquire Images.

-
Click the Acquisition Agent icon
on the dock. -
From the Acquisition Agent menu, click Preferences.
The Acquisition Agent Preferences dialogue box appears.
-
Click Check For Updates.
If an update is available, the Agent Auto Update dialogue box appears.

-
Click Download And Install.
-
Follow the instructions in the Acquisition Agent Setup to complete the upgrade.
Acquiring images
You can acquire or import a single image or a set of images. You can also quickly acquire images for selected teeth.
Acquiring images
You can acquire images with a device (such as an X-ray sensor or an intraoral camera) or by importing image files (such as .png or .jpg files). The images will be attached to a patient's record upon acquisition. When you acquire images, you can customise the acquisition settings, and there are options for posting the associated procedure and billing the procedure to insurance.
For the complete list of acquisition devices that are supported by Dentrix Ascend Imaging, see the "Supported Acquisition Devices" section.
To acquire images
-
If the correct patient is not already selected, use the Patient Search box to access the patient's record.
Note: You can include inactive patients in the search results by setting the Include inactive patients switch to On.
-
On the Patient menu, under Clinical, click (or tap) Chart, Progress Notes, Quick Exam, Perio, Tx Planner, NHS Claims, or Imaging.
-
On the Chart, Progress Notes, Perio, Tx Planner, NHS Claims, or Imaging tab of a patient's clinical record, on the Imaging tab's menu, click (or tap) Acquire images.
Notes:
-
If the acquisition agent is not installed, the Acquisition Activation dialogue box appears. Click (or tap) the Click here link to download the acquisition agent installer. Then, click (or tap) Done. After you install the acquisition agent and the drivers for your acquisition devices, you can begin acquiring images.
-
If you have not already accepted the diagnostic use policy, the Diagnostic Use Warning dialogue box appears. To begin using the imaging features of Dentrix Ascend, you must select the I accept the above-mentioned policy check box, and then click (or tap) Accept & Go to Imaging.

The options for acquiring images become available.

-
-
Under Imaging Procedures, either leave the Standard tab selected, or click (or tap) the Custom tab or the Favorites tab.
Note: Custom and favorite imaging procedures are location specific.
-
Select the procedure that you want to perform (each corresponds to a particular acquisition type: individual intraoral X-ray, intraoral X-ray series, extraoral X-ray, intraoral photo, or extraoral photo.
The options for the selected procedure become available.

-
Under Billing Options, set up the following options:
-
Apply charges - To post the fee for the selected procedure (such as FMX for a full mouth series), select the check box. To post a zero amount for the procedure, clear the check box.
-
Bill to third party - Specify whether you want to bill or not bill the patient's third party for the procedure by selecting or clearing the check box, respectively.
-
Provider - Select the provider who you want to associate with the procedure. Only providers who have access to the current location are available.
-
-
Set up the Acquisition Options that corresponding to the acquisition type.
Intraoral X-ray
Do the following:
-
On the Tooth chart, select the teeth that apply to the current acquisition session.

Note: To deselect all selected teeth, click (or tap) the Clear selected link.
-
To allow for the automatic retaking of the radiograph (without having to click, or tap, Recapture) until a satisfactory image is acquired, select the Enable auto-repeat check box. Only the last image you acquire will be saved.

-
Under Task to Perform, on the Acquire Images tab, select the desired device in the Available Devices button pop-up list if it is not already selected.

Note: For the complete list of acquisition devices that are supported by Dentrix Ascend Imaging, see the "Supported Acquisition Devices" section.
Intraoral X-ray series
Do the following:
-
If you are acquiring a series with two types of sequences, under Acquisition sequence, do one of the following (otherwise, skip this step):
-
For a full-mouth series - Select FMX 18 or FMX 21.
-
For a 3-periapical series - Select Maxillary or Mandibular.
-
For a 4-bitewing and 3-periapical series - Select Maxillary or Mandibular.
-
For a 7-bitewing and 3-periapical series - Select Maxillary or Mandibular.
-
-
Under Acquisition sequence, select "Default sequence" or a custom order (if any).
-
To change the order of the acquisition sequence, on the graphic with the numbered boxes, click (or tap) each box in the order that you will acquire the images.

Tips:
-
To undo the previous selection, click (or tap) Undo as needed. To undo all selections, click (or tap) Reset.
-
When you finish specifying the order, to save the custom sequence for future use, type a name for the sequence, and then click (or tap) Save as ([sequence name]).

-
To delete a custom sequence, with that sequence selected, click (or tap) the white Delete button
 , which then turns red, and then click (or tap) the button again.
-
-
Under Task to Perform, on the Acquire Images tab, select the desired device in the Available Devices button pop-up list if it is not already selected.
Note: For the complete list of acquisition devices that are supported by Dentrix Ascend Imaging, see the "Supported Acquisition Devices" section.
Extraoral X-ray
Do the following:
-
Under Task to Perform, on the Acquire Images tab, select the desired device in the Available Devices button pop-up list if it is not already selected.

Note: For the complete list of acquisition devices that are supported by Dentrix Ascend Imaging, see the "Supported Acquisition Devices" section.
Intraoral/extraoral photo
Do the following:
-
Under Task to Perform, on the Acquire Images tab, select the desired device in the Available Devices button pop-up list if it is not already selected.

Notes:
-
For the complete list of acquisition devices that are supported by Dentrix Ascend Imaging, see the "Supported Acquisition Devices" section.
-
The first time you attempt to use an intraoral camera with Dentrix Ascend Imaging on any computer, when a message from the browser appears and asks if you want to allow the browser to have access to the camera, allow it.
-
-
-
Click (or tap) Proceed with Acquisition to start acquiring images for the corresponding acquisition type.
Intraoral X-ray
The selected acquisition device is initialised.

Then, the X-ray sensor is armed.

Then, the X-ray sensor becomes ready for exposure.

Do the following:
Note: A phantom, test target, and/or another non-human object should be X-rayed when installing or using any image acquisition device for the first time in Dentrix Ascend Imaging to verify proper operation prior to use on live patients.-
To change the acquisition device, select a device in the Available Devices for Procedure button pop-up list.
-
In the Automatically Apply Enhancement list, select the type of enhancement that you want to have applied automatically to the image that will be acquired (Entire Image, For Perio, For Endo), or select Not Enhanced to not apply any enhancement.

Note: When viewing an image after it has been acquired, you can turn the enhancement off and on. The original, raw image is preserved. For more information about enhancements and turning them on and off, see the "Manipulating images" section.
-
Position the sensor in the patient's mouth, and align your X-ray source cone to point at the sensor, utilising the paralleling or bisecting angle techniques. Set the appropriate exposure time on your X-ray source's control panel for the specific imaging device in use, and then trigger the radiation emission, which initiates the capture of the X-ray image. (
 Refer to the documentation provided by the manufacturer of your X-ray source for details about changing settings and usage.)
Note: Radiation from an X-ray source initiates the imaging device (sensor) to capture an image, and this is controlled by someone triggering the X-ray source. The Dentrix Ascend Imaging program does not directly control the X-ray source or exposure settings.

The resulting image is saved to the patient's record, and a preview of the image appears.

Notes:
The saved state of the Smaller/Larger button
 , which is available when you are viewing images, affects the preview size of images during acquisitions. The state of the button is stored per computer (or device).
-
If you are acquiring in endo mode, the Recapture button is not available. The sensor is re-armed automatically and becomes ready for another exposure. Continue retaking the radiograph until you have acquired a satisfactory image to replace the previous image.

-

Intraoral X-ray (using a phosphor plate)
Do the following:
Note: A phantom, test target, and/or another non-human object should be X-rayed when installing or using any image acquisition device for the first time in Dentrix Ascend Imaging to verify proper operation prior to use on live patients.-
Position a phosphor plate in the patient's mouth, and align your X-ray source cone to point at the phosphor plate, utilising the paralleling or bisecting angle techniques. Make sure that the edge of the phosphor plate with the dot or letter is pointing upward for all vertical placements or pointing toward the back of the mouth for all horizontal placements. Set the appropriate exposure time on your X-ray source's control panel for the specific imaging device in use, and then trigger the radiation emission, which causes the phosphor plate to capture the X-ray image. (
Refer to the documentation provided by the manufacturer of your X-ray source for details about changing settings and usage.)Note: Radiation from an X-ray source causes the phosphor plate to capture the image, and this is controlled by someone triggering the X-ray source. The Dentrix Ascend Imaging program does not directly control the X-ray source or exposure settings.

-
To change the acquisition device, select a device in the Available Devices for Procedure button pop-up list.
-
From the Automatically Apply Enhancement list, select the type of enhancement that you want to have applied automatically to the image (Entire Image, For Perio, For Endo), or select Not Enhanced to not apply any enhancement.
Note: When viewing an image after it has been acquired, you can turn the enhancement off and on. The original, raw image is preserved. For more information about enhancements and turning them on and off, see the "Manipulating images" section.
-
Click (or tap) Start Acquisition.

-
When the scanner is ready, put the phosphor plate, with the edge with the dot or letter pointing up, in the scanner according to the manufacturer's instructions.

When the scanner finishes scanning the plate, the resulting image is saved to the patient's record, and a preview of the image appears.
Notes:
The saved state of the Smaller/Larger button
, which is available when you are viewing images, affects the preview size of images during acquisitions. The state of the button is stored per computer (or device).To replace the image that you just acquired, click (or tap) Recapture. Reacquire the image. In the Select Image dialogue box that appears, click (or tap) either Keep Existing to keep the original image or Keep Recaptured to replace the original image with the new image.
Intraoral X-ray (using a software device)
If you have selected one of the software devices (bridges) as your acquisition device, the corresponding third-party imaging program opens. Do the following:
Note: A phantom, test target, and/or another non-human object should be X-rayed when installing or using any image acquisition device for the first time in Dentrix Ascend Imaging to verify proper operation prior to use on live patients.-
Acquire the image in the third-party imaging program. Position the sensor in the patient's mouth, and align your X-ray source cone to point at the sensor, utilising the paralleling or bisecting angle techniques. Set the appropriate exposure time on your X-ray source's control panel for the specific imaging device in use, and then trigger the radiation emission, which initiates the capture of the X-ray image. (
Refer to the documentation provided by the manufacturer of your X-ray source for details about changing settings and usage.)Note: Radiation from an X-ray source initiates the imaging device (sensor) to capture an image, and this is controlled by someone triggering the X-ray source. The Dentrix Ascend Imaging program does not directly control the X-ray source or exposure settings.
-
Close the third-party imaging program.
The resulting image appears in the Dentrix Ascend Imaging program automatically.
Notes:
The saved state of the Smaller/Larger button
, which is available when you are viewing images, affects the preview size of images during acquisitions. The state of the button is stored per computer (or device).To replace the image that you just acquired, click (or tap) Recapture. Reacquire the image. In the Select Image dialogue box that appears, click (or tap) either Keep Existing to keep the original image or Keep Recaptured to replace the original image with the new image.
Intraoral X-ray series
The selected acquisition device is initialised.
Then, the X-ray sensor is armed.
Then, the X-ray sensor becomes ready for exposure.

Do the following:
Note: A phantom, test target, and/or another non-human object should be X-rayed when installing or using any image acquisition device for the first time in Dentrix Ascend Imaging to verify proper operation prior to use on live patients.-
To pause acquisition and change the acquisition device, click (or tap) Pause, and then select a device from the Available Devices for Procedure button menu. Click (or tap) Continue to resume acquisition.
-
To skip ahead in the acquisition sequence, click (or tap) Skip Forward. This button is available only if the current step in the sequence is not the last step.
-
To go backward in the acquisition sequence, click (or tap) Skip Backward. This button is available only if the current step in the sequence is not the first step, and if the previous step in the sequence does not have an image.
-
In the Automatically Apply Enhancement list, select the type of enhancement that you want to have applied automatically to the image that will be acquired (Entire Image, For Perio, For Endo), or select Not Enhanced to not apply any enhancement.
Note: When viewing an image after it has been acquired, you can turn the enhancement off and on. The original, raw image is preserved. For more information about enhancements and turning them on and off, see the "Manipulating images" section.
-
Position the sensor in the patient's mouth, and align your X-ray source cone to point at the sensor, utilising the paralleling or bisecting angle techniques. Set the appropriate exposure time on your X-ray source's control panel for the specific imaging device in use, and then trigger the radiation emission, which initiates the capture of the X-ray image. (
Refer to the documentation provided by the manufacturer of your X-ray source for details about changing settings and usage.)Note: Radiation from an X-ray source initiates the imaging device (sensor) to capture an image, and this is controlled by someone triggering the X-ray source. The Dentrix Ascend Imaging program does not directly control the X-ray source or exposure settings.
Radiation triggers the X-ray sensor.
The resulting image is saved to the patient's record, and a preview of the image appears.

Note: The saved state of the Smaller/Larger button
, which is available when you are viewing images, affects the preview size of images during acquisitions. The state of the button is stored per computer (or device). -
Wait until the timer counts down to zero to proceed to the next step in the acquisition sequence.

The current step in the acquisition sequence and the applicable teeth are selected for your reference.

Notes:
-
To stop the acquisition session before completing the series, click (or tap) Finish Acquisition. You can resume the incomplete exam later on if necessary.
-
To replace the image that you just acquired, click (or tap) Recapture. Reacquire the image. In the Select Image dialogue box that appears, click (or tap) either Keep Existing to keep the original image or Keep Recaptured to replace the original image with the new image.
-
-
Repeat steps a - f until you finish acquiring the series.
Intraoral X-ray series (using phosphor plates)
Do the following:
Note: A phantom, test target, and/or another non-human object should be X-rayed when installing or using any image acquisition device for the first time in Dentrix Ascend Imaging to verify proper operation prior to use on live patients.-
For each image you want to acquire, position a phosphor plate in the patient's mouth, and align your X-ray source cone to point at the phosphor plate, utilising the paralleling or bisecting angle techniques. Make sure that the edge of the phosphor plate with the dot or letter is pointing upward for all vertical placements or pointing toward the back of the mouth for all horizontal placements. Set the appropriate exposure time on your X-ray source's control panel for the specific imaging device in use, and then trigger the radiation emission, which causes the phosphor plate to capture the X-ray image. (
Refer to the documentation provided by the manufacturer of your X-ray source for details about changing settings and usage.)Note: Radiation from an X-ray source causes the phosphor plate to capture the image, and this is controlled by someone triggering the X-ray source. The Dentrix Ascend Imaging program does not directly control the X-ray source or exposure settings.

-
To change the acquisition device, select a device in the Available Devices for Procedure button pop-up list.
-
From the Automatically Apply Enhancement list, select the type of enhancement that you want to have applied automatically to the images (Entire Image, For Perio, For Endo), or select Not Enhanced to not apply any enhancement.
Note: When viewing an image after it has been acquired, you can turn the enhancement off and on. The original, raw image is preserved. For more information about enhancements and turning them on and off, see the "Manipulating images" section.
-
Click (or tap) Start Scanning.
-
When the scanner is ready, put the phosphor plates, with the edges with the dot or letter pointing up, in the scanner according to the manufacturer's instructions.
As the scanner finishes scanning a plate, the resulting image appears as a thumbnail image on the panel at the bottom of the Dentrix Ascend Imaging program.

-
One at a time, drag the thumbnail images from the panel to the appropriate boxes of the template.

Note: If the orientations the phosphor plates were correct when the radiographs were taken and when inserting them into the scanner, the images will have the correct orientation in the series. When you drop a thumbnail image into a box of the template, the image is rotated automatically as needed for that position in the series.
-
As needed, do any of the following:
-
To change the orientation of an image in the template, select it to view the toolbar, and then click (or tap) any of the available buttons as needed: Flip Horizontal, Flip Vertical, Rotate Counterclockwise (90 degrees), and/or Rotate Clockwise (90 degrees).

-
To swap two images in the template, drag one of the images to the box with another image.
-
To remove an image from the template, drag it back to the panel at the bottom.
-
Intraoral X-ray series (using a software device)
Do the following:
Note: A phantom, test target, and/or another non-human object should be X-rayed when installing or using any image acquisition device for the first time in Dentrix Ascend Imaging to verify proper operation prior to use on live patients.
-
To change the acquisition device, select a device in the Available Devices for Procedure button pop-up list.
-
From the Automatically Apply Enhancement list, select the type of enhancement that you want to have applied automatically to the images (Entire Image, For Perio, For Endo), or select Not Enhanced to not apply any enhancement.
Note: When viewing an image after it has been acquired, you can turn the enhancement off and on. The original, raw image is preserved. For more information about enhancements and turning them on and off, see the "Manipulating images" section.
-
Click (or tap) Start Importing.
The corresponding third-party imaging program opens.
-
Acquire the images in the third-party imaging program. For each image you want to acquire, position the sensor in the patient's mouth, and align your X-ray source cone to point at the sensor, utilising the paralleling or bisecting angle techniques. Set the appropriate exposure time on your X-ray source's control panel for the specific imaging device in use, and then trigger the radiation emission, which causes the sensor to capture the X-ray image. (
Refer to the documentation provided by the manufacturer of your X-ray source for details about changing settings and usage.)Note: Radiation from an X-ray source causes the sensor to capture the image, and this is controlled by someone triggering the X-ray source. The Dentrix Ascend Imaging program does not directly control the X-ray source or exposure settings.
-
Close the third-party imaging program.
The resulting images appear as thumbnail images on the panel at the bottom of the Dentrix Ascend Imaging program automatically.

-
One at a time, drag the thumbnail images from the panel to the appropriate boxes of the template.

-
As needed, do any of the following:
-
To change the orientation of an image in the template, select it to view the toolbar, and then click (or tap) any of the available buttons as needed: Flip Horizontal, Flip Vertical, Rotate Counterclockwise (90 degrees), and/or Rotate Clockwise (90 degrees).
-
To swap two images in the template, drag one of the images to the box with another image.
-
To remove an image from the template, drag it back to the panel at the bottom.
-
Extraoral X-ray
Do the following:
Note: A phantom, test target, and/or another non-human object should be X-rayed when installing or using any image acquisition device for the first time in Dentrix Ascend Imaging to verify proper operation prior to use on live patients.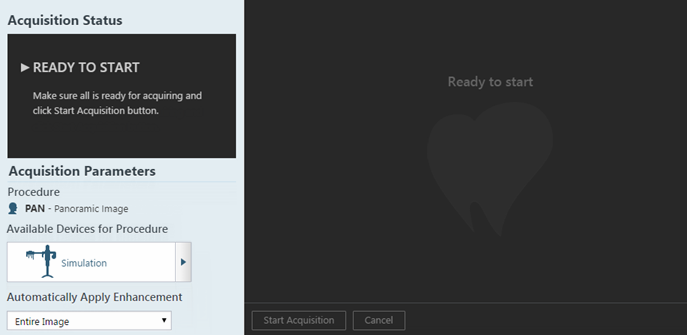
-
To change the acquisition device, select a device in the Available Devices for Procedure button pop-up list.
-
In the Automatically Apply Enhancement list, select the type of enhancement that you want to have applied automatically to the image that will be acquired (Entire Image, For Perio, For Endo), or select Not Enhanced to not apply any enhancement.
Note: When viewing an image after it has been acquired, you can turn the enhancement off and on. The original, raw image is preserved. For more information about enhancements and turning them on and off, see the "Manipulating images" section.
-
Click (or tap) Start Acquisition.
-
Use the options on the TWAIN interface window that appears to get ready to use the X-ray device. Dentrix Ascend Imaging waits to obtain the image from the device.

-
Position the patient properly for your extraoral X-ray imaging device (for example, place the patient in a stand-up panoramic imaging device). Set the appropriate exposure parameters on your X-ray source's control panel, and then trigger the radiation emission, which initiates the capture of the X-ray image. (
Refer to the documentation provided by the manufacturer of your X-ray source for details about changing settings and usage.)Note: Radiation from an X-ray source initiates the imaging device to capture an image, and this is controlled by someone triggering the X-ray source. The Dentrix Ascend Imaging program does not directly control the X-ray source or exposure settings.
The resulting image is saved to the patient's record, and a preview of the image appears.

Note: The saved state of the Smaller/Larger button
, which is available when you are viewing images, affects the preview size of images during acquisitions. The state of the button is stored per computer (or device).
Extraoral X-ray (using a phosphor plate)
Do the following:
Note: A phantom, test target, and/or another non-human object should be X-rayed when installing or using any image acquisition device for the first time in Dentrix Ascend Imaging to verify proper operation prior to use on live patients.-
Put a phosphor plate in your extraoral X-ray imaging device. Position the patient properly for your extraoral X-ray imaging device (for example, place the patient in a stand-up panoramic imaging device). Set the appropriate exposure parameters on your X-ray source's control panel, and then trigger the radiation emission, which initiates the capture of the X-ray image on the phosphor plate. (
Refer to the documentation provided by the manufacturer of your X-ray source for details about changing settings and usage.)Note: Radiation from an X-ray source causes the phosphor plate to capture the image, and this is controlled by someone triggering the X-ray source. The Dentrix Ascend Imaging program does not directly control the X-ray source or exposure settings.

-
To change the acquisition device, select a device in the Available Devices for Procedure button pop-up list.
-
From the Automatically Apply Enhancement list, select the type of enhancement that you want to have applied automatically to the image (Entire Image, For Perio, For Endo), or select Not Enhanced to not apply any enhancement.
Note: When viewing an image after it has been acquired, you can turn the enhancement off and on. The original, raw image is preserved. For more information about enhancements and turning them on and off, see the "Manipulating images" section.
-
Click (or tap) Start Acquisition.
-
When the scanner is ready, put the phosphor plate in the scanner according to the manufacturer's instructions.
When the scanner finishes scanning the plate, the resulting image is saved to the patient's record, and a preview of the image appears.
Note: The saved state of the Smaller/Larger button
, which is available when you are viewing images, affects the preview size of images during acquisitions. The state of the button is stored per computer (or device).
Extraoral X-ray (using a software device)
Do the following:
Note: A phantom, test target, and/or another non-human object should be X-rayed when installing or using any image acquisition device for the first time in Dentrix Ascend Imaging to verify proper operation prior to use on live patients.
-
To change the acquisition device, select a device in the Available Devices for Procedure button pop-up list.
-
From the Automatically Apply Enhancement list, select the type of enhancement that you want to have applied automatically to the image (Entire Image, For Perio, For Endo), or select Not Enhanced to not apply any enhancement.
Note: When viewing an image after it has been acquired, you can turn the enhancement off and on. The original, raw image is preserved. For more information about enhancements and turning them on and off, see the "Manipulating images" section.
-
Click (or tap) Start Acquisition.
The corresponding third-party imaging program opens.
-
Acquire the image in the third-party imaging program. Position the patient properly for your extraoral X-ray imaging device (for example, place the patient in a stand-up panoramic imaging device). Set the appropriate exposure parameters on your X-ray source's control panel, and then trigger the radiation emission, which initiates the capture of the X-ray image. (
Refer to the documentation provided by the manufacturer of your X-ray source for details about changing settings and usage.)Note: Radiation from an X-ray source initiates the imaging device to capture an image, and this is controlled by someone triggering the X-ray source. The Dentrix Ascend Imaging program does not directly control the X-ray source or exposure settings.
-
Close the third-party imaging program.
The resulting image appears in the Dentrix Ascend Imaging program automatically.
Note: The saved state of the Smaller/Larger button
, which is available when you are viewing images, affects the preview size of images during acquisitions. The state of the button is stored per computer (or device).
Intraoral/extraoral photo
Do the following:

-
To change the acquisition device, select a device in the Available Devices for Procedure button pop-up list.
-
Click (or tap) Start Acquisition.
The live video stream from your camera appears.

Note: To tune your camera's settings, you can click (or tap) the Tune Camera button
 .
. -
With the camera properly positioned, use the button on your camera to pause or freeze the live video stream (or click, or tap, Pause Streaming).

-
Use the button on your camera to capture the current video frame (or click, or tap, Take a snapshot).
Note: If alternative button functionality has been enabled for your camera in the acquisition agent settings, you can push the button twice to not capture to current video frame.
The resulting image is added to the snapshot panel, and the video stream automatically becomes live again.

-
Repeat steps c - d as needed to acquire additional snapshots.
-
On the snapshot panel, clear the check box of the snapshots that you do not want to save.

-
Click (or tap) Assign Images.
-
Do any of the following:
-
To save one or more snapshots as intraoral images and assign tooth numbers, select the snapshots that pertain to the same teeth (deselect snapshots that do not pertain to the same teeth), and then drag them to the Select Teeth, UR/UL/LR/LL, Upper Jaw, or Lower Jaw box.

If you drag snapshots to the Select Teeth box, select the applicable teeth, and then click (or tap) Assign Teeth.

-
To save one or more snapshots as extraoral images, select the snapshots that are extraoral images (deselect snapshots that are not extraoral images), and then drag them to the Extraoral Photos box.

-
To save the snapshots on the snapshot panel as intraoral images but not assign tooth numbers at this time, leave those snapshots on the snapshot panel.
Assigned intraoral images appear on the left side of the preview area; extraoral, on the right.

Note: If you have a mix of intraoral and extraoral images, they will be split into two procedures (PHOTOIO and PHOTOEO), which will appear in the progress notes.
-
Intraoral/extraoral photo (using a software device)
Do the following:

-
To change the acquisition device, select a device in the Available Devices for Procedure button pop-up list.
-
Click (or tap) Start Acquisition.
The corresponding third-party imaging program opens.
-
Acquire the images in the third-party imaging program.
-
Close the third-party imaging program.
The resulting images appear as thumbnail images on the panel at the bottom of the Dentrix Ascend Imaging program automatically.
-
Do any of the following:
-
To save one or more snapshots as intraoral images and assign tooth numbers, select the snapshots that pertain to the same teeth (deselect snapshots that do not pertain to the same teeth), and then drag them to the Select Teeth, UR/UL/LR/LL, Upper Jaw, or Lower Jaw box.
If you drag snapshots to the Select Teeth box, select the applicable teeth, and then click (or tap) Assign Teeth.
-
To save one or more snapshots as extraoral images, select the snapshots that are extraoral images (deselect snapshots that are not extraoral images), and then drag them to the Extraoral Photos box.
-
To save the snapshots on the snapshot panel as intraoral images but not assign tooth numbers at this time, leave those snapshots on the snapshot panel.
Assigned intraoral images appear on the left side of the preview area; extraoral, on the right.
Note: If you have a mix of intraoral and extraoral images, they will be split into two procedures (PHOTOIO and PHOTOEO), which will appear in the progress notes.
-
-
-
Click (or tap) Finish Acquisition or Begin Uploading (only for an intraoral X-ray series using phosphor plates or a software device or for intraoral/extraoral photos).
Note: For an intraoral X-ray series using phosphor plates or a software device, if not all thumbnail images have been mounted into the template when you click (or tap) Begin Uploading, a confirmation message appears. If you choose to continue, only the mounted images will be saved.
-
If any images fail to upload, a message appears and provides the option for you to recover the images. Click (or tap) Recover Images to begin the recovery process.
-
For an intraoral X-ray series using phosphor plates or a software device or for intraoral/extraoral photos, when the images are finished being saved to the patient's record, click (or tap) Continue.


Do one of the following:
-
For a set of intraoral photos (or an individual intraoral photo or X-ray), you can assign tooth numbers to a selected snapshot by clicking (or tapping) the Edit button
 .
.For each snapshot that needs tooth numbers assigned to it, do the following:
-
Under Image Navigator, click (or tap) an image thumbnail. You can skip this step if there is only one image thumbnail.
A larger version of the current image appears in the viewing area.

-
Click the Edit button
.The Assign Tooth Numbers dialogue box appears.

-
To change dentition, click (or tap) the Toggle primary/permanent link to show a tooth chart and the dentition buttons, select the applicable teeth, and then click (or tap) the Permanent or Primary button. Repeat this process as needed to change the dentition of other teeth. Then, click (or tap) the Back to assignment link.

-
Select the applicable tooth numbers.
-
Click (or tap) Assign Teeth.
-
-
Acquiring an image for selected teeth
You can quickly acquire an image for the teeth that are selected on a patient's clinical chart.
To acquire an image
-
If the correct patient is not already selected, use the Patient Search box to access the patient's record.
Note: You can include inactive patients in the search results by setting the Include inactive patients switch to On.
-
On the Patient menu, under Clinical, click (or tap) Chart.
The patient's clinical record opens with the Chart tab selected.
-
Select one or more teeth.

-
Do one of the following:
-
If you have selected teeth for a periapical image, on the Imaging tab's menu, click (or tap) PA Quick acquire.

The options to acquire an image become available. Skip steps 5 - 8.
-
On the Imaging tab's menu, click (or tap) Acquire images.
The options for acquiring images become available. Proceed to step 5.
-
-
Under Imaging Procedures, either leave the Standard tab selected, or click (or tap) the Custom tab or the Favorites tab.
Note: Custom and favorite imaging procedures are location specific.
-
Select the procedure that you want to perform (an intraoral periapical or bitewing X-ray image).
The options for the selected procedure become available.

-
Under Billing Options, set up the following options:
-
Apply charges - To post the fee for the selected procedure (such as 1PA for a periapical image), select the check box. To post a zero amount for the procedure, clear the check box.
-
Bill to third party - Specify whether you want to bill or not bill the patient's third party for the procedure by selecting or clearing the check box, respectively.
-
Provider - Select the provider who you want to associate with the procedure. Only providers who have access to the current location are available.
-
-
Under Task to Perform, on the Acquire Images tab, select the desired device in the Available Devices button pop-up list if it is not already selected.
Notes:
-
For the complete list of acquisition devices that are supported by Dentrix Ascend Imaging, see the "Supported Acquisition Devices" section.
-
The first time you attempt to use an intraoral camera with Dentrix Ascend Imaging on any computer, when a message from the browser appears and asks if you want to allow the browser to have access to the camera, allow it.
-
-
Click (or tap) Proceed with Acquisition to start acquiring an image for the corresponding acquisition type.
Note: A phantom, test target, and/or another non-human object should be X-rayed when installing or using any image acquisition device for the first time in Dentrix Ascend Imaging to verify proper operation prior to use on live patients.The selected acquisition device is initialised.
Then, the X-ray sensor is armed.
Then, the X-ray sensor becomes ready for exposure.

-
If you need to change the selected acquisition device, select the correct device on the Available Devices for Procedure list.

-
In the Automatically Apply Enhancement list, select the type of enhancement that you want to have applied automatically to the image that will be acquired (Entire Image, For Perio, For Endo), or select Not Enhanced to not apply any enhancement.
Note: When viewing an image after it has been acquired, you can turn the enhancement off and on. The original, raw image is preserved. For more information about enhancements and turning them on and off, see the "Manipulating images" section.
-
Position the sensor in the patient's mouth, and align your X-ray source cone to point at the sensor, utilising the paralleling or bisecting angle techniques. Set the appropriate exposure time on your X-ray source's control panel for the specific imaging device in use, and then trigger the radiation emission, which initiates the capture of the X-ray image. (
Refer to the documentation provided by the manufacturer of your X-ray source for details about changing settings and usage.)Note: Radiation from an X-ray source initiates the imaging device (sensor) to capture an image, and this is controlled by someone triggering the X-ray source. The Dentrix Ascend Imaging program does not directly control the X-ray source or exposure settings.
Then, the resulting image is saved to the patient's record.

Then, a preview of the image appears.

Notes:
The saved state of the Smaller/Larger button
, which is available when you are viewing images, affects the preview size of images during acquisitions. The state of the button is stored per computer (or device).To replace the image that you just acquired, click (or tap) Recapture. Reacquire the image. In the Select Image dialogue box that appears, click (or tap) either Keep Existing to keep the original image or Keep Recaptured to replace the original image with the new image.
-
Click (or tap) Finish Acquisition.
-
If any images fail to upload, a message appears and provides the option for you to recover the images. Click (or tap) Recover Images to begin the recovery process.
Importing images
You can import image files (.bmp, .png, .jpg, and .tiff files) to attach to a patient's record.
To import images
-
If the correct patient is not already selected, use the Patient Search box to access the patient's record.
Note: You can include inactive patients in the search results by setting the Include inactive patients switch to On.
-
On the Patient menu, under Clinical, click (or tap) Chart, Progress Notes, Quick Exam, Perio, Tx Planner, NHS Claims, or Imaging.
-
On the Chart, Progress Notes, Perio, Tx Planner, NHS Claims, or Imaging tab of a patient's clinical record, on the Imaging tab's menu, click (or tap) Acquire images.
The options for acquiring images become available.
-
Under Imaging Procedures, either leave the Standard tab selected, or click (or tap) the Custom tab or the Favorites tab.
Note: Custom and favorite imaging procedures are location specific.
-
Select the procedure that you want to perform (each corresponds to a particular acquisition type: individual intraoral X-ray, intraoral X-ray series, extraoral X-ray, intraoral photo, or extraoral photo).
The options for the selected procedure become available.
-
Under Billing Options, set up the following options:
-
Apply charges - To post the fee for the selected procedure (such as FMX for a full mouth series), select the check box. To post a zero amount for the procedure, clear the check box.
-
Bill to third party - Specify whether you want to bill or not bill the patient's third party for the procedure by selecting or clearing the check box, respectively.
-
Provider - Select the provider who you want to associate with the procedure. Only providers who have access to the current location are available.
-
-
If you are importing an individual intraoral X-ray image, on the Tooth chart, select the teeth that apply to the current importing session; otherwise, skip this step.
Note: To deselect all selected teeth, click (or tap) the Clear selected link.
-
If you are importing intraoral X-ray images for a series with two types of sequences, under Acquisition sequence, do one of the following (otherwise, skip this step):
-
For a full-mouth series - Select FMX 18 or FMX 21.
-
For a 3-periapical series - Select Maxillary or Mandibular.
-
For a 4-bitewing and 3-periapical series - Select Maxillary or Mandibular.
-
For a 7-bitewing and 3-periapical series - Select Maxillary or Mandibular.
-
-
Under Task to Perform, do one of the following:
-
On the Acquire Images tab, select the Import From File device in the Available Devices button pop-up list if it is not already selected.

Note: For the complete list of acquisition devices that are supported by Dentrix Ascend Imaging, see the "Supported Acquisition Devices" section.
-
On the Import Images tab, select one of the following options:
-
Existing Procedure - Use this for a procedure that was performed prior to today (and may already have been billed to the patient's third party). Specify the date that the procedure was performed.
Note: With this option selected, the Apply charges and Bill to third party check boxes under Billing Options become unavailable because the procedure will be posted with a zero dollar fee and will not be billed to a third party.
-
Completed Procedure - Use this for a procedure that you are performing. Today's date and time will be associated with the procedure.

-
-
-
Click (or tap) Proceed with Acquisition.
-
Do one of the following:
-
For X-ray images - To import one or more intraoral or extraoral X-ray images, do one of the following:
-
If Import from File was selected as the acquisition device on the Acquire Images tab in step 10, click (or tap) Start Acquisition.
-
If the Import Images tab was selected in step 10, click (or tap) Start Importing.

-
-
For photos - To import one or more intraoral or extraoral photos, do one of the following:
-
If Import from File was selected as the acquisition device on the Acquire Images tab in step 10, click (or tap) Start Acquisition.
-
If the Import Images tab was selected in step 10, click (or tap) Start Importing.

-
The Import File dialogue box appears.

-
-
Select the desired image files, and then click (or tap) Open.
For an intraoral X-ray series, intraoral photos, or extraoral photos, the selected image files appear as thumbnail images on the panel at the bottom of the Dentrix Ascend Imaging program.

-
For an intraoral X-ray series, intraoral photos, or extraoral photos, repeat steps 10 - 11 as needed to import additional images.
-
For X-ray images, from the Automatically Apply Enhancement list, select the type of enhancement that you want to have applied automatically to the images (Entire Image, For Perio, For Endo), or select Not Enhanced to not apply any enhancement.
Note: When viewing an image after it has been imported, you can turn the enhancement off and on. The original, raw image is preserved. For more information about enhancements and turning them on and off, see the "Manipulating images" section.
-
For an intraoral X-ray series, do the following:
-
One at a time, drag the thumbnail images from the panel to the appropriate boxes of the template.
-
Do any of the following:
-
To change the orientation of an image in the template, select it to view the toolbar, and then click (or tap) any of the available buttons as needed: Flip Horizontal, Flip Vertical, Rotate Counterclockwise (90 degrees), and/or Rotate Clockwise (90 degrees).
-
To swap two images in the template, drag one of the images to the box with another image.
-
To remove an image from the template, drag it back to the panel at the bottom.
-
-
-
For intraoral or extraoral photos, do the following:
-
Clear the check box of any thumbnail image on the panel that you do not want to save to the patient's record.
-
Click (or tap) Assign Images.
-
Do any of the following:
-
To save one or more snapshots as intraoral images and assign tooth numbers, select the snapshots that pertain to the same teeth (deselect snapshots that do not pertain to the same teeth), and then drag them to the Select Teeth, UR/UL/LR/LL, Upper Jaw, or Lower Jaw box.
If you drag snapshots to the Select Teeth box, select the applicable teeth, and then click (or tap) Assign Teeth.

-
To save one or more snapshots as extraoral images, select the snapshots that are extraoral images (deselect snapshots that are not extraoral images), and then drag them to the Extraoral Photos box.
-
To save the snapshots on the snapshot panel as intraoral images but not assign tooth numbers at this time, leave those snapshots on the snapshot panel.
Assigned intraoral images appear on the left side of the preview area; extraoral, on the right.
-
-
-
Click (or tap) Finish Acquisition (only for an individual intraoral or extraoral X-ray image) or Begin Uploading (only for an intraoral X-ray series, intraoral photos, or extraoral photos).
Note: For an intraoral X-ray series, if not all thumbnail images have been mounted into the template when you click (or tap) Begin Uploading, a confirmation message appears. If you choose to continue, only the mounted images will be saved.
-
If any images fail to upload, a message appears and provides the option for you to recover the images. Click (or tap) Recover Images to begin the recovery process.
-
For an intraoral X-ray series, intraoral photos, or extraoral photos, when the images are finished being saved to the patient's record, click (or tap) Continue.
-
For a set of intraoral photos (or an individual intraoral photo or X-ray), you can assign tooth numbers to a selected snapshot by clicking the Edit button
.For each snapshot that needs tooth numbers assigned to it, do the following:
-
Under Image Navigator, click (or tap) an image thumbnail. You can skip this step if there is only one image thumbnail.
A larger version of the current image appears in the viewing area.
-
Click the Edit button
.The Assign Tooth Numbers dialogue box appears.
-
Select the applicable tooth numbers.
-
Click (or tap) Assign Teeth.
-
Modifying exams
You can resume incomplete exams, retake images in an exam, and recover missing images. You can also rearrange images in a set of images.
Resuming incomplete exams or retaking images
If you skipped the acquisition of any images in an exam that uses a set of images or canceled an exam before acquiring all the images, you can return to that exam and complete the image acquisitions as needed. You can also resume an exam to retake any or all of the images in that exam.
To resume an incomplete exam or retake images
-
If the correct patient is not already selected, use the Patient Search box to access the patient's record.
Note: You can include inactive patients in the search results by setting the Include inactive patients switch to On.
-
On the Patient menu, under Clinical, click (or tap) Chart, Progress Notes, Quick Exam, Perio, Tx Planner, NHS Claims, or Imaging. Then, on the Imaging tab's menu, click (or tap) Show Image History.

The patient's imaging page opens to the history view, and the most recent image or series (such as a full mouth series or bitewings) is selected by default on the Images tab.

-
Select a series (such as a full mouth series or bitewings).
-
On the corresponding options menu, click (or tap) Resume exam. This option is available only if the exam is a series.

The Acquisition Options dialogue box appears.

-
Under Acquisition sequence, select "Default sequence" or a custom order (if any).
-
Click (or tap) Proceed with Acquisition.
The options for acquiring images in the series appear.

-
Acquire missing images or retake images for the exam by doing any of the following as needed:
-
If any images are missing, the first missing image in the sequence is selected automatically, so acquire the image. The next missing image in the sequence is selected automatically, so acquire the image. Repeat this process for any other missing images that you want to acquire as each one is selected.
-
If you are retaking an image, click (or tap) Skip Backward or Skip Forward as needed to navigate to the desired image in the sequence. The acquisition is paused automatically. Click (or tap) Recapture, and then acquire the image. Next, in the Select Image dialogue box that appears, click (or tap) either Keep Existing to keep the original image or Keep Recaptured to replace the original image with the new one.
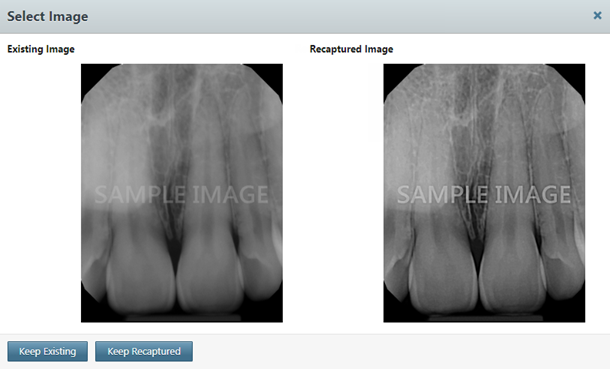
Repeat this process for any other images that you want to retake.
Note: When the acquisition is paused (manually or automatically), the Pause button changes to either the Recapture button (for a box in the template with an existing image) or the Capture button (for an empty box in the template).
-
-
Click (or tap) Finish Acquisition.
Note: Once the acquisition device is ready to acquire an image, the Cancel button changes to the Finish Acquisition button.
-
If any images fail to upload, a message appears and provides the option for you to recover the images. Click (or tap) Recover Images to begin the recovery process.
Recovering images
If an individual image or any images in a set did not get uploaded to the server, you can recover those images from the computer where those images were acquired.
To recover images
-
If the correct patient is not already selected, use the Patient Search box to access the patient's record.
Note: You can include inactive patients in the search results by setting the Include inactive patients switch to On.
-
On the Patient menu, under Clinical, click (or tap) Chart, Progress Notes, Quick Exam, Perio, Tx Planner, NHS Claims, or Imaging. Then, on the Imaging tab's menu, click (or tap) Show Image History.
The patient's imaging page opens to the history view, and the most recent image or series (such as a full mouth series or bitewings) is selected by default on the Images tab.
-
Select an image or a series (such as a full mouth series or bitewings).
-
On the corresponding options menu, click (or tap) Recover images.

The options for recovering images appear.

-
In the Recover Images From list, select either The past two days to search for images from the past two days or All time to search for images from any time in the past.
-
Click (or tap) Start Recovery.
The images that can be recovered appear in the panel at the bottom of the page.

-
One at a time, drag the correct thumbnail images from the panel to the appropriate boxes of the template. For intraoral or extraoral photos, you can select multiple thumbnail images on the panel and then drag them together.
-
Click (or tap) Begin Uploading.
Rearranging images in exams
You can rearrange images within an exam that uses a set of images.
To rearrange images in an exam
-
If the correct patient is not already selected, use the Patient Search box to access the patient's record.
Note: You can include inactive patients in the search results by setting the Include inactive patients switch to On.
-
On the Patient menu, under Clinical, click (or tap) Chart, Progress Notes, Quick Exam, Perio, Tx Planner, NHS Claims, or Imaging. Then, on the Imaging tab's menu, click (or tap) Show Image History.
The patient's imaging page opens to the history view, and the most recent image or series (such as a full mouth series or bitewings) is selected by default on the Images tab.
-
Select a series (such as a full mouth series or bitewings).
-
On the corresponding options menu, click (or tap) Re-arrange exam.

The Re-arrange Image dialogue box appears.
-
Do any of the following as needed:
-
To swap two images in the template, drag one of the images to the box with another image.

-
To move an image to an empty box in the template, drag the image to the desired box.
-
To change the orientation of an image in the template, select it to view the toolbar, and then click (or tap) any of the available buttons as needed: Flip Horizontal, Flip Vertical, Rotate Counterclockwise (90 degrees), and/or Rotate Clockwise (90 degrees).
When you have moved, or changed the orientation of, at least one image, the Confirm button becomes available.

-
-
When you have finished rearranging the images, click (or tap) Confirm.
Viewing images
You can view the recent images and the image history for a patient. You can also quickly determine which teeth have images and view images for selected teeth.
Viewing recent images
You can view a patient's most recent images by category. This is the default view when you select the Imaging tab of the patient's clinical record.
To view a patient's recent images
-
If the correct patient is not already selected, use the Patient Search box to access the patient's record.
Note: You can include inactive patients in the search results by setting the Include inactive patients switch to On.
-
Do one of the following:
-
On the Patient menu, under Clinical, click (or tap) Imaging.
-
On the Patient menu, under Clinical, click (or tap) Chart, Progress Notes, Quick Exam, Perio, or Tx Planner. Then, on the Imaging tab's menu, click (or tap) Show Most Recent Images.

The patient's recent images appear.

-
-
In any of the boxes, which correspond to categories (intraoral X-rays, intraoral photos, extraoral photos, extraoral X-rays, CAD/CAM scans, and 3D volumes), do any of the following:
-
Click (or tap) the Previous button
 to view an image that was acquired prior to the image being displayed currently. This button is available only if there is an older image.
 -
If you have navigated to an older image, click (or tap) the Next button
 to view a more recent image.
 -
Click (or tap) the image being displayed currently to view that image larger. The image will open in the image history view. For information about using the image history view, see the "Viewing history" section.
Note: If you click (or tap) a specific image of a series (such as a full mouth series or bitewings), that image appears by itself, and you can easily navigate through the other images in that series in the patient's image history view.

-
Viewing image history
You can view a patient's entire image history chronologically and quickly navigate between each image. Also, in the history view, you can view individual images larger than you can in the recent images view, and you can manipulate (such as annotate) an image. For information about using the recent images view, see the "Viewing recent images" section. For information about manipulating images, see the "Manipulating images" section.
To view a patient's image history
-
If the correct patient is not already selected, use the Patient Search box to access the patient's record.
Note: You can include inactive patients in the search results by setting the Include inactive patients switch to On.
-
On the Patient menu, under Clinical, click (or tap) Chart, Progress Notes, Quick Exam, Perio, Tx Planner, NHS Claims, or Imaging. Then, on the Imaging tab's menu, click (or tap) Show Image History.
The patient's imaging page opens to the history view, and the most recent image or series (such as a full mouth series or bitewings) is selected by default on the Images tab.
-
If needed, filter the list of images on the Images tab to display only the images that match the filter criteria that you specify.
Do the following:
-
Click (or tap) in the Narrow down the results field to view the available filters.

-
Set up any of the following filters:
-
Date - To view the images according to a different date, select the desired date in the list under Show images taken on. To view all images that have been acquired on and after the selected date, select the All since that day check box. To view the images that were acquired only on the selected date, clear the All since that day check box.
-
Type - To view images in any category (intraoral X-rays, intraoral photos, intraoral photos without tooth numbers assigned, extraoral X-rays, and extraoral photos), select the All types check box. To view images in only certain categories, make sure the check boxes of only those categories are selected; the other check boxes must be cleared.
-
Teeth - If the Intraoral X-ray and/or Intraoral photo check boxes are selected, to view those types of images for specific teeth, select the desired teeth on the Tooth Chart. The tooth filter does not apply to intraoral photos that do not have tooth numbers assigned to them and extraoral X-rays (which apply to all teeth), and extraoral photos (which apply to all teeth). To clear all tooth selections, click (or tap) the Clear selected link.
-
Show everything - To set the filter options to their default states and display all the patient's images, click (or tap) the Show everything link.
The image list displays the images that match your filter criteria. Additionally, if you select a series of images, the first image of that series that matches the criteria is selected and shown in the viewing area.
-
-
Click (or tap) the X in the upper-right corner of or anywhere outside of the Narrowing Down the Results menu to close the menu.
-
-
With an image or a series selected, do any of the following:
-
Navigate the series - If you have selected a series (such as a full mouth series or bitewings), to navigate between the images of that series, click (or tap) each image of the series under Image Navigator. A larger version of the current image (highlighted with a yellow box) in the series appears in the viewing area.

Note: You can also click (or tap) the Previous and Next buttons
 to navigate between the images in the set.
 -
Zoom in/out - To increase the zoom level (zoom in), move the Zoom slider to the right. To decrease the zoom level (zoom out), move the slider to the left. If you are using a mouse, you can also zoom in and out by positioning the pointer over the image (the pointer will change to cross hairs) and then rotating the scroll wheel of your mouse.

If you increase the zoom so that the whole image no longer fits in the viewing area, the Pan dialogue box appears. Drag the red box around on the thumbnail image in the dialogue box to display the area within the red box in the main viewing area. Additionally, the Pan dialogue box automatically hides two seconds after you move your pointer away from the dialogue box or click (or tap) elsewhere, and it reappears if you position your pointer or click (or tap) in the lower-right corner of the viewing area where the dialogue box had appeared previously.

-
Quickly resize - By default Dentrix Ascend Imaging displays images as large as it can in the viewing area. This can cause the images from some older devices or programs to look fuzzy or grainy. To view the image smaller and sharper, click (or tap) the Smaller/Larger button
 . The button becomes orange . To view the image as large as it can be and still all fit in the viewing area, click (or tap) the button again.
Note: The state of the Smaller/Larger button also affects the preview size of images during acquisitions and the size of images in the Image Peek dialogue box. The state of the button is stored per computer (or device).
-
View full screen - To view the image full screen, click (or tap) the Full Screen button
 . To return to the normal view mode, click (or tap) the Normal Mode button
  .
. -
View the entire series - If you have selected a series (such as a full mouth series or bitewings), to view all the images in the series at once in the viewing area, click (or tap) the Series Mode button
 . Then, to return to the single-image view mode, do one of the following:
-
Click (or tap) an image in the viewing area to view only that image.
-
Click (or tap) an image under Image Navigator to view only that image.

-
Click (or tap) the Single Mode button
 .
.
Note: You can zoom in and out while viewing a series.
-
-
View recaptured images - If the image being displayed has been recaptured, View Recaptured is available (as a button or an option on the More button menu).

To view other versions of the image and even choose which one should be active (visible when viewing the exam), either click (or tap) the View Recaptured button, or select the View Recaptured option on the More button menu. The View Recaptured Images dialogue box appears.

The current image appears on the left; other versions, on the right. To navigate between each version, next to Recaptured Image, click (or tap) the Previous and Next buttons
. To use the image being displayed under Recaptured Image instead of the one under Current Image for the exam, click (or tap) Replace Current.Note: Dentrix Ascend always stores all original and recaptured images.
-
Determining which teeth have images
You can determine which teeth have images associated with them from a patient's clinical chart and progress notes.
To determine which teeth have images
-
If the correct patient is not already selected, use the Patient Search box to access the patient's record.
Note: You can include inactive patients in the search results by setting the Include inactive patients switch to On.
-
On the Patient menu, under Clinical, click (or tap) Chart.
The patient's clinical record opens with the Chart tab selected.
-
Do one of the following:
-
Look at a tooth's number. You can tell if a tooth has an image associated with it, and the age of that image, by the background colour of the circle around that tooth number: black is 0 - 6 months, dark grey is 7 - 12 months, light grey is 13 - 24 months, and white is 25 or more months (or no image).

-
Select one or more or no teeth, and then click (or tap) the Progress Notes tab. On the Progress Notes tab, there is an imaging icon next to any procedure that has images associated with it.

-
Select one or more or no teeth, and then click (or tap) the Quick Exam tab. On the Quick Exam tab, look at a tooth's number. You can tell if a tooth has an image associated with it, and the age of that image, by the background colour of the circle around that tooth number: black is 0 - 6 months, dark grey is 7 - 12 months, light grey is 13 - 24 months, and white is 25 or more months (or no image).

-
Viewing images for selected teeth
You can view images for selected teeth from a patient's clinical chart and progress notes.
To view images for selected teeth
-
If the correct patient is not already selected, use the Patient Search box to access the patient's record.
Note: You can include inactive patients in the search results by setting the Include inactive patients switch to On.
-
On the Patient menu, under Clinical, click (or tap) Chart.
The patient's clinical record opens with the Chart tab selected.
-
Do one of the following:
-
Select one or more teeth with associated images, and then click (or tap) Image Peek. The button is available only if at least one tooth with an image is selected.

-
Select one or more teeth with associated images, and then click (or tap) the Progress Notes tab. On the Progress Notes tab, click (or tap) the imaging icon next to a procedure.
-
Select one or more teeth with associated images, and then click (or tap) the Quick Exam tab. On the Quick Exam tab, click (or tap) Image Peek (the button appears as a white tooth on a blue background
 if there is not enough room to display the button with a text label). The button is available only if at least one tooth with an image is selected.
The Image Peek dialogue box appears.

Tips:
-
If there are multiple images, use the Back and Forward buttons
 to navigate between the images.
 -
To manipulate the image that is currently being viewed, click (or tap) the Open for Editing button
 .
.
Note: The saved state of the Smaller/Larger button
, which is available when you are viewing images, affects the size of images in the Image Peek dialogue box. The state of the button is stored per computer (or device). -
-
Click (or tap) Done.
Comparing images
Comparing images
You can compare two images side by side.
To compare images
-
If the correct patient is not already selected, use the Patient Search box to access the patient's record.
Note: You can include inactive patients in the search results by setting the Include inactive patients switch to On.
-
Do one of the following:
-
View an image from the patient's image history list.
-
On the Patient menu, under Clinical, click (or tap) Chart, Progress Notes, Quick Exam, Perio, Tx Planner, NHS Claims, or Imaging. Then, on the Imaging tab's menu, click (or tap) Show Image History.
-
On the Images tab, select an image or a series (such as a full mouth series or bitewings).
-
If you have selected a series, under Image Navigator, click (or tap) an image of that series.
-
-
View one of the patient's most recent images.
-
Do one of the following:
-
On the Patient menu, under Clinical, click (or tap) Imaging.
-
On the Patient menu, under Clinical, click (or tap) Chart, Progress Notes, Quick Exam, Perio, Tx Planner, NHS Claims, or Imaging. Then, on the Imaging tab's menu, click (or tap) Show Most Recent Images.
-
-
Click (or tap) any single image (intraoral X-ray, intraoral photo, extraoral photo, or extraoral X-ray) or an image within a series (such as a full mouth series or bitewings).
-
The selected image appears in the viewing area.

-
-
Click (or tap) Compare.
The images that have tooth numbers in common with the selected image (the "Original") appear on the Images for tooth range panel.

-
If needed, filter the Images for tooth range panel to display only the images that match the filter criteria that you specify.
Do the following:
-
Click (or tap) the Edit button
 (at the top of the panel) to view the available filters.
-
Set up any of the following filters:
-
Date - To view the images according to a different date, select the desired date in the list under Show images taken on. To view all images that have been acquired on and after the selected date, select the All since that day check box. To view the images that were acquired only on the selected date, clear the All since that day check box.
-
Type - To view images in any category (intraoral X-rays, intraoral photos, intraoral photos without tooth numbers assigned, extraoral X-rays, and extraoral photos), select the All types check box. To view images in only certain categories, make sure the check boxes of only those categories are selected; the other check boxes must be cleared.
-
Teeth - If the Intraoral X-ray and/or Intraoral photo check boxes are selected, to view those types of images for specific teeth, select the desired teeth on the Tooth Chart. The tooth filter does not apply to intraoral photos that do not have tooth numbers assigned to them and extraoral X-rays (which apply to all teeth), and extraoral photos (which apply to all teeth). To clear all tooth selections, click (or tap) the Clear selected link.
-
Show everything - To set the filter options to their default states and display all the patient's images, click (or tap) the Show everything link.
The image list displays the images that match your filter criteria. Additionally, if you select a series of images, the first image of that series that matches the criteria is selected and shown in the viewing area.
-
-
Click (or tap) the X in the upper-right corner of or anywhere outside of the Narrowing Down the Results menu to close the menu.
-
-
The first image on the Images for tooth range panel is selected by default, but you can select a different image to compare with the original.
-
To modify how an image is being viewed, click (or tap) the Original or Compared image, and then do any of the following for the selected image:
-
Use the (yellow or blue) Brightness/Contrast button to change the brightness and/or contrast.
-
Use the (yellow or blue) Zoom slider to zoom in and out.
-
While zoomed in on an image, drag the blue square (on the comparison image on the Images for tooth range panel) or the yellow square (on the image under Image Navigator) to pan to another part of the image.
-
-
Linking the images being compared allows the zooming and panning of one image to be synchronised with the other. To link images, do the following:
-
Click (or tap) the Original or Compared image (zoomed and panned or not).

-
Click (or tap) the (yellow or blue) Link button
 .
.The images are linked.
Note: If you alter the zoom and/or pan of an image before linking it to the other, when you link them, the zoom factor and the position of the pan box (red box) of the other image is synchronised to be the same as the first.
Now, as you zoom in and out and pan, both images are affected.

Note: To unlink the images, click (or tap) the Link button
 .
. -
-
Click (or tap) Finish Comparison.
Manipulating images
Manipulating images
You can perform various tasks to manipulate images.
Note: Any manipulation of an image is permanent (except for colourise, greyscale, and emboss, which are temporary). However, you can view the image in its original state by turning off any filters that you have applied.
To manipulate an image
-
If the correct patient is not already selected, use the Patient Search box to access the patient's record.
Note: You can include inactive patients in the search results by setting the Include inactive patients switch to On.
-
Do one of the following:
-
View an image from the patient's image history list.
-
On the Patient menu, under Clinical, click (or tap) Chart, Progress Notes, Quick Exam, Perio, Tx Planner, NHS Claims, or Imaging. Then, on the Imaging tab's menu, click (or tap) Show Image History.
-
On the Images tab, select an image or a series (such as a full mouth series or bitewings).
-
If you have selected a series, under Image Navigator, click (or tap) an image of that series.
-
-
View one of the patient's most recent images.
-
Do one of the following:
-
On the Patient menu, under Clinical, click (or tap) Imaging.
-
On the Patient menu, under Clinical, click (or tap) Chart, Progress Notes, Quick Exam, Perio, Tx Planner, NHS Claims, or Imaging. Then, on the Imaging tab's menu, click (or tap) Show Most Recent Images.
-
-
Click (or tap) any single image (intraoral X-ray, intraoral photo, extraoral photo, or extraoral X-ray) or an image within a series (such as a full mouth series or bitewings).
-
The selected image appears in the viewing area.
-
-
Click (or tap) the Tools tab if it is not already selected.

-
Use any of the following tools as needed:
One Click Tools

-
Enhance - Select the filter that corresponds to the anatomical structures that you want to enhance in an X-ray:
-
Not Enhanced - The image is not enhanced.
-
Entire Image - Adds a balance of sharpening and contrast levels that affects the overall sharpness and contrast.
-
For Perio - Adds a lower level of sharpening and a grey level adjustment to accentuate the subtle differences in the greyscale values of periodontal conditions.
-
For Endo - Adds a higher level of sharpening and contrast and a grey level adjustment to accentuate endodontic conditions. You may want to use this filter, for example, to help you to see the position of a file in relation to the root of a tooth when doing a root canal.
Note: To switch between viewing the image with or without an applied enhancement, click (or tap) the Enhancement button. If the enhancement is turned on, the button is grey
 . If the enhancement is turned off, the button is orange
  .
. -
-
Rotate - Click (or tap) the button that corresponds to how you want to rotate the image: 180 degrees (clockwise), 90 degrees (clockwise), or -90 degrees (counterclockwise).
-
Flip - Click (or tap) the button that corresponds to how you want to flip the image: Horizontal or Vertical.
-
Invert - To invert the image's colours, select the Invert check box. To remove the filter, clear the check box.
-
Colorize (X-rays only) - To convert the image from greyscale to colour, select the Colorize check box. To remove the filter, clear the check box. This option is available only for intraoral and extraoral X-rays.
-
Grayscale (Photos only) - To convert the image from colour to greyscale, select the Grayscale check box. To remove the filter, clear the check box. This option is available only for intraoral and extraoral photos.
-
Emboss - To emboss the image, select the Emboss check box. To remove the filter, clear the check box.
Annotations

To add a shape, do the following:
-
Under Drawing tools, select a shape: arrow, rectangle, or circle
-
Select a line color and thickness:
-
Select a colour from the Colors menu, or click (or tap) one of the Last used colors.
-
Select an Outline width: extra thin, thin, standard, wide, or extra wide. A preview of the selected line thickness that will be used for the shape appears.
-
-
Click (or tap) and drag over a specific area of the image to create the shape.
To add text, do the following:
-
Under Drawing tools, select the T (text) option.

-
Select a font color and size:
-
Select a colour from the Colors menu, or click (or tap) one of the Last used colors.
-
Select a Text size: small, normal, medium, large, or extra large. A preview of the selected font size that will be used for the text appears.
-
-
Click (or tap) and drag to create a rectangle with dashed borders around the area of the image that you want to draw attention to.
The Text Annotation dialog box appears.

-
Enter the desired Text.
-
Click (or tap) Create text.
The text appears above the rectangle that you created in step c.
Notes:
-
To remove the last annotation that you added to the image, click (or tap) Undo.
-
To remove all annotations from the image, click (or tap) Clear All.
-
To switch between showing and hiding the annotations, select and clear the Show check box.
-
To switch between showing and hiding annotations and measurements, click (or tap) the Annotations/Measurements button
 . The button is available only if an annotation or a measurement has been applied to the image.
Measurements

Important: Distance and Angle measurements are calculated from specified points after calibration from an object with a known length. Image resolution, displayed size, inherent image quality, and proper calibration all affect the accuracy of the measurement results. However, the factors that have the greatest effect on the overall precision of a measurement are the accuracy of the calibration and selection of the start and end points of the actual line or angle to be measured. Using the calibration results, you can decide as to whether the overall accuracy achieved is correct for the desired measurement.
Precaution: It is your responsibility to properly calibrate prior to clinical measurements and to determine if the accuracy achieved is within the error range required.To add measurements, do the following:
-
To calibrate distance measurements using an object of known size in the image, click (or tap) Calibrate. Click (or tap) the first (starting) point of the known-length object on the image where you want to start measuring, and then drag to another point on the known-length object. Change the length of the Standard for calibration as needed to the correct number of millimeters for the known length.
Perform the above calibration step until you are comfortable that you can measure the calibration object accurately and that the displayed results have the accuracy needed. Now that you have defined the length of the segment, all dynamic measurements will be calculated respective to that calibration.
Note: For most sensors that integrate directly with Dentrix Ascend Imaging, it may not be necessary to calibrate images taken with those sensors.
-
Click (or tap) Dynamic Measure.

-
Click (or tap) a point on the image, then another point, and so on until you have created all the necessary lines.
Notes:
-
To remove the last measurement that you added to the image, click (or tap) Undo.
-
To remove all measurements from the image, click (or tap) Clear All.
-
To show the calculated length of each line segment, select the Show segment length (SL) check box.
-
To show the calculated angle where two line segments meet, select the Show angle (A) check box.
-
To switch between showing and hiding the lines and their calculated lengths and angles, select and clear the Show check box.
-
When you initially access the Measurements tool, any annotations hide automatically. To switch between showing and hiding annotations and measurements, click (or tap) the Annotations/Measurements button
. The button is available only if an annotation or a measurement has been applied to the image.
Density (Line)

Important: Density measurements are calculated from specified points on the image and are reported from the actual pixel values selected. Image resolution, displayed size, and inherent image quality can all affect the accuracy of the Density measurement. However, the factor which has the greatest effect on the overall precision of a density measurement is the accuracy of the selected point or points to be measured.
To get the density (grey level) from one point to another on the image (X-ray images only), do the following:
-
Click (or tap) Line.
-
Click (or tap) a point on the image, then another point to create a line.
A graph of the grey levels along the specified line appears, and the average Gray level is indicated.
Note: To remove the density line, click (or tap) Clear.
Density (Rectangle)

To get the density (grey level) of a rectangular area on the image (X-ray images only), do the following:
-
Click (or tap) Rectangle.
-
Click (or tap) and drag to create a rectangle.
The Average gray level is indicated.
Spotlight

To add spotlights, do the following:
-
Select an Effect: Invert, Colorize (for X-ray images only), Zoom x2, Sharpen, or Contrast.
-
Move the Spot size slider to specify the size of the spotlight.
-
Click (or tap) a specific area of the image to place the spotlight. A spotlight with a red border appears.
Invert

Colorize

Zoom x2

Sharpen

Contrast

-
To move the spotlight, click (or tap) another area of the image.
-
To suspend the spotlight on the image so that you can add other spotlights, click (or tap) Suspend. The border of the spotlight turns blue.

-
Repeat steps a-e as needed to continue adding spotlights.

Note: To remove all spotlights, click (or tap) Clear Suspended, or select another tool.
-
-
Adjust the brightness and/or contrast as needed.
Do the following:
-
Click (or tap) the Brightness/Contrast button.

-
Do any of the following:
-
Move the Brightness slider to decrease or increase the brightness.
-
Move the Contrast slider to decrease or increase the contrast.
-
To reset the brightness and contrast levels to their default states, click (or tap) the Reset to default link.
Note: If you change the brightness or contrast, the corresponding button becomes orange
 .
. -
-
Deleting images
Deleting images
You can delete a single image or a series of images from a patient's record.
Notes: The procedures that are associated with the images that you are deleting will also be deleted or voided (if older than 120 days).
To delete images
-
If the correct patient is not already selected, use the Patient Search box to access the patient's record.
Note: You can include inactive patients in the search results by setting the Include inactive patients switch to On.
-
On the Patient menu, under Clinical, click (or tap) Chart, Progress Notes, Quick Exam, Perio, Tx Planner, NHS Claims, or Imaging. Then, on the Imaging tab's menu, click (or tap) Show Image History.
The patient's imaging page opens to the history view, and the most recent image or series (such as a full mouth series or bitewings) is selected by default on the Images tab.
-
Select an image or a series (such as a full mouth series or bitewings).
-
If you have selected a series, and you want to delete a specific image of that series, under Image Navigator, click (or tap) that image.
-
Do one of the following:
-
Delete the entire series or the exam with one image:
-
On the corresponding options menu, click (or tap) Delete exam.

The Delete Exam confirmation message appears.

-
Click (or tap) Delete.
-
-
Delete the selected image within the series:
-
Either click (or tap) the Delete button, or select the Delete Image option on the More button menu.

A confirmation message appears.
-
Click (or tap) Yes.
-
-
Reassigning images to a different patient
Reassigning images to a different patient
You can move a single image or a series of images from one patient's record to another's.
Note: The procedures that are associated with the images that you are moving will be deleted or voided (if older than 120 days) in the original patient's record and posted to the new patient's record.
To manipulate an image
-
If the correct patient is not already selected, use the Patient Search box to access the patient's record.
Note: You can include inactive patients in the search results by setting the Include inactive patients switch to On.
-
On the Patient menu, under Clinical, click (or tap) Chart, Progress Notes, Quick Exam, Perio, Tx Planner, NHS Claims, or Imaging. Then, on the Imaging tab's menu, click (or tap) Show Image History.
The patient's imaging page opens to the history view, and the most recent image or series (such as a full mouth series or bitewings) is selected by default on the Images tab.
-
Select an image or a series (such as a full mouth series or bitewings).
-
On the corresponding options menu, click (or tap) Reassign exam.

The Reassign Exam dialogue box appears.

-
Use the to the following patient search box to search for and select the name of the patient to whom you want to move the images.
-
Click (or tap) Reassign Exam.
Sharing images
You can export and print images.
Exporting images
You can export an image, a specific image of a series, or an entire series (such as a full mouth series).
To export images
-
If the correct patient is not already selected, use the Patient Search box to access the patient's record.
Note: You can include inactive patients in the search results by setting the Include inactive patients switch to On.
-
Do one of the following:
-
View an image or a series in the patient's image history list.
-
On the Patient menu, under Clinical, click (or tap) Chart, Progress Notes, Quick Exam, Perio, Tx Planner, NHS Claims, or Imaging. Then, on the Imaging tab's menu, click (or tap) Show Image History.
-
On the Images tab, select an image or a series (such as a full mouth series or bitewings).
-
-
View one of the patient's most recent images.
-
Do one of the following:
-
On the Patient menu, under Clinical, click (or tap) Imaging.
-
On the Patient menu, under Clinical, click (or tap) Chart, Progress Notes, Quick Exam, Perio, Tx Planner, NHS Claims, or Imaging. Then, on the Imaging tab's menu, click (or tap) Show Most Recent Images.
-
-
Click (or tap) any single image (intraoral X-ray, intraoral photo, extraoral photo, or extraoral X-ray) or an image within a series (such as a full mouth series or bitewings).
-
The selected image (or the first of the selected series) appears in the viewing area.
-
-
If you are viewing a series (such as a full mouth series or bitewings), to view a differrent image of that series, under Image Preview, click (or tap) an image. Otherwise, skip this step.

-
Do one of the following:
-
Click (or tap) Share.

-
From the options menu of the image or series, click (or tap) Share exam.

The Exam or Image(s) to be shared dialogue box appears.

Note: If you used the Share button, by default, the Selected images(s) option under Share exam as is selected, and the image that was being viewed is selected (as indicated by the yellow box around the individual image in the preview area).

Note: If you used the Share exam menu option, by default, the Selected images(s) option under Share exam as is selected, and the series is selected (as indicated by the yellow box around the entire preview area).
-
-
Set up the following options:
-
Include image enhancements - Select this check box to apply an enhancement, which adds a balance of sharpening and contrast levels that affects the overall sharpness and contrast, to any of the images being exported that have enhancement applied to their originals. Any images being exported that do not have enhancement applied to their originals will not be exported with enhancement. Clear this check box to not enhance any of the images being exported even if enhancement has been applied to their originals.
-
Include annotations and measurements - Select this check box to include any annotations or measurements that were added to the images being exported. Clear this check box to export the images without the annotations and measurements.
-
Export as JPEG (Otherwise PNG) - Select this check box to export the selected images as .jpg files. Clear this check box to export the selected images as .png files. If you are exporting multiple images, they will be saved as individual images in one compressed folder.
-
Share exam as - For a series, do one of the following:
-
To export the series as one file that contains all the images, select the Entire exam in one image option. A yellow box appears around the entire preview area to indicate that the series is being exported.
-
To export each image in the series as an individual file, select the Entire exam in separate image(s) option. A yellow box appears around the entire preview area to indicate that the series is being exported.
-
To export only some of the images in the series, each as an individual file, select the Selected image(s) option, and then click (or tap) the desired images in the preview area. Yellow boxes appear around the selected images to indicate that those images are being exported. If necessary, you can click (or tap) a selected image to remove the yellow box unless only one image is selected.
Note: If the series is selected (the entire preview area has a yellow box around it), and you click (or tap) an image in the series, the Selected image(s) option becomes selected automatically.
-
-
-
Click (or tap) Export.
The images are downloaded.
Printing images
You can print an image, a specific image of a series, or an entire series (such as a full mouth series).
To print images
-
If the correct patient is not already selected, use the Patient Search box to access the patient's record.
Note: You can include inactive patients in the search results by setting the Include inactive patients switch to On.
-
Do one of the following:
-
View an image or a series in the patient's image history list.
-
On the Patient menu, under Clinical, click (or tap) Chart, Progress Notes, Quick Exam, Perio, Tx Planner, NHS Claims, or Imaging. Then, on the Imaging tab's menu, click (or tap) Show Image History.
-
On the Images tab, select an image or a series (such as a full mouth series or bitewings).
-
-
View one of the patient's most recent images.
-
Do one of the following:
-
On the Patient menu, under Clinical, click (or tap) Imaging.
-
On the Patient menu, under Clinical, click (or tap) Chart, Progress Notes, Quick Exam, Perio, Tx Planner, NHS Claims, or Imaging. Then, on the Imaging tab's menu, click (or tap) Show Most Recent Images.
-
-
Click (or tap) any single image (intraoral X-ray, intraoral photo, extraoral photo, or extraoral X-ray) or an image within a series (such as a full mouth series or bitewings).
-
The selected image (or the first of the selected series) appears in the viewing area.
-
-
If you are viewing a series (such as a full mouth series or bitewings), to view a differrent image of that series, under Image Preview, click (or tap) an image. Otherwise, skip this step.
-
Do one of the following:
-
Click (or tap) Share.
-
From the options menu of the image or series, click (or tap) Share exam.
The Exam or Image(s) to be shared dialogue box appears.
Note: If you used the Share button, by default, the Selected images(s) option under Share exam as is selected, and the image that was being viewed is selected (as indicated by the yellow box around the individual image in the preview area).
Note: If you used the Share exam menu option, by default, the Selected images(s) option under Share exam as is selected, and the series is selected (as indicated by the yellow box around the entire preview area).
-
-
Set up the following options:
-
Include image enhancements - Select this check box to apply an enhancement, which adds a balance of sharpening and contrast levels that affects the overall sharpness and contrast, to any of the images being printed that have enhancement applied to their originals. Any images being printed that do not have enhancement applied to their originals will not be printed with enhancement. Clear this check box to not enhance any of the images being printed even if enhancement has been applied to their originals.
-
Include annotations and measurements - Select this check box to include any annotations or measurements that were added to the images being printed. Clear this check box to export the images without the annotations and measurements.
-
Share exam as - For a series, do one of the following:
-
To print all the images in the series on one page, select the Entire exam in one image option. A yellow box appears around the entire preview area to indicate that the series is being printed.
-
To print each image in the series on a separate page, select the Entire exam in separate image(s) option. A yellow box appears around the entire preview area to indicate that the series is being printed.
-
To print only some of the images in the series, each on a separate page, select the Selected image(s) option, and then click (or tap) the desired images in the preview area. Yellow boxes appear around the selected images to indicate that those images are being printed. If necessary, you can click (or tap) a selected image to remove the yellow box unless only one image is selected.
Note: If the series is selected (the entire preview area has a yellow box around it), and you click (or tap) an image in the series, the Selected image(s) option becomes selected automatically.
-
-
-
Click (or tap) Print.
A .pdf file of the images is created for you to print.
Managing custom imaging procedures
You can create, edit, and delete custom imaging procedures.
Creating custom imaging procedures
Dentrix Ascend Imaging comes with several default imaging procedures. However, you can create a custom imaging procedure. The imaging procedure will be available to every user who has rights to acquire images.
Note: Custom and favorite imaging procedures are location specific.
To create a custom imaging procedure
-
If you are not already viewing the correct location, select it on the Location menu.
-
If the correct patient is not already selected, use the Patient Search box to access the patient's record.
Note: You can include inactive patients in the search results by setting the Include inactive patients switch to On.
-
On the Patient menu, under Clinical, click (or tap) Chart, Progress Notes, Quick Exam, Perio, Tx Planner, NHS Claims, or Imaging.
-
On the Chart, Progress Notes, Perio, Tx Planner, NHS Claims, or Imaging tab of a patient's clinical record, on the Imaging tab's menu, click (or tap) Acquire images.
The options for acquiring images become available.
-
Under Imaging Procedures, click (or tap) the Custom tab.

Any existing custom imaging procedures are listed. Also, at the bottom of the list, there is an option for creating an imaging procedure.
-
Click (or tap) Create Custom Procedure.
The options to set up the imaging procedure become available.

-
Enter a name for the imaging procedure in the Procedure Name box. The name can be up to seven characters long.
-
Enter a valid procedure code or a multi-code in the Code box. The specified code will be posted to a patient's record when this imaging procedure is used to acquire images. However, if the code is invalid, an error message will appear during acquisition, and the code will not be posted.
-
Set the default state for the following check boxes (which are available only if a Code is entered):
-
Apply charges - Select or clear this check box to specify whether you want to have the fee or a zero amount, respectively, posted for the specified Code by default. This can be changed at the time of acquisition.
-
Bill to third party - Select or clear this check box to specify whether you want to have the patient's third party billed or not billed, respectively, for the specified Code by default. This can be changed at the time of acquisition.
-
-
Select the Intraoral X-ray, Intraoral photo, or Extraoral photo option
 to specify the acquisition type for the imaging procedure.
Note: Once you save the imaging procedure, you cannot change the acquisition type.
-
Add image placeholders to the template as needed (the order in which you add them determines the default acquisition order):
Click (or tap) Add Horizontal or Add Vertical.
-
Drag the placeholder to the desired spot on the template.

-
If needed, you can click (or tap) the Rotate button
 to switch the orientation of the placeholder.
 -
For a template with intraoral X-rays or photos, click (or tap) the Edit button
 to assign tooth numbers to the placeholder.
 -
Repeat steps a-d as needed to add other placeholders.
Note: To remove a placeholder, with that placeholder selected, click (or tap) Remove Placeholder.
-
To view or change the default acquisition order, click (or tap) Set Order.
Numbers appear on the placeholders to indicate the order.

To change the order, do the following:
Click (or tap) Reset to remove the order number from every placeholder.
-
Click (or tap) each placeholder in the order that you want to acquire the images.
Note: To undo order assignments, click (or tap) Undo as needed.
-
When you have assigned an order to every placeholder, click (or tap) Finish.
The imaging procedure is ready to be saved.

-
Click (or tap) Save.
Editing custom imaging procedures
You can edit any custom imaging procedure. Any changes to a custom imaging procedure do not affect images that have already been taken using that imaging procedure.
To edit a custom imaging procedure
-
If you are not already viewing the correct location, select it on the Location menu.
-
If the correct patient is not already selected, use the Patient Search box to access the patient's record.
Note: You can include inactive patients in the search results by setting the Include inactive patients switch to On.
-
On the Patient menu, under Clinical, click (or tap) Chart, Progress Notes, Quick Exam, Perio, Tx Planner, NHS Claims, or Imaging.
-
On the Chart, Progress Notes, Perio, Tx Planner, NHS Claims, or Imaging tab of a patient's clinical record, on the Imaging tab's menu, click (or tap) Acquire images.
The options for acquiring images become available.
-
Under Imaging Procedures, click (or tap) the Custom tab.
Any existing custom imaging procedures are listed.
Note: Custom and favorite imaging procedures are location specific.
-
Select an imaging procedure.
The options for the selected procedure become available.

-
Click (or tap) the Edit button
 next to Acquisition Options for [Procedure Name].
The options to edit the imaging procedure become available.

-
Change any of the following options as needed:
-
Procedure Name - A name for the imaging procedure. The name can be up to seven characters long.
-
Code - A valid procedure code or a multi-code. The specified code will be posted to a patient's record when this imaging procedure is used to acquire images. However, if the code is invalid, an error message will appear during acquisition, and the code will not be posted.
-
The default state for the following check boxes (which are available only if a Code is entered):
-
Apply charges - Select or clear this check box to specify whether you want to have the fee or a zero amount, respectively, posted for the specified Code by default. This can be changed at the time of acquisition.
-
Bill to third party - Select or clear this check box to specify whether you want to have the patient's third party billed or not billed, respectively, for the specified Code by default. This can be changed at the time of acquisition.
-
-
-
Edit the image placeholders in the template as needed:
-
To move a placeholder, drag it to a different spot.

-
To switch the orientation of the selected placeholder, click (or tap) the Rotate button
. -
For a template with intraoral X-rays or photos, to assign different tooth numbers to the selected placeholder, click (or tap) the Edit button
. -
Repeat steps a-c as needed to edit other placeholders.
Notes:
You cannot add or remove placeholders.
You cannot change the acquisition type.
-
-
To view or change the default acquisition order, click (or tap) Set Order.
Numbers appear on the placeholders to indicate the order.
To change the order, do the following:
Click (or tap) Reset to remove the order number from every placeholder.
-
Click (or tap) each placeholder in the order that you want to acquire the images.
Note: To undo order assignments, click (or tap) Undo as needed.
-
When you have assigned an order to every placeholder, click (or tap) Finish.
-
Click (or tap) Save.
Deleting custom imaging procedures
You can delete any custom imaging procedure. Deleting a custom imaging procedure does not affect images that have already been taken using that imaging procedure.
To delete a custom imaging procedure
-
If you are not already viewing the correct location, select it on the Location menu.
-
If the correct patient is not already selected, use the Patient Search box to access the patient's record.
Note: You can include inactive patients in the search results by setting the Include inactive patients switch to On.
-
On the Patient menu, under Clinical, click (or tap) Chart, Progress Notes, Quick Exam, Perio, Tx Planner, NHS Claims, or Imaging.
-
On the Chart, Progress Notes, Perio, Tx Planner, NHS Claims, or Imaging tab of a patient's clinical record, on the Imaging tab's menu, click (or tap) Acquire images.
The options for acquiring images become available.
-
Under Imaging Procedures, click (or tap) the Custom tab.
Any existing custom imaging procedures are listed.
Note: Custom and favorite imaging procedures are location specific.
-
Select an imaging procedure.
The options for the selected procedure become available.
-
Click (or tap) the Edit button
next to Acquisition Options for [Procedure Name].The options to edit the imaging procedure become available.
-
Click (or tap) Delete.
A confirmation message appears.
-
Click (or tap) Yes.
Managing favourite imaging procedures
You can mark imaging procedures as favourites and remove them from the list of favourites.
Adding imaging procedures to the list of favourites
You can have an imaging procedure appear as a favourite in Dentrix Ascend Imaging when you are acquiring images so that you have quick and easy access to that procedure.
To add an imaging procedure to the list of favourites
-
If you are not already viewing the correct location, select it on the Location menu.
-
If the correct patient is not already selected, use the Patient Search box to access the patient's record.
Note: You can include inactive patients in the search results by setting the Include inactive patients switch to On.
-
On the Patient menu, under Clinical, click (or tap) Chart, Progress Notes, Quick Exam, Perio, Tx Planner, NHS Claims, or Imaging.
-
On the Chart, Progress Notes, Perio, Tx Planner, NHS Claims, or Imaging tab of a patient's clinical record, on the Imaging tab's menu, click (or tap) Acquire images.
The options for acquiring images become available.
-
Under Imaging Procedures, on either the Standard tab or the Custom tab, select the imaging procedure that you want to make a favourite.
The options for the selected procedure become available.

Note: A favourite imaging procedure has a yellow star next to Acquisition Options for [Procedure Name]. A non-favourite has a grey star.
-
Click (or tap) the grey star next to Acquisition Options for [Procedure Name].
The star becomes yellow, indicating that the imaging procedure is now a favourite.

Removing imaging procedures from the list of favourites
You can have an imaging procedure appear as a favourite in Dentrix Ascend Imaging when you are acquiring images so that you have quick and easy access to that procedure. If you no longer want an imaging procedure to be a favourite, you can make it a non-favourite.
To remove an imaging procedure from the list of favourites
-
If you are not already viewing the correct location, select it on the Location menu.
-
If the correct patient is not already selected, use the Patient Search box to access the patient's record.
Note: You can include inactive patients in the search results by setting the Include inactive patients switch to On.
-
On the Patient menu, under Clinical, click (or tap) Chart, Progress Notes, Quick Exam, Perio, Tx Planner, NHS Claims, or Imaging.
-
On the Chart, Progress Notes, Perio, Tx Planner, NHS Claims, or Imaging tab of a patient's clinical record, on the Imaging tab's menu, click (or tap) Acquire images.
The options for acquiring images become available.
-
Under Imaging Procedures, on the Favorites tab, the Standard tab, or the Custom tab, select the imaging procedure that you want to make a non-favourite.
The options for the selected procedure become available.

Note: A favourite imaging procedure has a yellow star next to Acquisition Options for [Procedure Name]. A non-favourite has a grey star (on the Standard or Custom tab only) and does not appear on the Favorites tab.
-
Click (or tap) the yellow star next to Acquisition Options for [Procedure Name].
The star becomes grey (you see this change only on the Standard or Custom tab), indicating that the imaging procedure is now a non-favourite. The procedure no longer appears on the Favorites tab.

Using the offline mode
Acquiring images in offline mode
Dentrix Ascend Imaging supports an offline mode of operation. You can use the offline mode to acquire images when you do not have access to Dentrix Ascend Imaging online (for example, if the Internet is not working at the office). Offline mode allows you to acquire new images for diagnosis, and you can synchronize those images with your online database after you are back online.
Offline mode uses a local embedded database (for temporary storage of patient information, metadata, images, and so forth), and an embedded web server (embedded in the acquisition agent) to provide offline mode functionality. The latest acquisition agent installer automatic installs and sets up the database and web server.
The workflow for acquiring images offline is nearly identical to the online (normal) mode, but note the following differences:
You start offline mode from the acquisition agent.
You enter a patient's information prior to acquiring images.
The billing and provider options are not available, but you select them during the synchronization process.
To acquire offline images
Close all Chrome browser windows.
Important: To prevent any issues that may occur while starting the offline mode, close all Chrome browser windows that may be open.
Do one of the following:
For Windows users - Click (or tap) the Acquisition Agent icon in the notification area of the Windows taskbar, and then click (or tap) Start Offline Mode.

For Mac users - Click (or tap) the Acquisition Agent icon on the dock. From the Acquisition Agent menu, click (or tap) Start Offline Mode.

A new Chrome browser window opens with Dentrix Ascend Imaging running in offline mode.

Enter the First name, Last name, and Birth date of the patient whom you want to acquire images for.
Select whether the patient has Adult dentition or Pediatric dentition.
Click (or tap) Acquire Images.

The Acquire Images tab is selected by default, and the options for acquiring images, using the standard imaging procedures, are available.

Note: The billing and provider options are not available while you are using the offline mode, but you select them during the synchronization process (after you return to using Dentrix Ascend Imaging online).
-
Acquire images similarly to how you would when using Dentrix Ascend Imaging online.
-
When you are finished acquiring the patient's images, either close the Chrome browser window that has Dentrix Ascend Imaging running in offline mode to end the offline acquisition session for the patient, or click (or tap) the Select Patient tab to acquire or view images for another patient.
Viewing offline images
If a patient has offline images (images that have been acquired while using the offline mode) on this computer that have not been synchronized with that patient's online record, you can view those images.
Note: You cannot delete exams while you are using the offline mode, but you can delete images from an exam unless there is only one image.
To view offline images
Close all Chrome browser windows.
Important: To prevent any issues that may occur while starting the offline mode, close all Chrome browser windows that may be open.
Do one of the following:
For Windows users - Click (or tap) the Acquisition Agent icon in the notification area of the Windows taskbar, and then click (or tap) Start Offline Mode.
For Mac users - Click (or tap) the Acquisition Agent icon on the dock. From the Acquisition Agent menu, click (or tap) Start Offline Mode.
A new Chrome browser window opens with Dentrix Ascend Imaging running in offline mode.
Enter the First name, Last name, and Birth date of the patient whom you want to view images for.
Click (or tap) Show Image History.
The Show Image History tab is selected by default.

You can view the patient's offline image history chronologically and quickly navigate between each image. To display only the images that match the filter criteria that you specify, click (or tap) in the Narrow down the results box. Also, you can work with images as you normally would while using Dentrix Ascend Imaging online. For example, you can manipulate (such as annotate) images, compare images, export images, and resume incomplete exams.
-
When you are finished viewing the patient's images, either close the Chrome browser window that has Dentrix Ascend Imaging running in offline mode to end the offline viewing session, or click (or tap) the Select Patient tab to acquire or view images for another patient.
Synchronizing offline images
When you are able to get back online after being offline, you can synchronize offline images (images that have been acquired while using the offline mode) with your online database. When you attempt to acquire images with Dentrix Ascend Imaging online (from Dentrix Ascend), if any offline images exist on the computer that you are using, a message appears and asks if you want to synchronize the offline images now or to be reminded to synchronize them later.
Note: If any offline images have been acquired for a new patient, before you can synchronize those images with your online database, you must create a patient record in Dentrix Ascend; there is not an option to create a patient record during the synchronization process.
To synchronize offline images
Close all Chrome browser windows.
Important: Before attempting to synchronize offline images with online patient records, close all Chrome browser windows. You cannot synchronize offline images if the offline mode of Dentrix Ascend Imaging is open in any Chrome browser window.
Open Dentrix Ascend in a new browser window. In a patient's clinical record, from the Imaging tab menu, click (or tap) Acquire Images.
If any offline images exist on the computer that you are using, the Sync Offline Procedures message box appears.

Note: To postpone the synchronization for a later date, click (or tap) Remind Me Later. Dentrix Ascend Imaging will not prompt you again today to synchronize offline images from this computer.
Click (or tap) Synchronize Procedures.
The Imaging Data Synchronization dialog box appears and lists the patients who have offline images on this computer.

Select a patient.
Note: You can synchronize only one patient's record at a time.
Click (or tap) Next.
The Patient Match tab is selected, and one of the following occurs:
-
If a matching patient (a patient with the same first name, last name, and date of birth) is found in your online database, that patient's name and birth date appear.

-
If a matching patient is not found, the Search existing patient/household box is available.

-
Do one of the following:
-
If the Potential patient match is correct, skip to step 8.
-
If the Potential patient match is not correct, click (or tap) the Edit button
 , and then proceed to the next step.
-
If there is not a Potential patient match, proceed to the next step.

-
-
Click (or tap) in the Search existing patient/household box to search for and select the correct patient.

Click (or tap) Next.
The Imaging Options tab is selected. Under Offline Imaging Procedures, a list of the patient's imaging procedures appears. The first imaging procedure is selected by default.

Notes:
To postpone the synchronization for later, click (or tap) Remind Me Later.
To go back and change the patient, click (or tap) Back.
For the selected imaging procedure, set up the following options:
Apply charges - To post the fee for the selected procedure, select the check box. To post a zero amount for the procedure, clear the check box.
-
Bill to insurance - To bill the patient's insurance carrier for the procedure, select the check box. To not bill the patient's insurance carrier, clear the check box.
Select provider - Select the provider who you want to associate with the procedure. Only providers who have access to the current location are available.
If there are multiple imaging procedures, do one of the following:
To assign the selected billing options and provider to all the procedures that are listed, click Apply Selected Options to All Procedures.
To assign billing options and a provider for each procedure separately, select the next procedure, and then repeat step 9. Repeat this process until you have selected billing options and a provider for all the procedures that are listed.
Click (or tap) Next to begin synchronizing images.
If the synchronization is successful, a green check mark symbol appears next to each imaging procedure.

Notes:
If an imaging procedure fails to be synchronized, a red error symbol and message appear. Click (or tap) Sync the Procedure Again next to that procedure to try synchronizing it again.

-
If an imaging procedure fails to be synchronized a second time, either click (or tap) Sync the Procedure Again to try synchronizing it again, or click (or tap) Hide Procedure to move the corresponding images to a recovery folder on this computer (you will not be prompted to synchronize the hidden procedure again, but you can recover the images by attaching them to a patient record later on).

Do one of the following:
-
To synchronize another patient's offline images, click Sync Another Patient. You are returned to the list of patients who still have offline images to synchronize. Repeat steps 4-11.
If you have finished synchronizing all the patients, or if you have not, and want to begin acquiring images for the selected online patient (from step 2), click (or tap) Finish & Proceed to proceed to the acquisition options.
-