Creating fee schedules
You can create fee schedules for use with billing services and products. You can attach a fee schedule to a provider, to an insurance plan, to a location in your organization, or to a patient (as a discount plan).
Notes:
-
Fee schedules are global (available to all locations across your organization), but locations can each have different preferred fee schedules. Providers and insurance carriers can also each have their own preferred fee schedules. However, if you change the fee in a given fee schedule while logged on to any location, not only is the change accessible across the organization, but the procedure code will be updated for the locations that have that fee schedule as their preferred fee schedule.
-
You can also import fees from a .csv file to create a fee schedule.
To create a fee schedule
-
On the Settings menu, under Production, click (or tap) Fee Schedules.
The Fee Schedules page opens.
-
Click (or tap) Create New.

The options for creating a fee schedule become available.

-
In the Name of fee schedule box, enter a name for the fee schedule.
-
Optionally, do one of the following:
-
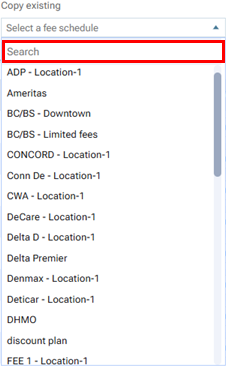
To base this fee schedule on an existing fee schedule, select the fee schedule that you want to copy from the Copy existing list, and then click (or tap) Copy.
Note: To help you quickly locate the fee schedule from which you want to copy fees to populate the new fee schedule, the Copy existing list has a Search box. Begin begin typing part of a fee schedule's name to view the matching fee schedules. Continue typing as needed to narrow down the list of results.

-
-
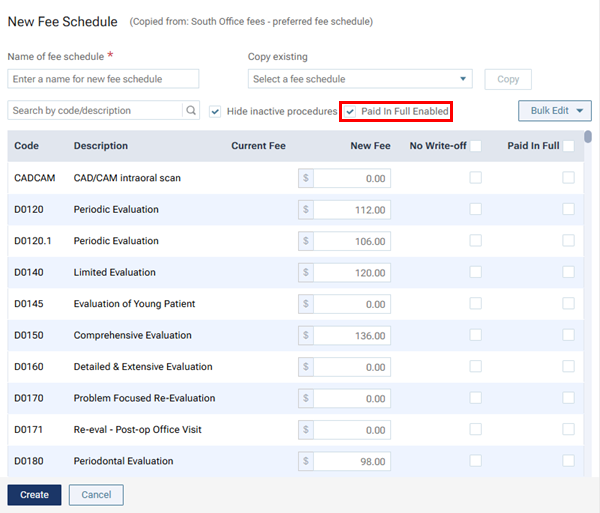
To enable "Paid in Full" procedures for the fee schedule, select the Paid in Full Enabled checkbox. With this checkbox selected, a Paid in Full column is available for the list of procedures.

-
To increase or decrease all the fees in the fee schedule by the same amount or percentage, do the following:
-
On the Bulk Edit menu, select Increase all by.
The Bulk Edit - Increase All dialog box appears.

-
Enter a positive or negative number (for example, 20 or -20; also, decimals are allowed), and then select $ or %.
-
Select the Round up resulting values to the nearest dollar checkbox if you want to round up the new fees.
-
If you are increasing fees, to ignore any current fees with a $0.00 amount (they will stay at $0.00; only non-zero fees will be increased), select the Exclude $0.00 fees from increase checkbox.
-
Click (or tap) Proceed. The resulting fees appear in the New Fee column.
-
-
For each procedure, do any of the following as needed:
-
In the box in the New Fee column, enter or change the fee that you charge for the procedure.
-
If you do not want to allow an automatic write-off to be posted for the procedure, select the checkbox in the No Write-off column.
Notes:
-
With the No Write-off checkbox selected for the procedure, an automatic write-off can occur for that procedure only if this fee schedule is selected as the Max allowable amount fee schedule for a patient's insurance plan. Also, an automatic write-off cannot occur if a patient's record has a discount plan attached and no insurance coverage is attached.
-
To select or clear every procedure's checkbox (if available) at the same time, select or clear the checkbox at the top of the column.
-
To select the checkboxes of a range of adjacent procedures, select the first checkbox of the range, and then while holding the Shift key, select the last checkbox of the range. All the checkboxes (if available) from the first one to the last one are selected.
-
If the Paid in Full Enabled checkbox is selected for this fee schedule, the No Write-off checkbox for the procedure is available only if the Paid in Full checkbox for the procedure is clear.
-
-
If the Paid in Full Enabled checkbox is selected for this fee schedule, and if you want the procedure to be marked as a "Paid in Full" procedure, select the checkbox in the Paid in Full column.
Notes:
-
With the Paid in Full checkbox selected for the procedure, instead of a patient being responsible for a portion of the charge, anything over the maximum allowed (contracted) rate gets written off. The patient's portion is always $0 for a "Paid in Full" procedure.
-
To select or clear every procedure's checkbox (if available) at the same time, select or clear the checkbox at the top of the column.
-
To select the checkboxes of a range of adjacent procedures, select the first checkbox of the range, and then while holding the Shift key, select the last checkbox of the range. All the checkboxes (if available) from the first one to the last one are selected.
-
The Paid in Full checkbox for the procedure is available only if the No Write-off checkbox for the procedure is clear.
-
Tips:
-
The Hide inactive procedures checkbox is selected by default, so only active procedures are shown. To temporarily show inactive procedures too, clear this checkbox (the checkbox reverts back to being selected the next time you access the Fee Schedules page and select a fee schedule).
-
To search for a procedure, begin typing a code or description in the Search by code/description box, and continue typing as needed to narrow down the list of procedures.
-
-
Click (or tap) Save.