Configuring and testing imaging filters
You can configure filters individually for any number of supported imaging devices. For example, you can define filters for Gendex sensors and different filters for a ScanX scanner.
As you experiment with the filters, you can see how those changes will affect images that you acquire from a given device without having to expose yourself or someone else to X-rays repeatedly. Configuring and testing your custom filters consists of the following steps.
1. Exporting a raw image
The first step is to export an existing image (such as a bitewing) that was captured using a given device (such as a Gendex sensor). It doesn't matter if enhancements were applied to the image when it was captured because Dentrix Ascend Imaging stores the raw image. You will export the image without any enhancements to get a raw image, which you can use as your baseline as you experiment with filters.
To export a raw image
-
With the desired image being viewed in Dentrix Ascend Imaging, click (or tap) Share.

The Exam or Image(s) to be shared dialog box appears.

-
Clear the Include image enhancements checkbox to not enhance the image being exported.
-
Clear the Include annotations and measurements checkbox to export the image without annotations and measurements.
-
Select the Export as JPEG (Otherwise PNG) checkbox to export the image as .jpg file.
-
Click (or tap) Export.
The raw image is downloaded to the default "Downloads" folder for your Web browser.
2. Adjusting the import filters
For testing, do not need to adjust the filters for your device. Instead, you will adjust the filters for the "Import From File" device.
To adjust the import filters
-
Click (or tap) the Acquisition Agent icon in the notification area of the Windows taskbar, and then select Preferences.

The Preferences dialog box appears.

-
Select the Filters tab.
-
Select Import From File from the Device list.
-
Set up the following filters as needed:
-
Apply Gamma Correction - To customize this filter, select the checkbox, and then enter the amount of Gamma correction. The gamma correction value defines the relationship between a pixel's numerical value and its actual luminance; use it to redistribute the tonal levels of a raw image to be closer to how human eyes perceive them (on a standard monitor).
-
Apply Pre Smoothing - To customize this filter, select the checkbox, and then enter the Strength of the smoothing effect.
-
Apply Sharpening - To customize this filter, select the checkbox, and then enter the Effect and the Strength of the sharpening effect.
-
Apply Post Smoothing - To customize this filter, select the checkbox, and then enter the Strength of the smoothing effect after the sharpening filter is applied. The Apply Post Smoothing checkbox is available only if the Apply Sharpening checkbox is selected.
-
-
Click (or tap) Done.
3. Importing the image with enhancements
To see how your custom enhancements affect images, you will import the raw image, applying enhancements.
To import the image with enhancements
-
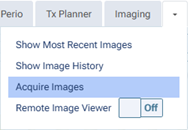
On the Imaging tab's menu, select Acquire Images to begin the process of importing an image in Dentrix Ascend Imaging.

The options for acquiring images become available.

-
Select a default procedure or a custom procedure.
-
Set up the acquisition options.
-
On the Input tab, select the Import From File device on the Available Devices menu if it is not already selected.
-
Click (or tap) Start.
The Import File dialog box appears.

-
Select the raw image file, and then click (or tap) Open.
The selected image appears.

-
From the Enhance list, select Entire Image.
If you are satisfied with the result, skip to step 6; otherwise, proceed to the next step.
4. Exporting the enhanced image
You will export the enhanced image to compare it with the raw image.
To export the enhanced image
-
With the imported image being viewed in Dentrix Ascend Imaging, click (or tap) Share.

The Exam or Image(s) to be shared dialog box appears.

-
Select the Include image enhancements checkbox to apply your custom enhancements to the image being exported.
-
Clear the Include annotations and measurements checkbox to export the image without annotations and measurements.
-
Select the Export as JPEG (Otherwise PNG) checkbox to export the image as .jpg file.
-
Click (or tap) Export.
The enhanced image is downloaded to the default "Downloads" folder for your Web browser.
5. Comparing the images
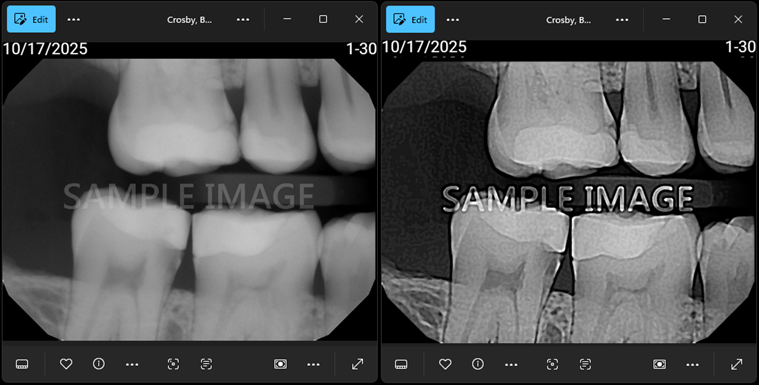
Locate and open the raw image and the enhanced image to compare them side by side. If you are satisfied with the results, proceed to the next step; otherwise, repeat steps 2-5 as needed to obtain the desired result.


6. Adjusting the device filters
You will apply the customized filters for the "Import From File" device to the filters for the actual, physical device.
To adjust the device filters
-
Click (or tap) the Acquisition Agent icon in the notification area of the Windows taskbar, and then select Preferences.

The Preferences dialog box appears.

-
Select the Filters tab.
-
Select the desired device from the Device list.
-
Set up the filters for the selected device to match those for the "Import From File" device.
-
Click (or tap) Done.
7. Acquiring a real image
Acquire a real image, using your imaging device and applying enhancements, to see how your custom enhancements affect images that are acquired using that device.
To acquire a real image
-
On the Imaging tab's menu, select Acquire Images to begin the process of acquiring an image in Dentrix Ascend Imaging.

The options for acquiring images become available.

-
Select a default procedure or a custom procedure.
-
Set up the acquisition options.
-
On the Input tab, select your device on the Available Devices menu if it is not already selected.
-
Click (or tap) Start.
-
Acquire the image.
The acquired image appears.

-
From the Enhance list, select Entire Image.