This Quick Start Guide provides step-by-step instructions for using the Dentrix Installation and Migration Tool, ensuring a smooth installation and migration process. The tool automatically detects your Windows version, system hardware, and Dentrix installation status. Then it will present simplified options that apply to your situation.
The Dentrix Installation and Migration Tool automates several of the processes related to the installation and migration of Dentrix. The Dentrix Installation and Migration Tool simplifies key tasks such as migrating Dentrix to a new server, restoring from a backup, reinstalling or uninstalling a workstation or server, or setting up a new system. No matter your scenario, this tool streamlines the process. During a migration, it transfers your database from the old server to the new one, restores it, and brings over all your essential data, including Document Center files and patient pictures. Even if you only have a backup copy of your Dentrix database, the tool can use it to complete the installation and fully restore your data.
To learn how to use the Dentrix Installation and Migration Tool, click the topics below.
To successfully use the Dentrix Installation and Migration Tool, make sure you meet the following requirements:
The Dentrix Installation and Migration Tool automatically configures Windows Firewall as needed. If your office uses a different firewall, ensure the following ports are open:
These functions will be available when the tool is run on a computer running a server version of Windows.
If Dentrix is installed on a server version of Windows, you can Place This Server into Migration Mode using the utility.
Migration Mode is the first step in transferring your Dentrix installation to a new server. The Dentrix Installation and Migration Tool ensures that the correct version of Dentrix is installed and that all data is successfully transferred.
Both the original server and the new server need to be running on the same network to participate in the migration process.
Migration duration depends on data volume. For most practices, including Document Center files, expect a 2-3 hour process.
On the original server, open the tool and select Place This Server Into Migration Mode to Migrate to a Different Server. Then click Continue.

Enter your database Passphrase, then click Validate Passphrase.
After a successful validation, select Start Migration Mode.

When the current server is successfully in migration mode, move to the new server.
On the New Server, open the Dentrix Installation and Migration Tool and select Migrate Dentrix From an Existing Server.
If Dentrix is installed with a blank database on server version of Windows, you will be able to Migrate From an Existing Server.
This is the second step toward moving your Dentrix installation from one server to another. The Dentrix Installation and Migration Tool ensures that the correct version of Dentrix is installed and that all data is successfully transferred.
Both the original server and the new server are required to be running on the same network to participate in the migration process.
Migration duration depends on data volume. For most practices, including Document Center files, expect a 2-3 hour process.
After placing the original server into migration mode, follow these steps on the new server:


If this computer runs a server version of Windows, and Dentrix is not installed, you will be able to choose the Migrate Dentrix From an Existing Server option:
This is the second step toward moving your Dentrix installation from one server to another. The Dentrix Installation and Migration Tool ensures that the correct version of Dentrix is installed and that all data is successfully transferred.
Both the original server and the new server are required to be running on the same network to participate in the migration process.
Migration duration depends on data volume. For most practices, including Document Center files, expect a 2-3 hour process.
After placing the original server into migration mode, follow these steps on the new server:


If Dentrix is installed on a server version of Windows, you can Reinstall This Server.
During reinstallation, administrators can choose to retain or remove existing settings. The process also includes restoration of Dentrix data.
Important:
Instructions:


If Dentrix is installed on a server version of Windows, you can Uninstall This Server.
⚠ Important: ⚠ This action cannot be undone.
Instructions:


If this computer runs a server version of Windows, you can use the Restore Data From a Copy of Database option to restore the database from the backup copy. If Dentrix is not already installed on this machine, that will be done as part of the process.
(If the original server is available, consider instead using the instructions outlined above to place the existing server into 'Migration Mode', then migrate Dentrix from the existing server to this one.)
Depending on the amount of data, this process may take several hours. Please allow sufficient time for the operation to complete.
Instructions:


If Dentrix is installed on a server version of Windows, and Dentrix is not installed, you can use the Install Dentrix Server and Restore Data From a Copy of Database option.
This option will install Dentrix and load the database from a backup copy.
Below is an example of an error that might occur during the file validation check. In this case, an important file from the Installs folder is missing. If possible, obtain another full copy of the “Common” folder from the Dentrix server.

These functions are available when the tool is run on a workstation (non-server version of Windows).
If Dentrix installed as a workstation, you can use the Point This Workstation to a Different Server option.
If you have migrated to a new server, use the Point This Workstation to a Different Server option on each workstation to seamlessly update its connection to the new server.
Instructions


If Dentrix installed as a workstation, you can use the Reinstall This Workstation option.
This option uninstalls Dentrix and then reinstalls it on the workstation.
Instructions


If Dentrix installed as a workstation, you can use the Uninstall This Workstation option.
This will remove Dentrix from a workstation. After uninstallation, Dentrix will no longer be accessible on the workstation unless reinstalled.
Instructions:

If Dentrix is not installed, and this version of Windows is not a server version, you can use the Install Dentrix as a Workstation option.
Select the Install Dentrix as a Workstation option to set this machine up as a Dentrix workstation on the network.


Using the Dentrix Server Administration Utility to export or restore the Dentrix database.
Your Dentrix database should be periodically exported—either manually or automatically. This is most commonly done using the Dentrix Server Administration Utility (discussed below).
When exported, all database activity is temporarily paused and a copy of the database is made to this folder: (drive):\Dentrix\Common\
You can then copy of the Common folder (including all subfolders and files) to another drive, either manually or automatically through a backup software. The Common folder contains everything you need to restore the Dentrix database if needed.
When using an automated backup software, be sure that it has administrative rights to access all files and folders within the Common folder.
Periodically check your processes verify that regular backups are taking place as intended.
To export your database in preparation for backup, use the Dentrix Server Administration Utility.
You can export the database manually or set up an automatic daily export schedule.
Within Dentrix, the Dentrix Server Administration Utility can be accessed in Office Manager > Maintenance > Practice Setup > Server Administration Utility.
You can also access the Dentrix Server Administration Utility outside of Dentrix. In the Windows File Explorer, browse to (drive):\Program Files (x86)\Dentrix\Utilities\ and open the Dentrix Server Administration shortcut file.
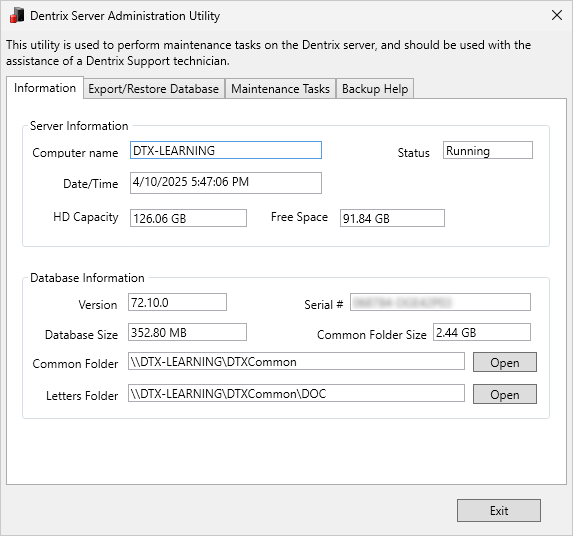
The Dentrix Server Administration Utility is divided into four tabs:
The Information tab displays details about your server and database.
It is important to know the Common Folder location, as this is where you will copy your database from.
You can perform several functions in the Export/Restore Database tab.

To export your database immediately, click the Perform Database Export button.
While exporting, Dentrix will temporarily pause all activity. Workstations may appear frozen or unresponsive during this process.
The files are copied to the server computer's (drive):\Dentrix\Common\DBCopyForBackup folder. (You can verify the location on the Information tab of this utility)

After the export is completed, Dentrix activity is resumed. You can then make a complete data backup by copying the entire Common folder, including all subfolders and files. Or you can use an automatic backup software to perform the copy.
When using an automated backup software, be sure that it has administrative rights to access all files and folders within the Common folder.
The Perform Database Restore button acts in the reverse of the Perform Database Export function. It will also temporarily pause all activity, then load the files from (drive):\Dentrix\Common\DBCopyForBackup and replace the live database files.
⚠ Important: ⚠ Restoring from a backup will erase any data entered after the last export. Additionally, if the last export took place using an earlier version of Dentrix, you may need to uninstall Dentrix on the workstations and reinstall the older program version.
Because of the risk of data loss, before the restore occurs you will be asked to confirm the action by entering a phrase. You must enter the phrase exactly as it is shown (including spelling, capitalization, and punctuation).

The Scheduled Database Exports section allows you to set up automatic exports of your database at the same time on certain days of the week. This allows you to schedule an export to occur after hours. Select Enable Scheduled Exports, set the days of the week and time of day, and click Update Scheduled Status to save the changes.
If you use an automatic backup service to make a copy the (drive):\Dentrix\Common\DBCopyForBackup folder, schedule the database export to occur first, and allow sufficient time for the export to complete before the backup copy commences.
The Maintenance Tasks tab allows you to manually stop and restart the Dentrix Server process. It also lists the names of all workstations that are currently accessing Dentrix and the application(s) that are open on each.
This is primarily intended to be used by the support team in troubleshooting situations.


The Backup Help tab offers explanation and guidance on how to back up the Dentrix database.