Using time blocks, you can reserve specific times in the Appointment Book for certain appointment types, such as crowns and exams. Once you set up and activate Perfect Day Scheduling, you will see a colored border surrounding the blocked time, which contains the time block name and the provider assigned to that block. If you attempt to schedule an incorrect procedure during the blocked time, you are warned and asked if you want to override the message.
Using Appointment Book, you can quickly search for the first available time block.
To find the first available time block
1. In the Appointment Book toolbar, click Schedule Appointment.
The Select Patient dialog box appears.

2. Type the first few letters of the patient’s last name.
3. Select the patient you want, and then click OK.
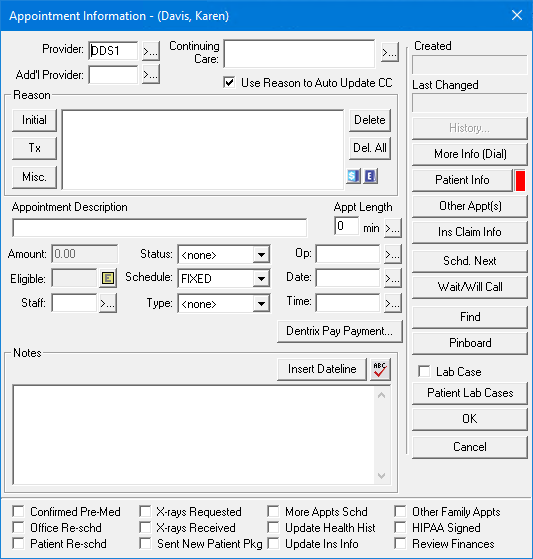
The Appointment Information dialog box appears.

4. In the Provider field, change the appointment provider if necessary.
5. To assign reasons for the appointment, click Initial or Add Tx, and select a reason from the list of Initial Reasons.
Note: The appointment type assigned to this procedure code is pulled in. If you select more than one procedure code, the appointment type for the first procedure code selected is assigned to the appointment. You can change the Appointment Type as needed.
6. In the Appointment Information dialog box, click Find.
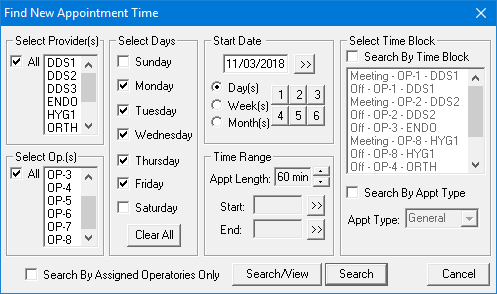
The Find New Appointment Time dialog box appears.

7. To find an appointment time, do the following:
Select Search By Time Block.
Select the Time Block that you want to find from the list.
Click Search/View to display a list of available times.
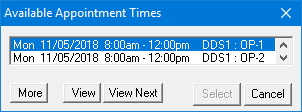
The Available Appointment Times dialog box appears.

Select a time from the list.
Click View to display the date and time of the appointment in the Appointment Book.
Click Select to select the time you want to schedule.
8. To schedule the appointment, click OK.