
QuickBill for Dentrix, by Henry Schein One, can help cut down on the cost and hassle of your monthly billing. Using QuickBill, you can create bills as you have always done with Dentrix. However, with QuickBill, instead of printing, folding, licking, and stamping hundreds of bills, you can deliver billing statements in one of the following ways:
By transmitting your bills to Henry Schein One where they will be printed, stamped, and mailed for you
By email using QuickBill Email
By mail using QuickBill Mail
By text using QuickBill Text
By using a combination of mail, email, and text
To learn more, click Submitting billing statements electronically.
In order to send electronic statements from Dentrix, you must register for the QuickBill Mail, QuickBill Email, or QuickBill Text service. As part of the QuickBill Mail, QuickBill Email, and/or QuickBill Text registration process, you will receive a QuickBill ID and password for your account.
To set up a QuickBill account
1. In the Office Manager, click Maintenance, point to Practice Setup, and then click Electronic Billing Setup.
The QuickBill Settings dialog box appears.
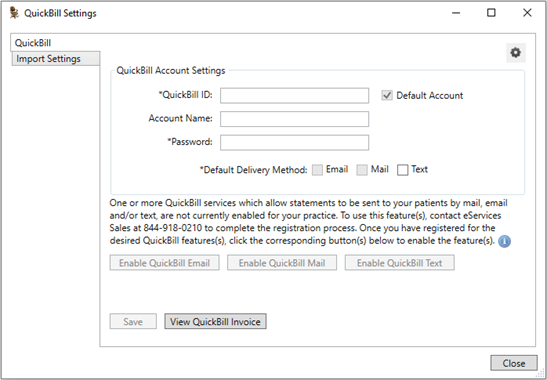
2. Configure the QuickBill Account Settings as follows:
QuickBill ID - Type the QuickBill ID that was provided to you at registration.
Account Name - (Optional) Type a name to identify your QuickBill account in Dentrix.
Password - Type or paste (Ctrl+V) the QuickBill Password that was provided to you at registration.
3. Once you have registered for QuickBill Mail, QuickBill Email, and/or QuickBill Text, in the QuickBill Settings dialog box, click the corresponding Enable button (Enable QuickBill Mail, Enable QuickBill Email, or Enable QuickBill Text) to enable the feature(s) in Dentrix.
Once the QuickBill features are enabled, the corresponding settings sections appear instead of the Enable button for each feature in the QuickBill Settings dialog box.

4. If QuickBill Email and/or QuickBill Text is enabled, configure the QuickBill Online Payment Settings as follows:
Notes:
In order for your patients to make payments toward their QuickBill Email, QuickBill Mail, or QuickBill Text statements (statements delivered by email, mail, or text message), you must register for the QuickBill Premium by contacting Sales at 800-336-8749, option 1, and then option 2. Once you have registered for the QuickBill Premium, you will receive your Worldpay merchant account credentials.
If you are a Dentrix Pay customer, you can use the same Worldpay Merchant account for Dentrix Pay, QuickBill Email, QuickBill Mail, and QuickBill Text Payments.
a. Do one of the following:
If you have not registered for QuickBill Premium and/or have not yet received your Worldpay merchant account credentials, clear the Register Worldpay Credentials checkbox.
If you have registered for QuickBill Premium and have also received your Worldpay merchant account credentials, select Register Worldpay Credentials, and then complete the Worldpay merchant credential boxes as follows:
1. In the Account Token box, type or paste your Worldpay Account Token.
Tip: We recommend that you copy and paste the Account Token you received from Worldpay into the Account Token box to avoid an entry error. To paste the Account Token from the Clipboard into the Account Token box, delete any text in that field, and then press Ctrl+V.
Note: After you save it, the Account Token is masked.
2. In the Acceptor ID box, type your Worldpay Acceptor ID.
3. In the Account ID box, type your Worldpay Account ID.
5. If you enabled QuickBill Text, do the following:
a. Click the requirements and recommendations link.
The Electronic Statement Text Message Consent dialog box appears from which you can review important information regarding obtaining consent from your patients to send them billing and payment notifications by text message.
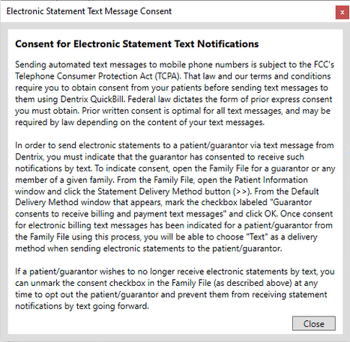
b. Review the consent requirements information, and then click Close.
c. Select I have read and understand the requirements and recommendations for obtaining consent from my patients to send them billing and payment notifications by text.
Note: You must select this checkbox to send QuickBill Text statements to your patients.
6. If you enabled QuickBill Mail, complete the QuickBill Mail Settings section as follows:
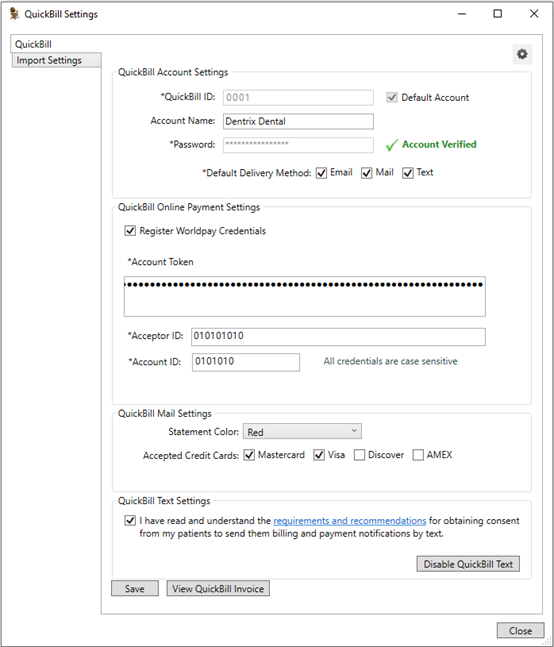
a. From the Statement Color list, select the color that you want to be used for electronic statements that are delivered by mail.
Note: This setting does not affect the color of the statement for the QuickBill Email and QuickBill Text features.
b. Select any accepted credit cards that you want to display on statements sent electronically.
7. From the QuickBill Account Settings section at the top of the QuickBill Settings dialog box, as necessary, review and modify the Default Delivery Method to be used for your practice when sending electronic statements.
8. When finished, click OK.
The QuickBill ID and Password are verified to ensure they match what is specified for your account on the QuickBill server. If you chose the option to register your Worldpay credentials for QuickBill online payments, your merchant credentials are also verified with Worldpay. Once all verification processes are completed, the QuickBill account settings are saved, and the QuickBill Settings dialog box closes.