
Payments made online toward QuickBill statements delivered by Email, Mail, and Text are imported to Dentrix automatically or manually according to the Import Payment settings in Dentrix.
To import a QuickBill and Text statement payment
1. In Office Manager, click Maintenance, point to Practice Setup, and then click Import Payment Settings.
The Import Settings dialog box appears.
Note: In order for QuickBill online payments to be imported to Dentrix, an eTrans account must be entered in Dentrix. If you are not using eClaims, an eTrans account will be automatically created for you and entered in Dentrix when you install Dentrix G 7.6 or later. If you are already using eClaims, but your eTrans account has not been entered in Dentrix, a warning message appears in the Import Settings dialog box instructing you to enter and save your eTrans User ID and password in eTrans Setup. Once your eTrans User ID and password are saved in Dentrix, the warning will no longer appear.
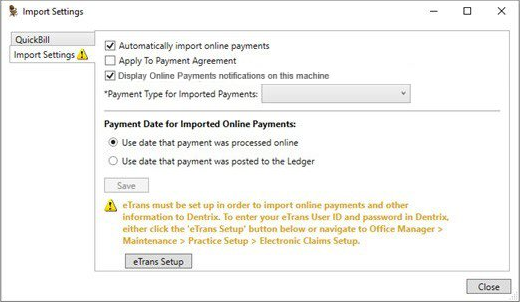
2. Configure the Import Settings as follows:
a. To have QuickBill Email, Mail and Text payments that are processed online automatically imported to Dentrix, leave Automatically import online payments selected. To manually review and import these payments, clear the checkbox.
b. To have imported online payments automatically applied to the payment agreement balance (when applicable), select Apply to Payment Agreement.
c. To have imported online payment notifications displayed on the current workstation, select Display Online Payments notifications on this machine.
d. From the Payment Type for Imported Payments list, select the payment type you want applied to all imported online payments.
e. Select which payment date you want applied to imported online payments.
f. When finished, click Save, and then close the Import Settings dialog box.

3. Whenever QuickBill Email, Mail, and Text payments are processed online, they are downloaded and either automatically or manually posted to Dentrix as follows:
If Automatically import online payments is selected, online payments are automatically posted to the corresponding guarantor’s Ledger.
If Automatically import online payments is cleared, whenever the Ledger is opened, a notification window is displayed in the lower-right corner of the Ledger, prompting you to review and manually import payments that have been processed online.

From the notification window, click Review and Import Payments.
The Import Online Payments dialog box appears.

4. From the Import Online Payments dialog box, you can do the following:
Verify details for each online payment listed, as necessary, from the searchable and sortable data grid or the payment details preview pane.
Use the buttons above the data grid to do the following:
|
|
Hide or Show the Payment Details panel. |
|
|
Select or Clear All online payments listed in the data grid. |
|
|
Open Ledger for selected payment. |
|
|
Open the Import Settings dialog box. |
5. When you are ready to post a received online payment to the corresponding account’s Ledger, select the payment from the list (or click the Select All button above the data grid to select all payments in the list).
6. Click Post Selected.
The selected payments are posted to the Ledger for the corresponding account(s).
To view online payments manually to import at any time
1. From the Ledger, click the Import Online Payments toolbar button  .
.
The Import Online Payments dialog box appears (as described earlier) listing any online payments that have been downloaded but not yet imported to the applicable accounts’ Ledger.


