
The QuickBill Premium Website Payments feature allows your patients to make payments through your website. To enable QuickBill Premium Website Payments, you must be running Dentrix 23.14 or higher, subscribe to QuickBill Premium, and establish a Worldpay Merchant ID.
Once you have have subscribed to QuickBill Premium and have established a Worlpay Merchant ID, you will need to add a link to your Website Payments page on your website. This link incorporates your Customer ID and eTrans ID.
To enable QuickBill Premium Website Payments
1. In the Office Manager, do one of the following:
Click Maintenance, point to Practice Setup, and then click Electronic Billing Setup.
Click the Electronic Billing Submission History toolbar button, and then in the Electronic Statement Submission History for dialog box, click Open QuickBill Setting.
The QuickBill Settings dialog box appears.
a. Navigate to the URL, and then click Copy to Clipboard.
b. Add the link to the URL to your website. (https://www.paymydentist.net/patientpay/[Customer ID]?dataservicesid=[eTrans ID]. For example, if your Customer ID was 67882 and your eTrans ID was 67894, the URL would be https://www.paymydentist.net/patientpay/67882?dataservicesid=67894.)
Important: The Customer ID and eTrans ID identify your specific practice. See steps 2 and 3 for instructions on where to find these IDs.
2. To find your Customer ID, in any Dentrix module, click Help, and then click About Dentrix.
The About Dentrix dialog box appears. Your Customer ID appears to the left of your Serial Number.
3. To find your eTrans ID, in the Office Manager, click Maintenance, point to Practice Setup, and then click Electronic Claims Setup.
The eTrans Setup dialog box appears, and the eTrans ID appears in the User ID box.
![]()
When a patient clicks the payment button on your website, a screen similar to the following appears.

4. Click Make Payment.
QuickBill Premium performs a series of validation checks, and the following screen appears.
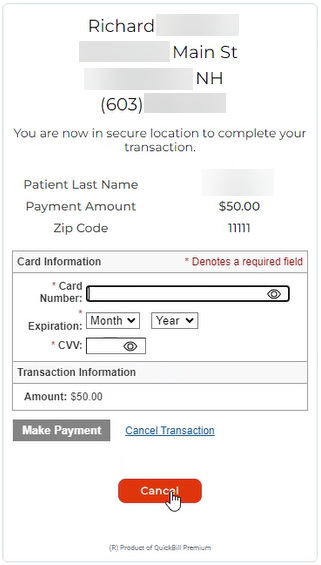
5. To complete the transaction, the patient enters the required information, and then clicks Make Payment.
At your practice, the Online Payment Notification screen appears when a website payment is made.

6. Click Review and Import Payments.
The Import Online Payments dialog box appears.
Note: In the grid, <Select Patient> appears under Name, and Website appears under Source. The patient's last name and phone number appear under Patient Information. No name appears for the cardholder under Cardholder Information.
7. To associate the correct patient with the specified credit card, under Name, click <Select Patient>.
The Select Patient dialog box appears.
8. Select the desired patient.

9. To post an online payment to the corresponding account’s Ledger, select it, and then click Post Selected.