
You can use Dentrix to edit plan benefits and coverages for both in-network and out-of-network insurance plans.
Note: Updating any benefit and coverage information will affect all patients who subscribe to the selected group plan.
To edit plan benefits and coverages
1. In the Office Manager, click Maintenance, point to Reference, and then click Insurance Maintenance.
The Insurance Maintenance dialog box appears.

2. Select the carrier and group plan whose benefits and coverages you want to edit.
3. Click Benefits/Coverage.
The Dental Insurance Benefits and Coverage dialog box appears.
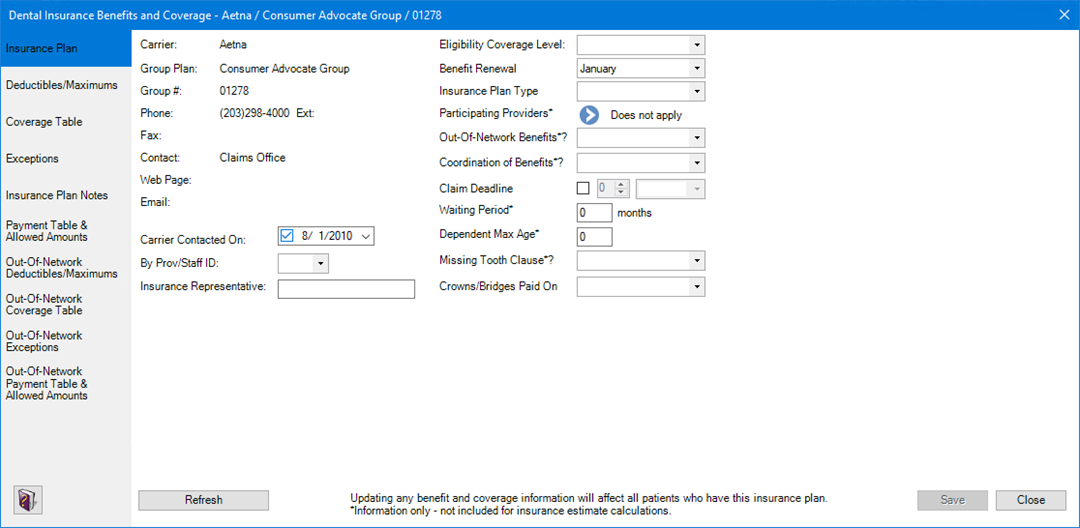
4. The following information is provided automatically:
· Carrier – Carrier's name.
· Group Plan – Group plan's name.
· Group # – Group plan number.
· Phone/ Ext – Carrier's phone number and a contact's extension.
· Contact – Contact's name.
· Web Page – Carrier's website URL.
· Email – Carrier's or a contact's email address.
5. You can edit the following information:
· Carrier Contacted On – The date the carrier was most recently contacted. The date updates automatically any time you make a change to the carrier information in the Dental Insurance Plan Information dialog box. You can also change the date by clicking the Down arrow and selecting a date from the calendar.
· By Prov/Staff ID – Click the Down arrow, and then from the list, select the Provider/Staff ID of the person from your office who most recently contacted the insurance carrier.
· Insurance Representative – Type the name of the insurance carrier's representative the provider or staff member spoke to most recently.
· Eligibility Coverage Level – Click the Down arrow, and then from the list, select the appropriate coverage for the selected group plan.
· Benefit Renewal – Click the Down arrow, and then from the list, select the month when the plan's benefits renew.
· Insurance Plan Type – Click the Down arrow, and then from the list, select the appropriate plan type:
· Traditional/Indemnity – Claim payment is based on the procedures performed, usually as a percentage of the charges. Can be paired with a PPO.
· PPO – A regular indemnity insurance plan combined with a network of dentists under contract to deliver specified services for set fees.
· HMO/DMO – A contracted dentist is "pre-paid" a certain amount each month for each patient assigned to that dentist.
· Capitation – A contracted dentist must provide certain contracted services at no-cost or reduced cost to specified patients.
· Fee Schedule – A type of indemnity plan that pays a set amount for each procedure regardless of the actual charges. Patients are responsible for the difference between the carrier's payment and the charged fee. May be paired with a PPO that limits contracted dentists to a maximum allowable charge.
· Other – These types of plans could include Exclusive Provider Organizations (EPO), point of service plans, direct reimbursement plans, and so on.
· Participating Providers – Click the arrow, and then in the Select Participating Providers dialog box, select the providers who participate in the selected plan.
· Out-Of-Network Benefits – Click the Down arrow, and then from the list, select Yes or No.
· Coordination of Benefits – Click the Down arrow, and then from the list, select Standard, Non-Duplication, or Other.
· Claim Deadline – Click the Down arrow, and then from the list, select a number (1-12). Click the Down arrow in the adjacent box, and then from the list, select Years, Months, Weeks, or Days.
· Waiting Period – Type the appropriate number of months.
· Dependent Max Age – Type the maximum age that coverage applies to a dependent.
· Missing Tooth Clause – Click the Down arrow, and then from the list, select Yes or No.
· Crowns/Bridges Paid On – Click the Down arrow, and then from the list, select Seat Date or Prep Date.
6. Click Save.