
You can set up options to filter this report and include production, collections, case acceptance, new patients, and scheduling statistics. You can also include a summary of scheduled patients in a grid format, a list of scheduled patients, a phone list for scheduled patients, and route slips. After you have set up the report options, you can preview and/or print the report.
To run the Daily Huddle Report
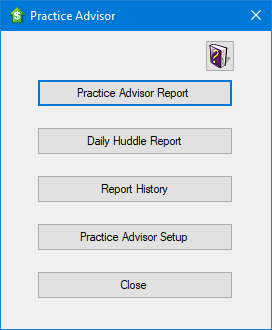
1. In the Office Manager, click Analysis, and then click Practice Advisor.
The Practice Advisor dialog box appears.
Note: If Dentrix passwords are enabled, a user must have security rights to "Practice Analysis, Open" to open the Practice Advisor.
2. Click Daily Huddle Report.
The Daily Huddle Report dialog box appears.
Note: You can also open this dialog box in the Appointment Book and Appointment List; from the File menu, click Print Daily Huddle Report.
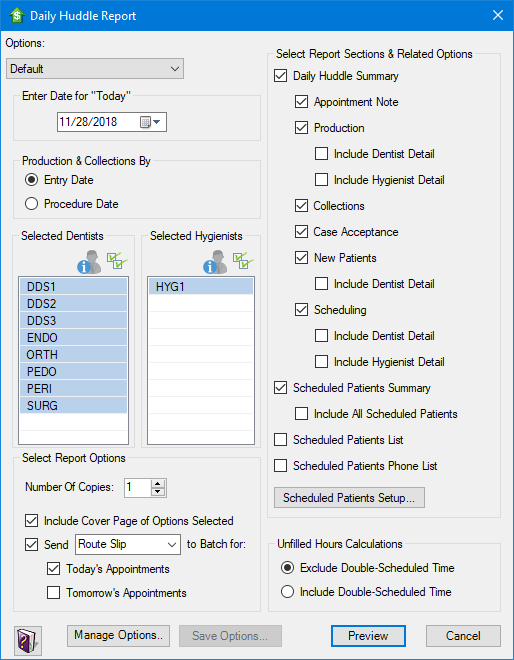
3. Select one of the Options to load a set of previously saved report options.
Note: The "Default," "Daily Huddle Detailed," "Daily Huddle Schedule Only," and "Daily Huddle - All Detail" options are the only available options if you haven't previously saved a set of report options. You cannot delete or rename these default report sets.
If you select a set of saved options before saving the current options being viewed, a message appears asking if you want to save the options. You have the following options:
· Click Yes to save the current options being viewed as a report option set, type the New Option Name, and then click OK.
· Click No to replace the current options being viewed with the selected option set.
· Click Cancel to return to the Daily Huddle Report dialog box with the current options still being viewed. The options from the saved set you selected are not loaded.
4. Set up the following options to change the settings that are loaded by one of the selected Options or to change the default system settings for the report:
· Enter Date for "Today" - The Today date for the report is used to determine the date to use for Today, Tomorrow, Prior Day, and the current MTD range or cutoff.
Type a date in the MM/DD/YYYY format or select a date by clicking the down arrow to open a calendar that you can choose the desired date from (click the arrows to navigate from month to month; click the year to change it; click the month to change it; click a date to select it). The date you type or select is used as the report Today date.
· Production & Collections By
· Entry Date - Select to use all transactions used for production and collections according to the entry date and the report Today date.
Entry date applies to the Production and Collections sections of the report.
· Procedure Date - Select to use all transactions used for production and collections according to procedure date and the report Today date.
· Treatment plan amounts are always determined according to the procedure date of treatment-planned procedures and according to the treatment plan date (Tx Plan Date) of completed procedures.
· Select Dentists - Click the Select
All button  to include
all dentists on the report, or select specific dentists by clicking each
one. You can change which providers are dentists on the report from the
Assign Providers as Dentist/Hygienist
dialog box (see Assigning Providers).
to include
all dentists on the report, or select specific dentists by clicking each
one. You can change which providers are dentists on the report from the
Assign Providers as Dentist/Hygienist
dialog box (see Assigning Providers).
The selected dentists are used as a filter for the following sections of the report:
· Daily Huddle Summary page and Dentist Detail pages
· Production - Production is determined according to the transaction provider.
· Case Acceptance - Treatment case acceptance is determined according to the transaction provider.
· New Patients - New patients are determined according to the patient’s provider.
· Scheduling - Scheduling is determined according to the provider setup in the Appointment Book and the appointment provider.
· Scheduled Patients Summary pages - Scheduled patients are determined according to the appointment provider.
· Scheduled Patients List pages - Scheduled patients are determined according to the appointment provider.
· Scheduled Patients Phone List pages - Scheduled patients are determined according to the appointment provider.
Note: All providers are always used for the Collections section of the report.
· Select Hygienists - Click the Select
All button to include
all hygienists on the report, or select specific hygienists by clicking
each one. You can change which providers are hygienists on the report
from the Assign Providers as Dentist/Hygienist
dialog box (see Assigning Providers).
The selected hygienists are used as a filter for the following sections of the report:
· Daily Huddle Summary page and Hygienist Detail pages
· Production - Production is determined according to the transaction provider.
· Case Acceptance - Treatment case acceptance is determined according to the transaction provider.
· New Patients - New patients are determined according to the patient’s provider.
· Scheduling - Scheduling is determined according to the provider setup in the Appointment Book and the appointment provider.
· Scheduled Patients Summary pages - Scheduled patients are determined according to the appointment provider.
· Scheduled Patients List pages - Scheduled patients are determined according to the appointment provider.
· Scheduled Patients Phone List pages - Scheduled patients are determined according to the appointment provider.
Note: All hygienists are always used for the Collections section of the report. Also, hygienists are not used for the New Patient Analysis section on the report based on the assumption that new patients will not have a hygienist as their primary provider.
· Select Report Options
· Number of Copies - Type the number of copies of the report you want to print. The number specified is used as the default when you click the Print button from the Print Preview window.
· Include Cover Page of Options Selected - Prints a cover page with the report that includes the following:
· The practice information, such as the name, phone number, and address.
· List of the options used to generate the report.
· Send Route Slips or Patient Visit Forms to Batch - Select Route Slip or Patient Visit Form from the list and then select Today’s Appointments and/or Tomorrow’s Appointments. Dentrix sends the selected form to the Batch Processor when you click Preview.
· Select Report Sections & Related Options
· Daily Huddle Summary - Select so the report includes the Daily Huddle Summary. The following options become available:
· Appointment Note - You can print the Appointment Book day note.
· Production - You can include dentist and hygienist production.
· Include Dentist Detail - You can include numbers and statistics for each dentist separately.
· Include Hygienist Detail - You can include numbers and statistics for each hygienist separately.
· Collections - You can include collections statistics.
· Case Acceptance - You can include treatment case acceptance figures.
· New Patients - You can include new patient counts.
· Include Dentist Detail - You can include numbers and statistics for each dentist separately.
· Scheduling - You can include scheduling details.
· Include Dentist Detail - You can include numbers and statistics for each dentist separately.
· Include Hygienist Detail - You can include numbers and statistics for each hygienist separately.
· Scheduled Patients Summary - Select so that the report includes the Scheduled Patients Summary. The following option becomes available:
· Include All Scheduled Patients - With this option selected, the following options in the Scheduled Patients Setup dialog box (see next step) will not be used to determine which patients are displayed on the Scheduled Patients Summary pages of the report:
· Select Report Sections & Order
· CONSENT* Date older than
· QUESTIONNAIRE* Response older than
· BIRTHDAY* within
· Select Appointment TYPEs*
· Select PHONE* Number Types
· Select Appointment STATUSes*
· Select CONTINUING CARE* Types
· Account BALANCE* over
· Number of MISSED* Appointments
The selected options for Select BILLING* Types will always be used.
· Scheduled Patients List - With this option selected, the report includes a list of patients and other information for each option selected under Select Report Sections & Order in the Scheduled Patients Setup dialog box (see next step) if a given appointment is scheduled for Today and/or Tomorrow (according to the selected options under Use Appointments for in the Scheduled Patients Setup dialog box) and if the patient for whom the appointment is scheduled and the appointment meet the selected criteria.
· Scheduled Patients Phone List - Select so that the report includes a list of each patient and any contact numbers that patient has (as entered in the Family File) if that patient and that patient’s scheduled appointment (for Today and/or Tomorrow) meet the selected criteria in the Scheduled Patients Setup dialog box (see next step).
· Unfilled Hours Calculations
· Exclude Double-Scheduled Time - With this option selected, in the Scheduling section of the report, the calculation used for the dentists’ and hygienists’ unfilled hours will not include double-booked time.
· Include Double-Scheduled Time - With this option selected, in the Scheduling section of the report, the calculation used for the dentists’ and hygienists’ unfilled hours will include double-booked time.
5. To customize which scheduled patients will show on the report, click Scheduled Patients Setup (this button is only available if the Scheduled Patients Summary, Scheduled Patients List or Scheduled Patient Phone List check box is selected). (For detailed instructions about the setting up the options in the Scheduled Patients Setup dialog box, see Setting up the scheduled patients summary and lists.)
6. Click Save Options to save the set of report options you have chosen for future use.
From the Save Options dialog box, type a name for the option set, and then click OK.
If you have made changes to a set of report options but do not save the changes, the next time the Daily Huddle Report dialog box is opened, the Options list item will have "(Modified)" added to the end of the selected set's name, and the last changes made to the options are selected. However, if you select a different set of options from the Options list and do not save the changes, the selections will be lost.
7. Click Manage Options to rename or delete previously saved report option sets.
From the Manage Saved Options dialog box, select a saved report, and then click Rename or Delete.
8. Click Preview to generate and preview the report. (From the Preview window, you can print the report.)
If the report options have not been saved as a set, a message appears and prompts you to save the options (see step 6).
The Processing Daily Huddle Report progress indicator appears.
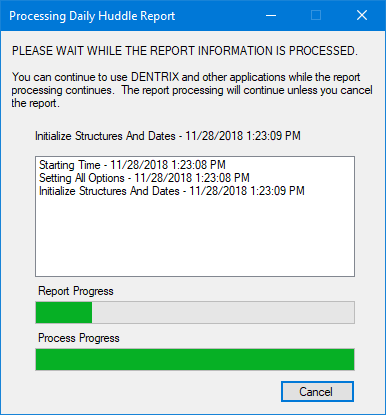
The report may take a long time to generate, but you can continue working in Dentrix during the process.
If you need to terminate the report generation, you can click Cancel at any time. A canceled report will not show in the report history (for details about previewing reports that have been generated previously, see Viewing reports generated previously).