To use Dentrix Pay, you must have internet access, have a compatible payment device from Worldpay, and set up and activate a Worldpay merchant account. For details on how to set up a Worldpay account, contact Henry Schein One Sales at 1-800-366-8749 option 1, then option 2.
As part of the Worldpay registration process, you will receive the following information that is required to set up Dentrix Pay:
Acceptor/Merchant ID
DBA Name
Account Token
Acceptor ID
Account ID
Before you can use Dentrix Pay, you must connect your payment device and set up options in the Office Manager.
To set up Dentrix Pay for Dentrix 25.11 and higher
1. Connect the payment device and wait for it to initialize and display the triPOS logo.
2. In the Office Manager, click Maintenance, point to Practice Setup, point to Dentrix Pay, and then click Enable Dentrix Pay.
The Dentrix Pay Setup dialog box appears.
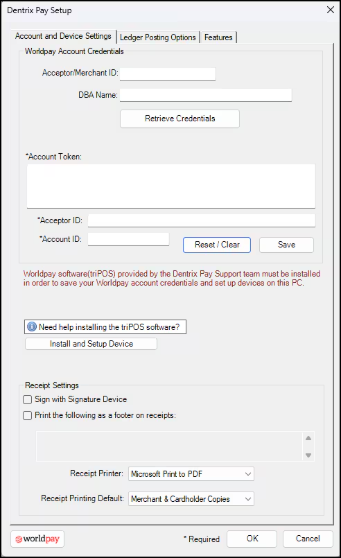
3. (Optional) If you have never set up Worldpay credentials, complete the following:
Acceptor/Merchant ID – (Applies to first-time setup only) Copy and paste from the welcome email letter from Worldpay.
DBA Name – (Applies to first-time setup only) Copy and paste from the welcome email letter from Worldpay.
a. Click Retrieve Credentials.
b. Click Save.
Notes:
To save your credentials, you must have previously saved your eTrans credentials to Dentrix and subscribed to eClaims.
If you have any issues, you must type or paste the Account Token, Acceptor ID (Merchant ID), and Account ID.
4. Click Install and Setup Device.
Note: The Install and Setup Device button only appears if triPOS is not installed.
The New Payment Device dialog box appears.
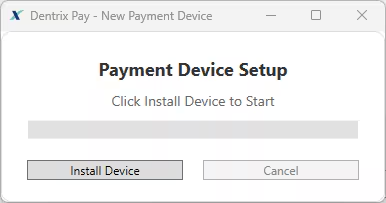
5. Click Install Device.
Note: Depending on the download speed of your internet connection, the installation can take up to 10 minutes.
The Setup Completed dialog box appears.
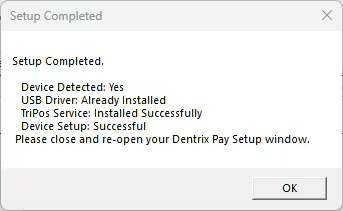
6. Click OK, and then close the Payment Device Setup dialog box.
7. In the Dentrix Pay Setup dialog box, click Manage Device.
The Device Setup dialog box appears.
Idle Screen Message – Type a short message (up to 20 characters) to replace the triPOS logo on the payment device screen.
8. In the Dentrix Pay Setup dialog box, complete the following:
Sign with Signature Device – You can use an Interlink ePad device (ePad II, ePad-ink, ePad Vision) to sign receipts after payments are processed.
Print the following as footer information on receipts – Select and then type a note or message of up to 100 characters that will appear on cardholder receipts.
Receipt Printer – Select the printer you want to print receipts on.
Receipt Printing Default – Select the appropriate option (Merchant Receipt Only, Customer Receipt Only, or Merchant & Cardholder Copies).
Worldpay – Click to open the Worldpay iQ website. After logging in, you can view payment processing reports and manage your account.
9. Click the Ledger Posting Options tab.
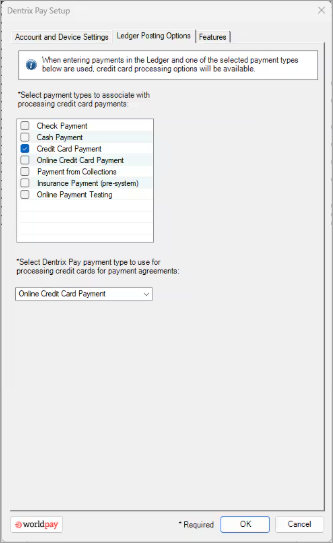
10. Select the payment types that you want to associate with processing credit card payments and the Dentrix Pay payment type to use for payment agreements, and then click OK.