
The Patient Privacy Requests List is a list of patients who have any privacy requests checked in their Family File. You can filter the list by type of request, provider, continuing care, consent date, Billing Type, and appointments.
To generate the list
1. In the Office Manager, click Reports, point to Lists, and then click Patient Privacy Requests List.
The Patient Privacy Requests List dialog box appears.
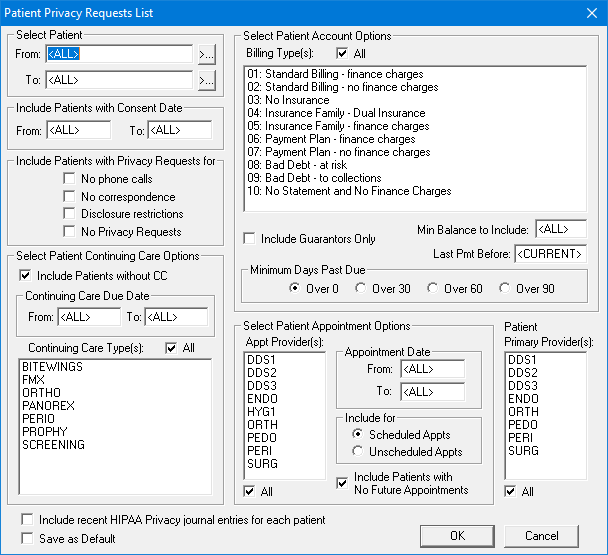
2. Do the following:
· Select Patient - Select the range of patients that you want to include. Click the From and the To search buttons to select the starting and ending patient, respectively, or leave <ALL> selected in both fields to include all patients.
· Include Patients with Consent Date - Type a date range of patients with consent dates in the From and To fields, or leave <ALL> selected in both fields to include all patients.
· Include Patients with Privacy Requests for - Select any or all of the following privacy request types:
· No phone calls - Dentrix does not display or print the head of household's phone numbers; <PRIVATE> appears instead.
· No correspondence - Dentrix and DXWeb does not send letters, email, or other correspondence to the head of household.
· Disclosure restrictions - Dentrix does not submit information via the internet when the patient is referred to another doctor.
· No Privacy Requests - No restrictions.
Note: These privacy requests can be set for each patient when you add new family accounts in the Family File.
· Select Patient Continuing Care Options - Set the following Continuing Care options:
· Include Patients without CC - Select to include patients without any Continuing Care set up.
· Continuing Care Due Date - Type a date range to include patients with CC only within that range in the From and To fields. Or, leave <ALL> entered in both fields to include all due dates.
· Continuing Care Type(s) - Select any of the types from the list or leave All selected to include all types. Type a due date range in the From and To fields. Or, leave <ALL> selected in both fields to include all due dates. Dentrix only includes patients with the selected types within the due date range in the list.
3. Under Select Patient Account Options, do the following:
· Billing Types - Select one or more types from the list, or leave All selected.
· Include Guarantors Only - Select to include guarantors only in the list.
· Min Balance to Include - Type an amount in the field to include patients with balances equal to or higher than the amount you specified. To ignore account balances, leave <ALL> selected.
· Last Pmt Before - Type a date to include patients who made a payment before that date. To ignore last payment dates, leave <CURRENT> selected.
· Minimum Days Past Due - Select the number of days accounts must be past due to appear in the list. Select Over 0 to include all accounts.
4. Under Select Patient Appointment Options, do the following:
· Appt Providers - Select one or more providers from the list or select All. Dentrix only includes patients who have appointments with the selected providers within the appointment date range.
· Appointment Date - Type a date range in the From and To fields, or leave <ALL> selected in both fields to include all appointment dates.
· Include For - Select one of the following:
· Scheduled Appts - To include patients who have appointments in the Appointment Book.
· Unscheduled Appts - To include patients who have an appointment on the Unscheduled List.
· Include Patients with No Future Appointments - To include patients who do not have a scheduled or unscheduled appointment for a future date.
5. From the Patient Primary Provider(s) list, select All or select one or more primary providers from the list.
6. To include recent Office Journal entries with the patient HIPAA Privacy type selected, select Include Recent Patient HIPAA Privacy journal entries for each patient.
7. To save your selections as the default settings, select Save as Default.
8. Click OK to send the report to the Batch Processor.