
If you choose to save money on preprinted billing statements, the Office Manager gives you the following options:
· Full Form/Download - Turns a plain piece of paper into a professional looking billing statement complete with a portion for the patient to tear off and return. With these forms, you have access to all the different billing information options, except practice information, which prints automatically.
· Full Sheet - Prints the fastest and provides the greatest printer compatibility. However, it always prints the account aging, does not print the information for credit card payments, and does not include the graphic lines to print as a form.
To set billing statement options
1. In the Office Manager, click Maintenance, point to Practice Setup, and then click Practice Defaults.
The Practice Defaults dialog box appears.
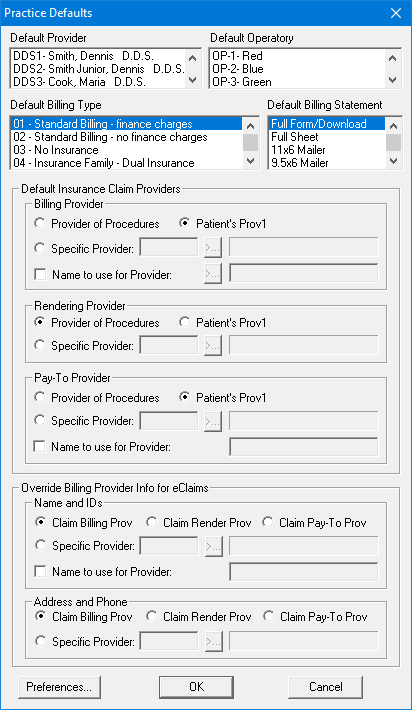
2. Under Default Billing Statement, select one of the following, and then click OK:
· Full Form/Download
· Full Sheet
Note: The other options are for pre-printed forms.
3. In the Reports menu in the Office Manager, click Billing.
The Billing Statements dialog box appears.
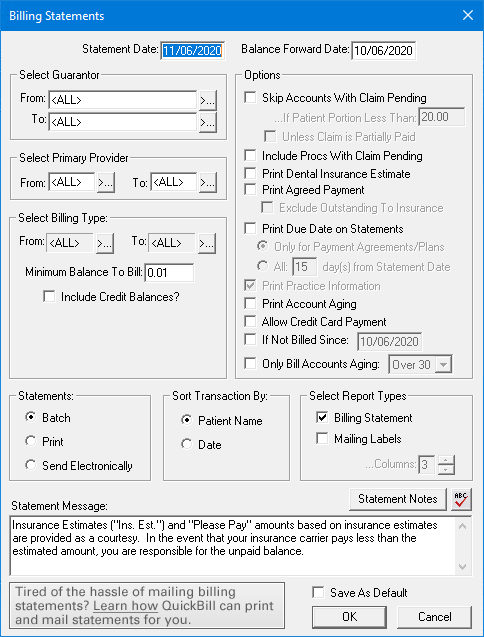
4. Set the following options:
· Statement Date – Defaults to the current date and prints on billing statements. The cut-off date for the statement information; the statement prints as of this date.
· Balance Forward Date – The date Dentrix uses to determine which transactions to print and which to include in the Balance Forward amount.
· Select Guarantor – Defaults to all guarantors. You can also print a single statement or a range for several guarantor accounts in alphabetical order.
· Select Provider – Defaults to all providers. You can select a single provider or a range of providers. If you select a range of providers, Dentrix prints statements for any guarantor's account whose provider is in the selected range, regardless of which provider performed the procedures.
· Select Billing Type – Specifies which accounts receive billing statements. Because you must select a range, if you have billing types that you do not send a statement to, place the billing type at the end of the billing types list during initial setup.
· Minimum Balance to Bill - Limits which billing statements Dentrix prints by allowing you to set a minimum balance. For example, you may determine that mailing a billing statement with a balance less than the cost of postage may not be cost effective.
· Include Credit Balances - Allows you to send billing statements to guarantors with a credit balance.
5. Under Options, set the following filters, as appropriate, to control which accounts receive billing statements and what information prints on them:
· Skip Accounts With Claims Pending - Select to skip accounts with outstanding claims, providing the estimated patient portion does not exceed the amount you specify. For example, if you set this option to $25.00 and your patient has an outstanding claim of $200.00 and the expected insurance payment is $185.00, Dentrix will not print a statement since the estimated patient portion is less than $25.00. However, if the patient has an additional outstanding balance of $15.00 for previous claims, the combined patient portion equals $30.00, so Dentrix prints a billing statement.
· Unless Claim is Partially Paid - Select to include partially paid claims in billing statements. Partially paid claims are identified with an asterisk (*).
· Include Procs With Claims Pending - Select to print procedures that are attached to pending insurance claims, rather than including them in the balance forward amount. Dentrix prints the procedures regardless of the transaction date and balance forward date until you receive the insurance payment for the claim. Usually, Dentrix does not itemize procedures dated before the balance forward date, but includes them in the balance forward. When you select this option, Dentrix prints the procedures until you receive payment and will print if you receive the insurance payment after the balance forward date to show what has been paid. All procedures attached to a claim have an asterisk (*).
· Print Dental Insurance Estimate - Dentrix prints the total amount of the outstanding balance that is expected from the insurance company at the bottom of the statement.
· Print Agreed Payment - Dentrix prints the amount to pay in the "Please Pay This Amount" box. To calculate this amount, Dentrix: 1) Subtracts any outstanding insurance estimates from the account balance to determine the "Patient Portion" amount. 2) Adds the total monthly payments of any payment plan to determine a "Pay Plan" amount. 3) Compares "Pay Plan" to "Patient Portion," and prints the lesser amount as the "Please Pay" amount. If a payment plan does not exist, Dentrix ignores the pay plan amount. If either the Pay Plan or Patient Portion amount is $0.00 or less, Dentrix prints a "Please Pay" amount of $0.00.
· Exclude Outstanding To Insurance - Dentrix excludes all procedures outstanding to insurance from the patient portion of the account balance, compares the patient portion to the payment plan, and prints the lesser amount in the "Please Pay This Amount" field of the billing statement. If the lesser of the two options is $0.00 or less, Dentrix does not print a billing statement for the account.
· Print Practice Information - Dentrix prints your practice name and address on your billing statements if you use pre-printed forms that do not contain your practice information. If you are using the Full Form/Download Form, this option is inactive, and Dentrix prints your practice information automatically.
· Print Account Aging - Dentrix includes an aging summary of the account. This option is active if you selected the Full Form/Download Form. The account aging will print on pre-printed forms if they are formatted to allow account aging. Dentrix calculates each account’s aging as of the statement date.
· Allow Credit Card Payment - Billing statements include credit card payment options. This option is active if you selected the Full Form/Download form. Dentrix prints a place for the credit card #, exp. date, name, and signature on the return portion of the billing statement.
· If Not Billed Since - Allows you to print statements for accounts that have not been billed since the specified date. The Last Statement Date is displayed from the Ledger. If the Last Statement Date is before the "If Not Billed Since" date, or it is the same as the statement date, a statement will be printed for the account, providing other statement options do not exclude the account.
· Only Bill Accounts Aging - Prints billing statements only for accounts with a balance over the aging bracket that you select. Dentrix uses the aging as of the last month-end update to determine whether to print a statement.
6. Do the following:
· Statements- Select one of the following:
· Batch - Sends billing statements to the Batch Processor.
· Print - Sends billing statements to the printer immediately.
· Send Electronically - Submits billing statements electronically to QuickBill.
· Sort Transaction By - Sets the method for sorting transactions. Select on of the following:
· Patient Name - Sorts transactions by individual patients in the family.
· Date - Sorts transactions by their date.
· Select Report Types - Select one or both of the following:
· Billing Statements - To generate billing statements.
· Mailing Labels - To print a mailing label for each guarantor.
Tip: Based on your selections, Dentrix prints one of sixteen different billing statements. Click to see examples of these billing statements.
7. Type a Statement Message that prints on all billing statements.
Note: Dentrix limits the number of characters according to the amount of space available on the statement form.
8. To save your changes as a default, select Save As Default, and then click OK.