
Dentrix gives you the ability to generate customized billing statements.
To generate billing statements
1. In the Office Manager, click Reports, and then click Billing.
The Billing Statements dialog box appears.
2. Make any necessary changes to the following options:
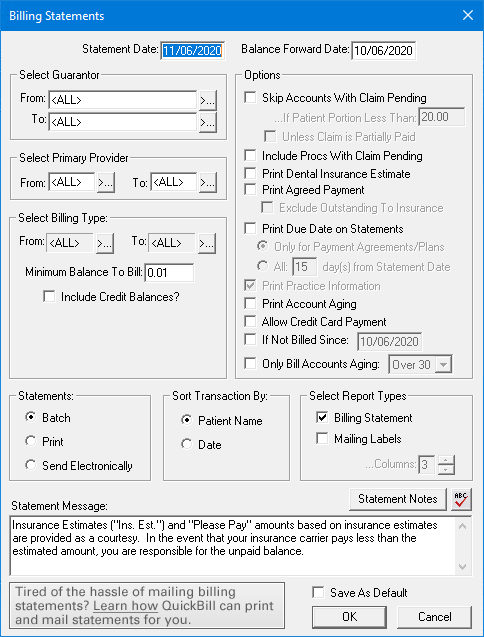
· Statement Date - Leave the default of the current date, or type a cut-off date for your billing statements. All statement calculations begin with the date that you enter.
· Balance Forward Date - A balance forward is a total of all outstanding procedures posted before the balance forward date. Dentrix prints the total balance forward rather than itemizing procedures from a previous statement according to the Balance Forward Date that you enter.
· Select Guarantor - Set the range of guarantors that you want to include. Click the From search button to select the starting guarantor and the To search button to select the ending guarantor. Or, leave <ALL> selected in both fields to include all guarantors.
· Select Primary Provider - Set the range of primary providers (Prov 1 from the Family File) that you want to include. Click the From search button to select the starting provider and the To search button to select the ending provider. Or, leave <ALL> selected in both fields to include all primary providers.
· Select Billing Type - Set the range of billing types that you want to include. Click the From search button to select the starting billing type and the To search button to select the ending billing type. Or, leave <ALL> selected in both fields to include all billing types.
· Minimum Balance to Bill - The default of .01 will print statements for patients who have a balance of at least one cent.
· Include Credit Balances - To print statements for those patients who have a credit balance.
· Statements - Select one of the following options:
· Batch - To send the statement to the Batch Processor.
· Print - To send the statement to the printer.
· Send Electronically - This submits the statement electronically to QuickBill for distribution. You must first set up an eServices account to use this feature.
· Sort Transaction By - Select one of the following methods for sorting transactions:
· Patient Name
· Date
· Statement Message - To print a message at the bottom of each statement, such as "Brush and floss regularly" or "All payments are due on or before the 5th day of the month," type the message in the text field.
Note: You can enter customized billing statement notes for individual guarantors from the Guarantor Note in the Ledger.
3. Under Options, select one or more of the following:
· Skip Accounts With Claims Pending - To skip accounts that have outstanding insurance claims. Then, in the If Patient Portion Less Than field, type the amount that determines the accounts that are skipped according to the estimated patient's portion for each account. For example, to have Dentrix skip accounts where the patient's portion is less than $50, change the default from $20 to $50.
· Include Procs With Claim Pending - To have the statement print procedures that are attached to pending insurance claims, rather than including them in the balance forward amount. Dentrix prints the procedures regardless of the balance forward date until you receive the insurance payment for the claim.
· Print Dental Insurance Estimate - To print the amount that Dentrix estimates the dental insurance company will pay.
· Print Agreed Payment - To include a box labeled "Please Pay This Amount" on the statement. Dentrix then prints either the total payment plan amounts for the account or, if no payment plan has been set up, the estimated patient portion of the balance.
· Print Agreed Payment - Makes Exclude Outstanding To Insurance active.
Note: If you select this option, the "Please Pay" Dentrix calculates the amount that prints for the Print Agreed Payment option differently. If the "Please Pay" amount is 0.00, Dentrix will not print a statement for the account. The "Please Pay" calculation does not include any transactions that are still billed to insurance. The "Please Pay" amount includes only the amounts remaining on claims that the insurance has already paid.
· Print Due Date on Statements - Dentrix automatically calculates due dates that will print on a billing statement. Select one of the following:
· Only for Payment Agreement/Plans - To print due dates on billing statements that have payment agreements or plans only.
· All - To print due dates on all billing statements regardless of payment agreement. Type the number of days following the statement date that you want to set as the due date.
· Print Practice Information - To print your practice name and address on your billing statements if you use pre-printed forms that do not contain your practice information. If you are using the Full Form/Download Form, this option is inactive, and Dentrix prints your practice information automatically.
· Print Account Aging - To include an aging summary of the account. This option is active if you selected the Full Form/Download Form. The account aging will print on pre-printed forms if they are formatted to allow account aging.
· Allow Credit Card Payment - To have billing statements include credit card payment options. This option is active if you selected the Full Form/Download form.
· If Not Billed Since - Type a last statement date in the corresponding text field. By default, the date is one month prior to the current system date. Dentrix compares the date that you specify to the last statement date for each account (as displayed in the Ledger) and will not print a statement for any accounts that have had a statement printed since the date specified.
Tip: This option works well for practices that print billing statements from the Ledger when they receive an insurance payment for an account. You can use cyclical billing as you print statements for individual accounts throughout the month and then print from the Office Manager in a batch to ensure that each account receives a statement for the month.
· Only Bill Accounts Aging - Select the aging bracket (Over 30, Over 60, and Over 90). Dentrix compares the aging bracket that you specify to the aging balances (as displayed in the Ledger) for each account. Dentrix prints billing statements only for accounts with balances equal to or greater than the aging bracket that you specified.
4. Under Select Report Types, select one or more of the following:
· Billing Statement - To generate billing statements.
· Mailing Labels - To print mailing labels. Next, specify the appropriate number of columns of labels to print.
· Statement Notes - To insert a custom statement note from a template where the text cursor is located. Select the note or notes that you want from the Insert Custom Billing Statement Note dialog box, and then click OK. The message will appear at the bottom of every billing statement that Dentrix generates.
· Save As Default - If you print statements using the same charges and options each time, this option saves the current settings so that the next time you print statements from this computer, you will not need to reset the parameters.
5. Click OK to generate statements and send them to the Batch Processor.