
Dentrix Imaging supports acquiring intraoral, extraoral, and CBCT images from the Sidexis software on computers running the Windows operating system. You must install the Sidexis software on each computer that uses the software bridge.
Notes:
· Configure all acquisition devices in the Sidexis software on each computer that acquires images using the Sidexis software bridge.
· Before installing any imaging devices or setting up the Sidexis software, you must configure the acquisition agent application on each computer that you use to acquire images.
· This guide was last updated: 6/12/2025
· Sidexis v4.3.x or later
· Sidexis v4.2.x or later
You must configure all acquisition devices in the Sidexis software on each computer that acquires images using the Sidexis software bridge.
To configure Sidexis 4.2.x or later
1. Open the Sidexis 4 application, and then click the Settings icon (cog).
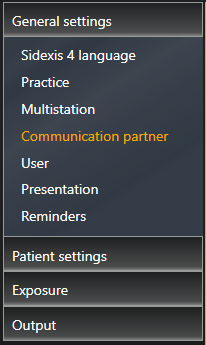
2. Under General settings, click Multistation.

3. Select Orders can be accepted here, and then Accept single order directly and Automatic acceptance of orders after registering a patient.

4. Under General settings, click Communications partner, and then click Add.
5. In the Name box, type AcquisitionAgent, and then set the path of the Mailbox file (SLIDA).
Note: To properly set up the Mailbox file, you must create a folder named Acquisition Agent in the ProgramData folder. The ProgramData folder is a hidden folder. To navigate to it, in File Explorer, type C:\ProgramData in the address bar, and then add the necessary folder.

6. Select Image exchange (Patient database is selected automatically), and then select Receives copies of new exposures automatically and Automatic 16 bit.

7. Under SLIDA 3D, select Partner can receive 3D volumes, and then select the *.dcm option.

8. Open the acquisition agent preferences.

a. On the DICOM tab, if applicable for your needs, select Compress DICOM Volumes and Cache DICOM Volumes.
b. Specify the Cache folder to be a shared folder with plenty of storage space so each computer can use the same cache for efficiency.
9. On the Software Bridge tab, under SIDEXIS, make sure that the Application Path, SLIDA Mailbox Path, Agent Mailbox Path, SLIDA Mailbox File, and Agent Mailbox File are correct.

Notes:
· The Application Path should match the running directory for Sidexis. The SLIDA Mailbox Path and SLIDA Mailbox File should match the path and file name for the Mailbox File (SLIDA) in step 3.
· The Agent Mailbox Path and Agent Mailbox File should match the path and file name for the Mailbox File (SLIDA) in step 5.
10. Click Done.
Once the Sidexis software bridge is functional, you can test it by acquiring an image.
To acquire a test image
1. In the Imaging Procedures list, click Bitewing Single Image.

2. In the tooth selection chart, click the teeth you want to image.

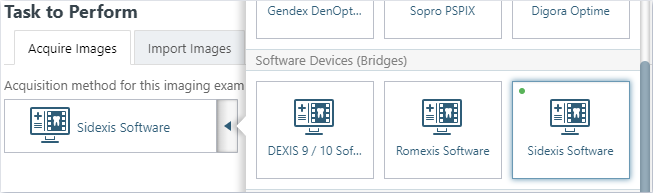
3. In the Acquisition method for this imaging exam menu, click Sidexis Software, and then click Proceed with Acquisition.
4. Acquire an image using the Sidexis software.
The captured image appears in Dentrix Imaging automatically.
Note: Images that are acquired using integrated hardware with Sidexis will be automatically sent to Imaging, but images imported into Sidexis using a file import will need to be sent using the Send image to communication partner button. This button is also helpful for sending images that have not already been bridged with Dentrix Imaging. It may be necessary to click the Send image to communication partner button when you are acquiring 3D Volumes.


If you attempt to acquire an image by clicking Proceed with Acquisition and receive an error message, refer to Configuring Sidexis. Also, if errors occur, make sure that the paths and file names in the Acquisition Agent.ini file are correct.