
Dentrix Imaging supports acquiring intraoral images from the Owandy ONE or OPTEO intraoral X-ray sensors on computers running the Windows operating system. Drivers for the Owandy ONE or OPTEO sensor must be installed on each computer that the Owandy ONE or OPTEO sensor will be connected to. You must install calibration (correction) files on each computer that the Owandy ONE or OPTEO sensor will be connected to.
Notes:
· Before installing the Owandy ONE or OPTEO sensor, you must configure the acquisition agent application on each computer that you use to acquire images.
· This guide was last updated: 6/12/2025
· Acquisition agent v1.2.7510.29950
Note: If an Owandy ONE or OPTEO sensor was installed and operating previously with this computer, and you plug the sensor into a USB port, Windows will not search for drivers because they are already installed. In this case, you can skip directly to step 10 of these installation instructions.
To install the Owandy ONE or OPTEO device drivers
1. The Owandy ONE or OPTEO sensor comes with a flash drive (SETUP) that contains the drivers and calibration files for your specific sensor. Connect the flash drive to the computer, and then run Autorun.exe.

2. Select ONE or OPTEO, depending on the sensor that you are setting up.

The OWANDY - Intraoral OPTEO installer starts, and the Choose Setup Language screen appears.

3. Select your setup language, and then click Next.
The Welcome screen appears.

4. Click Next.
The Ready to Install the Program screen appears.

5. Click Install.
The Driver installation screen appears.

6. Ensure that your sensor is connected to the computer, and then click Install.
When the installation has finished, a dialog box appears listing what was installed.

7. Click OK, and then click Finish.
8. Select the USB drive (CALIBRATION), and then run install.bat.

9. Press any key to continue.

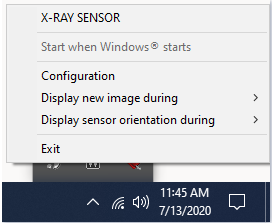
10. In the system tray, click the X-RAY SENSOR icon.
The sensor's acquisition box appears.
Note: There are more configuration settings in the system tray app. See Troubleshooting for more information.


11. Double-click the 0° rotation icon, select 180°, and then close the acquisition box.

Once the Owandy ONE or OPTEO sensor is functional, you can test it by acquiring an image.
To acquire a test image
1. In the Imaging Procedures list, click Bitewing Single Image.

2. In the tooth selection chart, click the teeth you want to image.

3. In the Acquisition method for this imaging exam menu, click Owandy/Opteo/One, and then click Proceed with Acquisition.

The system tray app's acquisition box opens. When the box and the Acquisition Status box in Dentrix Imaging are green, go to step 4.


4. Acquire an image using the Owandy/Opteo/One sensor.
Ensure that the Owandy ONE or OPTEO sensor is detected by the computer. Open Device Manager, and then verify that the device appears.

Note: If there is an error with an acquisition, it may be necessary to close the system tray apps (Acquisition Agent and X-RAY SENSOR) and then run the acquisition agent as an administrator one time.
If there is an error with an acquisition, or if an acquisition is being interrupted by a dialog box that asks to transfer images, it is recommended that you browse to C:\ProgramData\OWANDY\Intra Standalone\Data in File Explorer. If there are images in that folder, save copies in another location, and then delete all files in that folder.
The system tray app has more configuration settings for the sensor.
To access the additional settings, right-click the XRAY SENSOR icon in the system tray, and then select Configuration.
The CONFIGURATION dialog box appears.

This dialog box contains various settings; however, the ones to focus on are in the Image processing section.
If you like the way the images are processed before they get sent to Dentrix Imaging, make sure that enhancements are turned off when you are acquiring with the sensor.

Otherwise, select the Film alike option, clear the Apply sharpen checkbox in the CONFIGURATION dialog box, and then, click OK.
