You can make custom notations on the Graphic Chart to describe treatment, write a note to your staff, or highlight problem areas. You can make a notation with a mouse or a tablet PC pointing device and view or hide them at any time.
To make a notation
1. Select a patient.
2. In the Patient Chart, click Options, point to Chart Notations, and then click Edit Notations.
The Dentrix Notations toolbar appears.
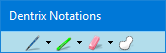
The Dentrix Notations toolbar consists of four buttons:
Pen - Use to draw on the Graphic Chart using a variety of colors and line widths.
To select a color and line width, click the button, and then click your choice from the list.
Click Pen Settings to change the color, thickness, and tip style of the pen tool.
Highlighter - Use to highlight teeth or surfaces in the Graphic Chart.
To select a color and line width, click the button, and then click your choice from the list.
Click Highlighter Settings to change the color, thickness, and tip style of the highlighter tool.
Eraser - Use to remove notations.
To select the size of the eraser, click the button.
Click Clear All to erase all notations.
Selection - Use to move, enlarge, or minimize notations.
To move a notation, click the button and drag the pointer around the notation that you want to move. Drag the notation to a new location on the Graphic Chart.
To enlarge or minimize a notation, drag a corner of the selection box.
To delete a notation, right-click it, and from the shortcut menu, click Delete Selection.