You can change the appearance of toolbars and menus to your personal preferences rather than relying solely on the default appearance. For example, you can choose to make the icons on toolbars and menus larger, so that they are easier to see.
To set a toolbar or menu option
1. In the Patient Chart, click View, point to Toolbars, and then click Customize Toolbars.
The Customize dialog box appears.

2. Click the Options tab.
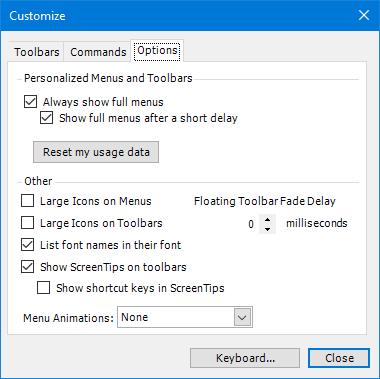
The Options tab view appears.
3. To personalize the appearance of the Patient Chart toolbars and menus, select or clear the following options:
Always show full menus - Shows the entire menu.
Show full menus after a short delay - Menus do not appear immediately.
Large Icons on Menus - The icons assigned to menu options appear larger.
Large Icons on Toolbars - Toolbar icons or buttons appear larger.
List font names in their font - Font names appear in the font they describe.
Show ScreenTips on Toolbars - A button's name appears when your mouse pointer passes over a toolbar button.
Show shortcut keys in ScreenTips - A keyboard shortcut appears if your mouse pointer passes over a toolbar button.
4. To change the animation of your menus, click one of the following:
Random - Menus open by alternating the Unfold, Slide, and Fade patterns.
Unfold - Menus open from the upper left to the lower right.
Slide - Menus open from top to bottom like a window shade.
Fade - Menus open by fading in.
5. When you finish setting options, click Close.